Broker Cash
/brokers/account/cash
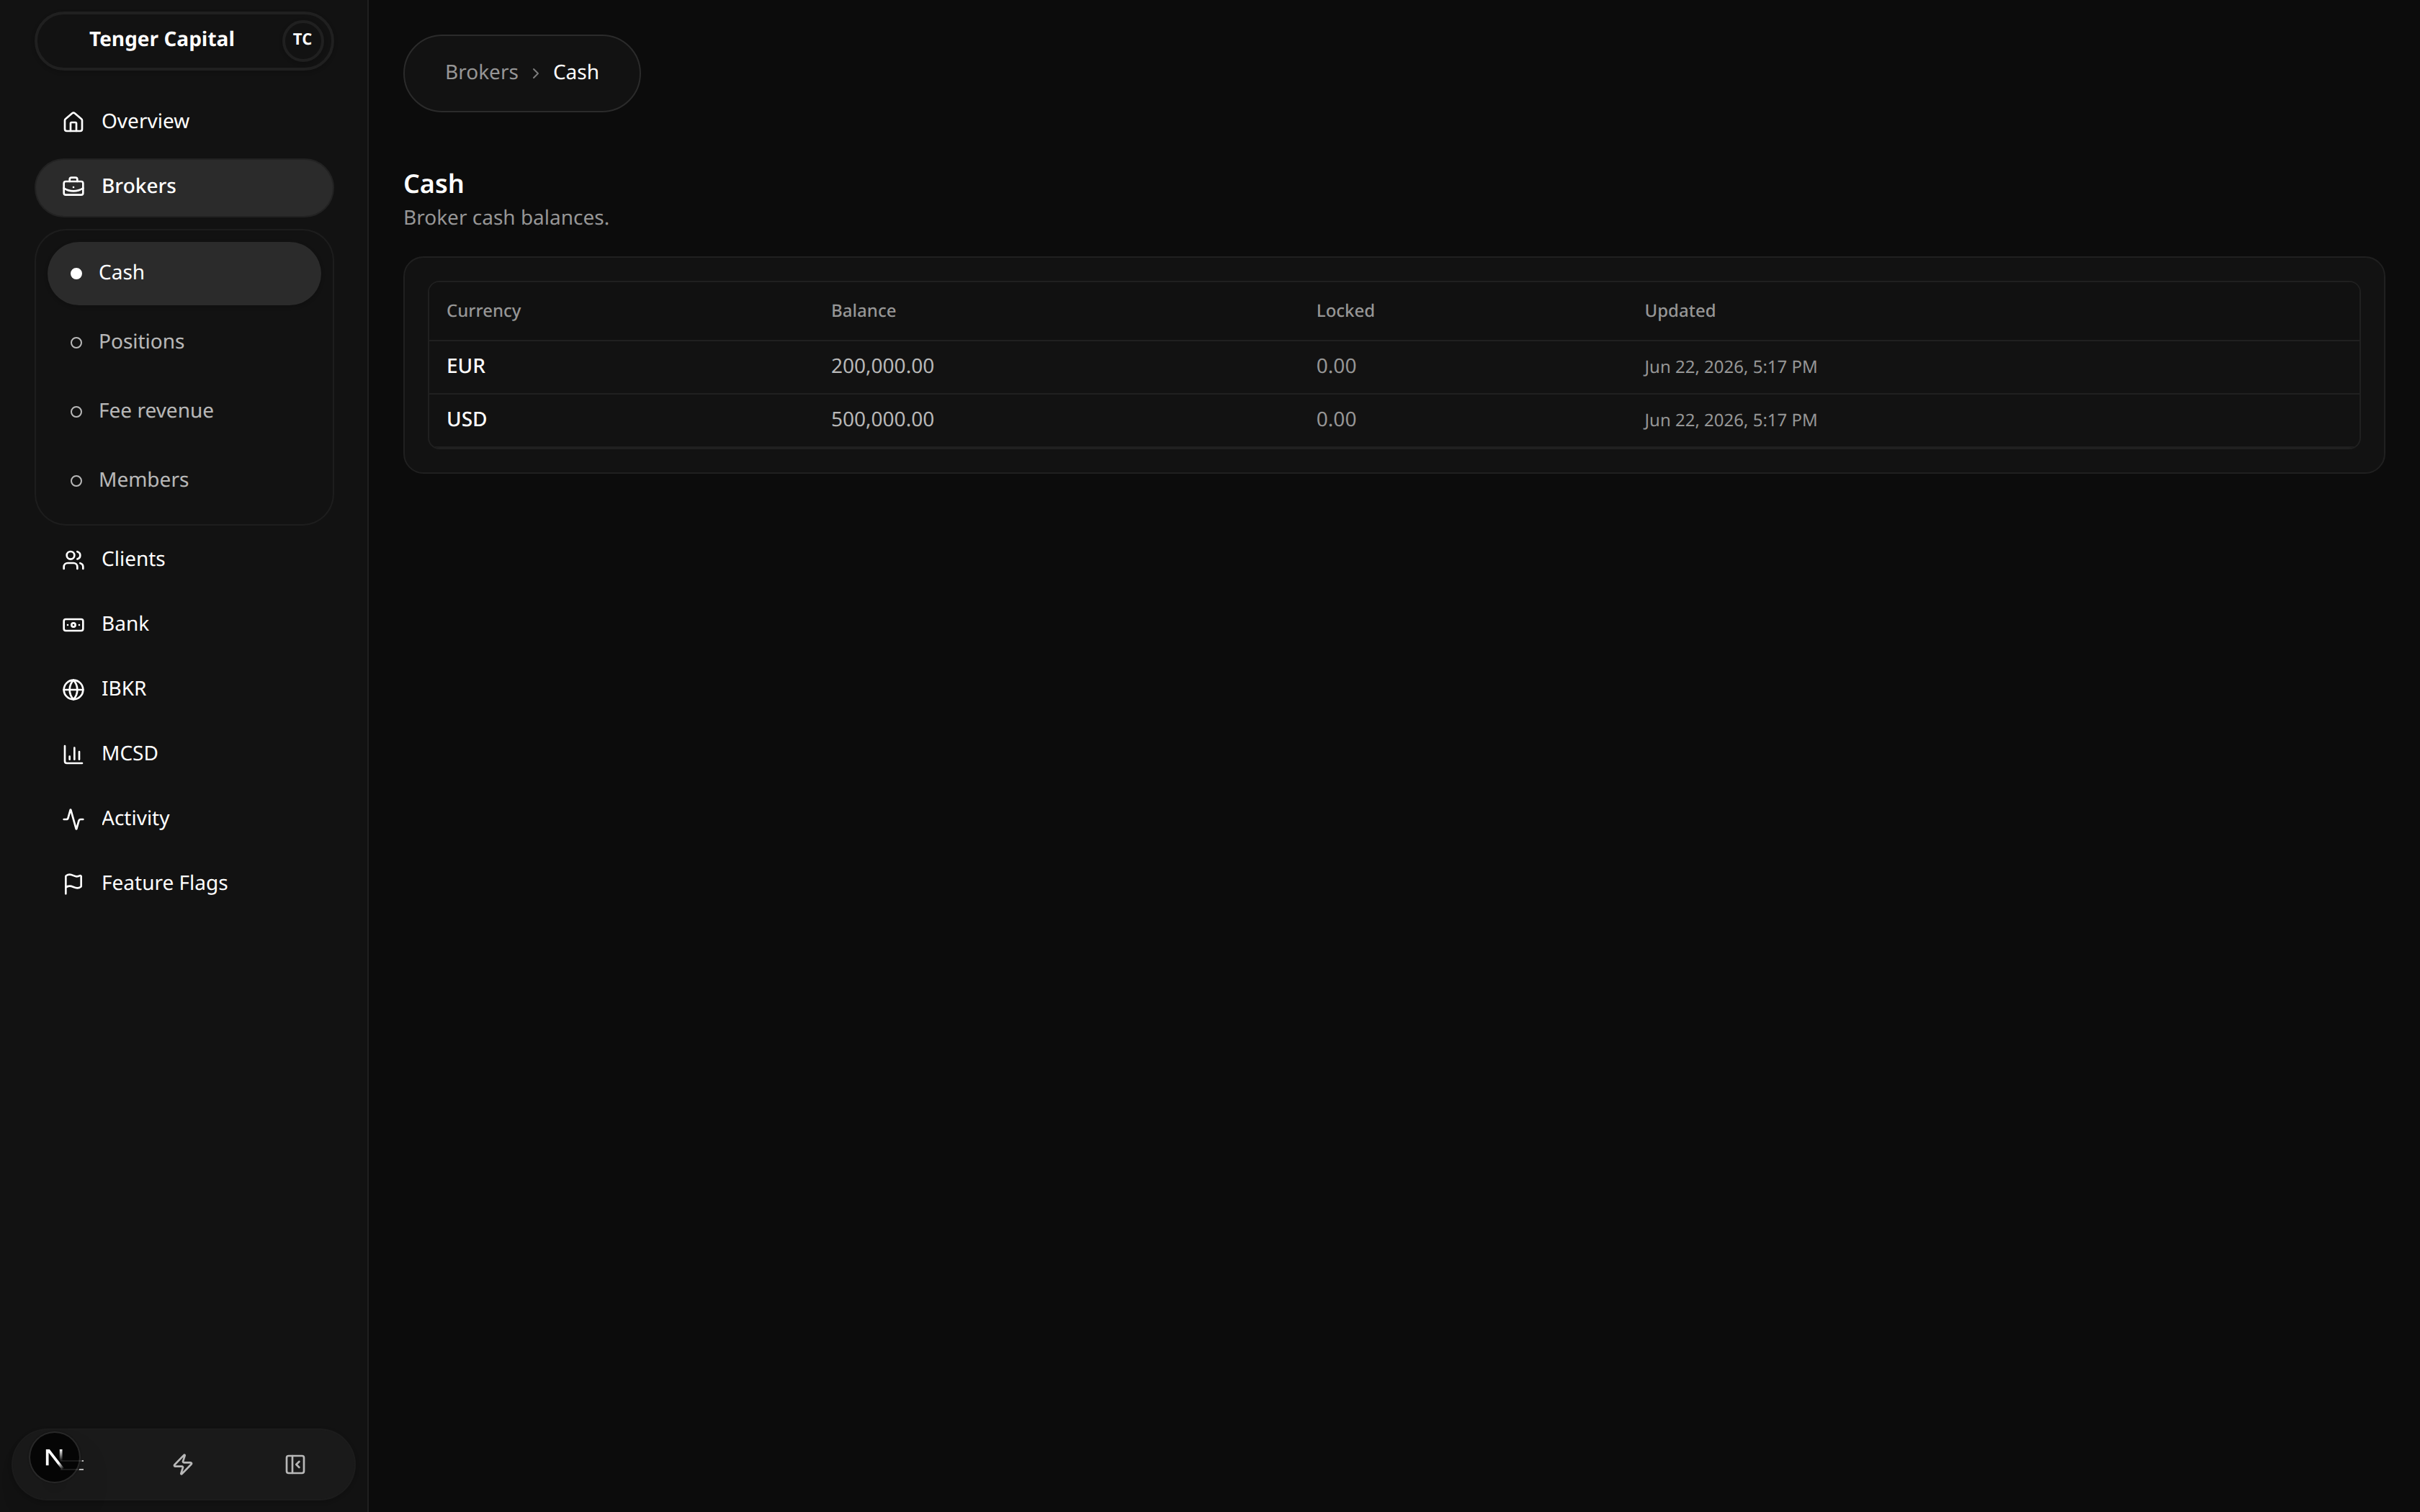
What it does
Shows the firm's own cash balances — the house inventory, not a client's money. Each row is a single currency, with its total balance and the part that is currently locked (set aside for pending settlement or holds), so you can see at a glance how much cash the firm holds and how much of it is free to use.
How to use
- Open Brokers → Cash from the sidebar.
- Read the table:
- Currency — the currency of the balance (for example USD or EUR).
- Balance — total cash the firm holds in that currency.
- Locked — the portion of that balance that is reserved and not available to use.
- Updated — when the balance last changed.
This page is for viewing only — there are no buttons or filters, and balances change as a result of activity elsewhere in the platform.
Notes
- To find how much is actually available in a currency, subtract Locked from Balance.
- If there is no cash in a currency, it simply won't appear in the table.
- A freshly recorded movement can take a moment to show up — reload the page if a balance looks out of date.
Broker Positions
/brokers/account/positions
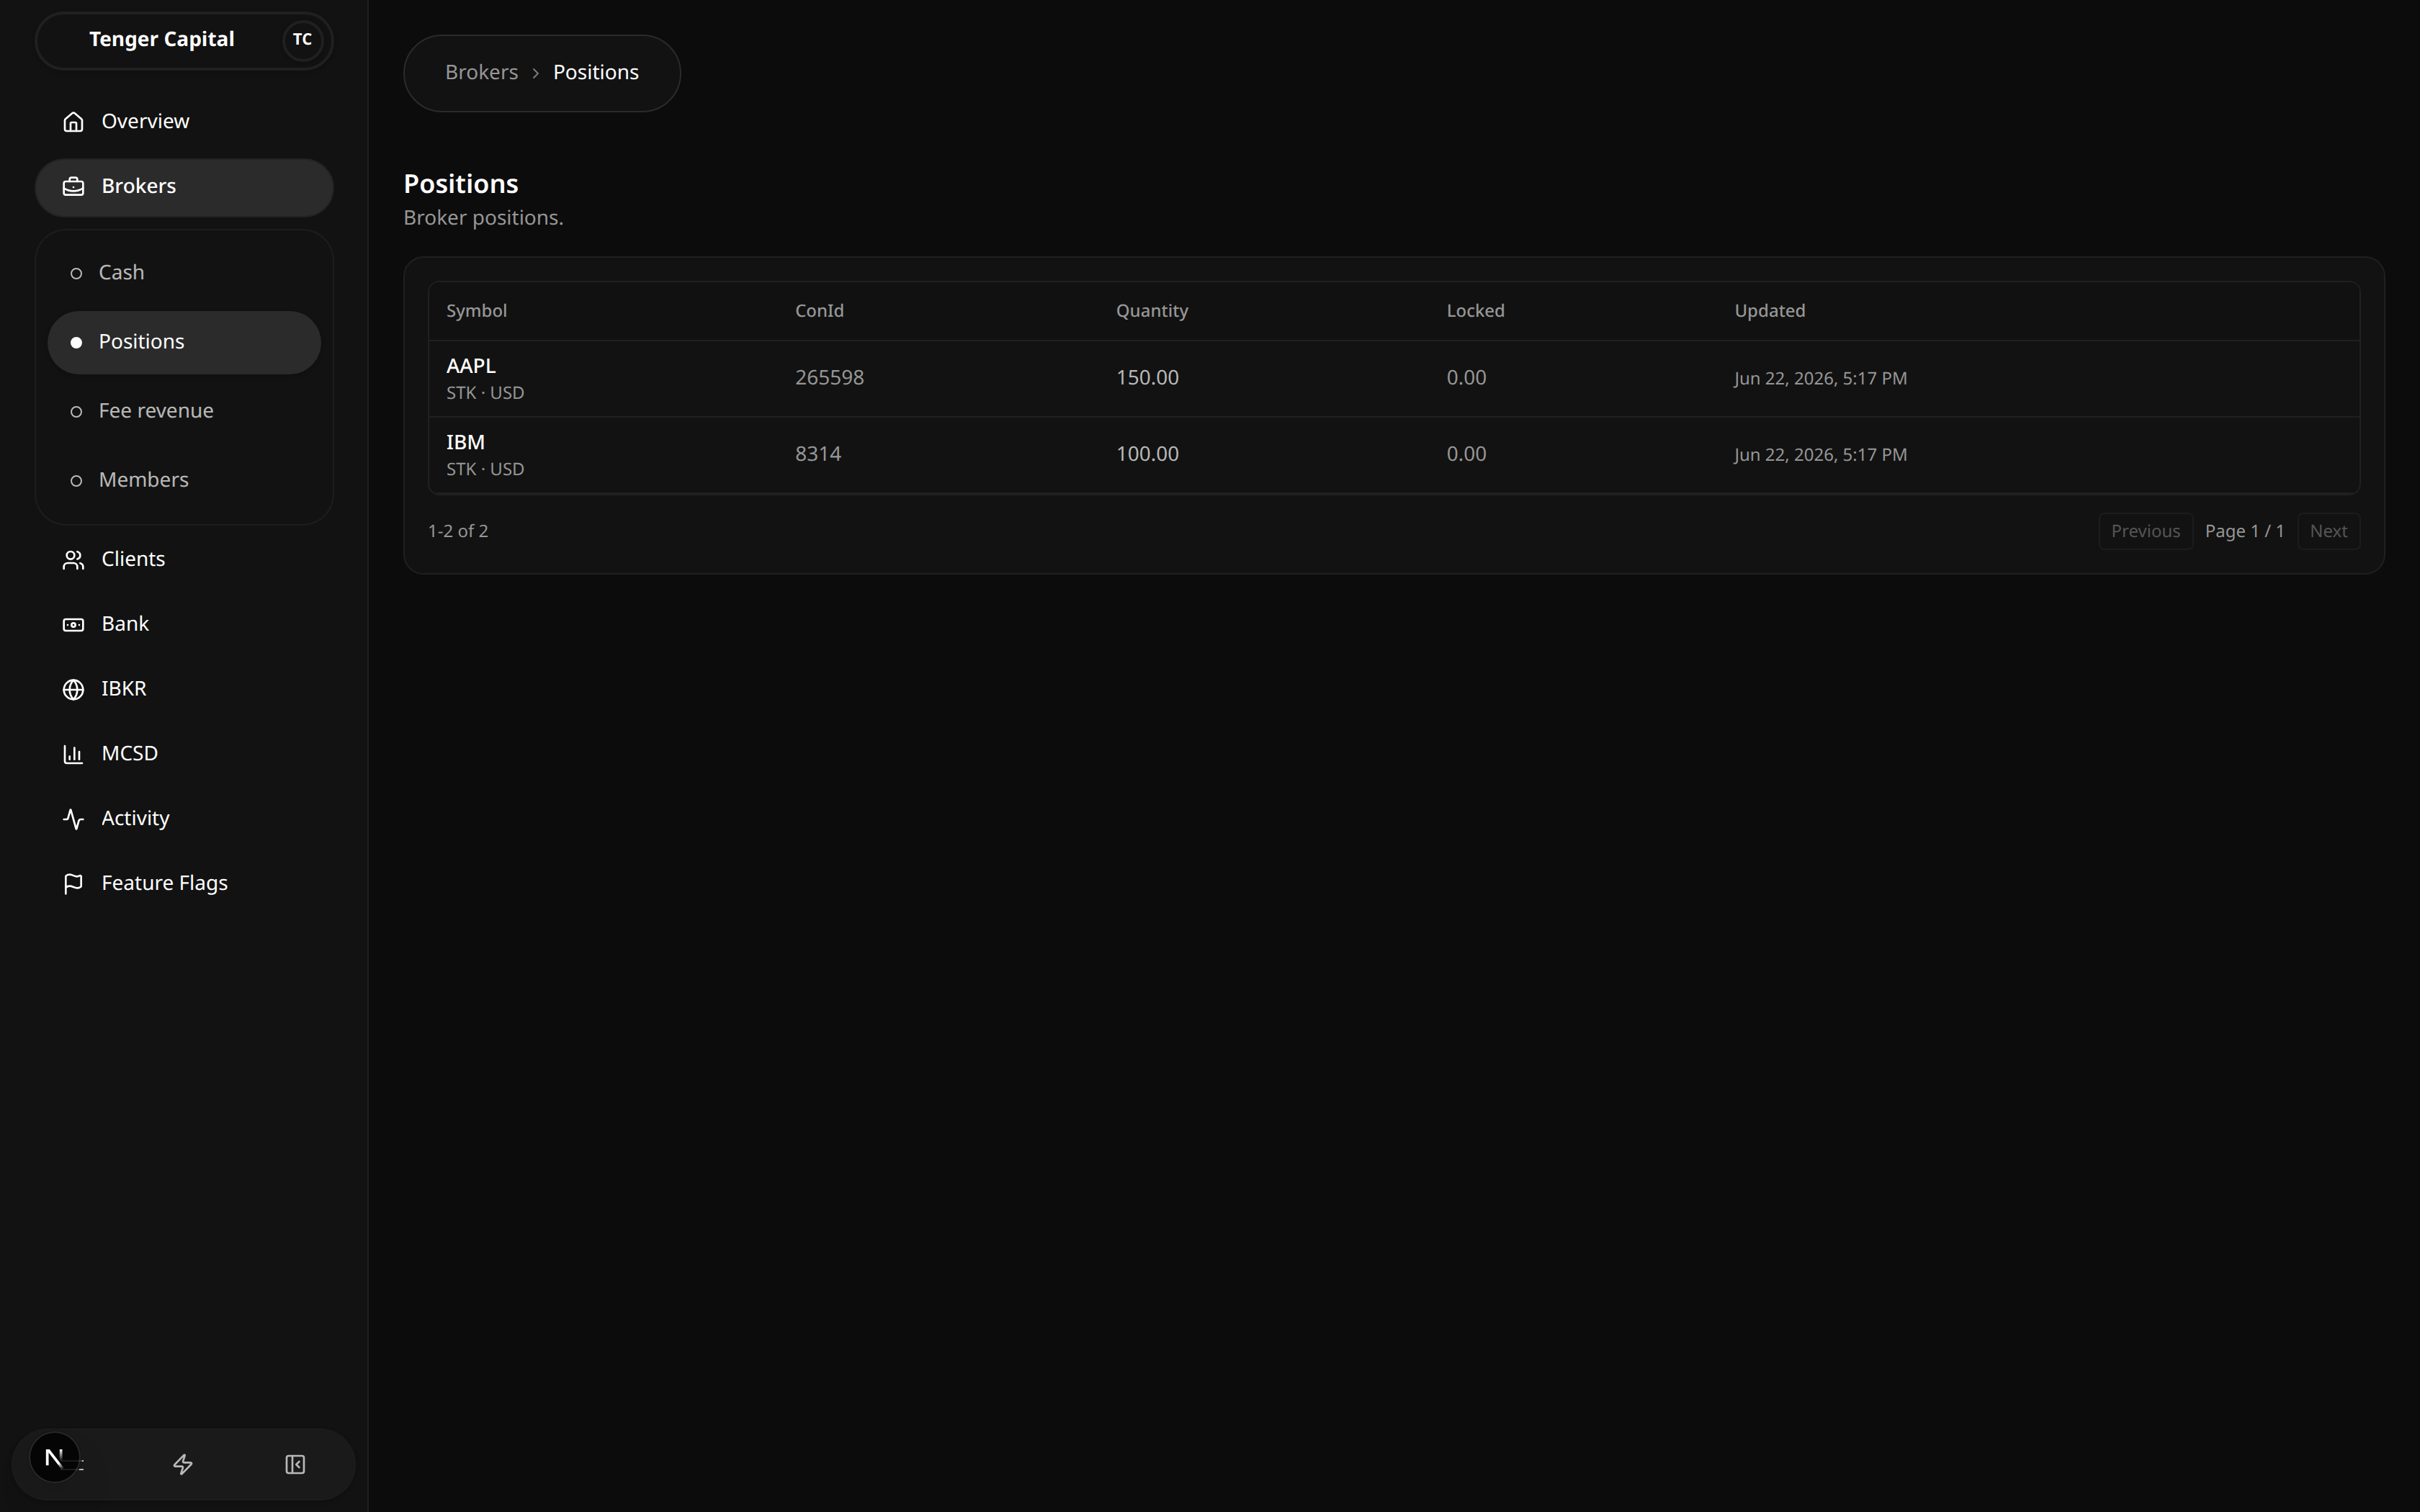
What it does
Shows the firm's own security holdings — the house inventory, not a client's portfolio. Each row is one position the firm holds, with the quantity it owns and the portion currently locked, so you can see at a glance what securities sit in the firm's inventory account.
How to use
Open Brokers → Positions from the sidebar and read the table:
- Symbol — the security's ticker, with its type and currency shown underneath (for example STK · USD).
- ConId — the security's identifier. For securities held through the local depository this shows the depository's securities code instead.
- Quantity — how many units of the security the firm holds.
- Locked — the portion of that quantity that is reserved (for example set aside for pending settlement) and not freely available.
- Updated — when the position last changed.
This page is for viewing only — there are no buttons or filters. When there are more positions than fit on one page, use Previous and Next at the bottom to move between pages; the count on the left (for example "1-2 of 2") tells you which rows you are looking at.
Notes
- To find how much of a position is actually free to use, subtract Locked from Quantity.
- A security only appears once the firm holds it, so an empty table simply means the firm currently holds no positions.
- Positions change as a result of activity elsewhere on the platform — reload the page if a row looks out of date.
Fee Revenue
/brokers/fee-revenue
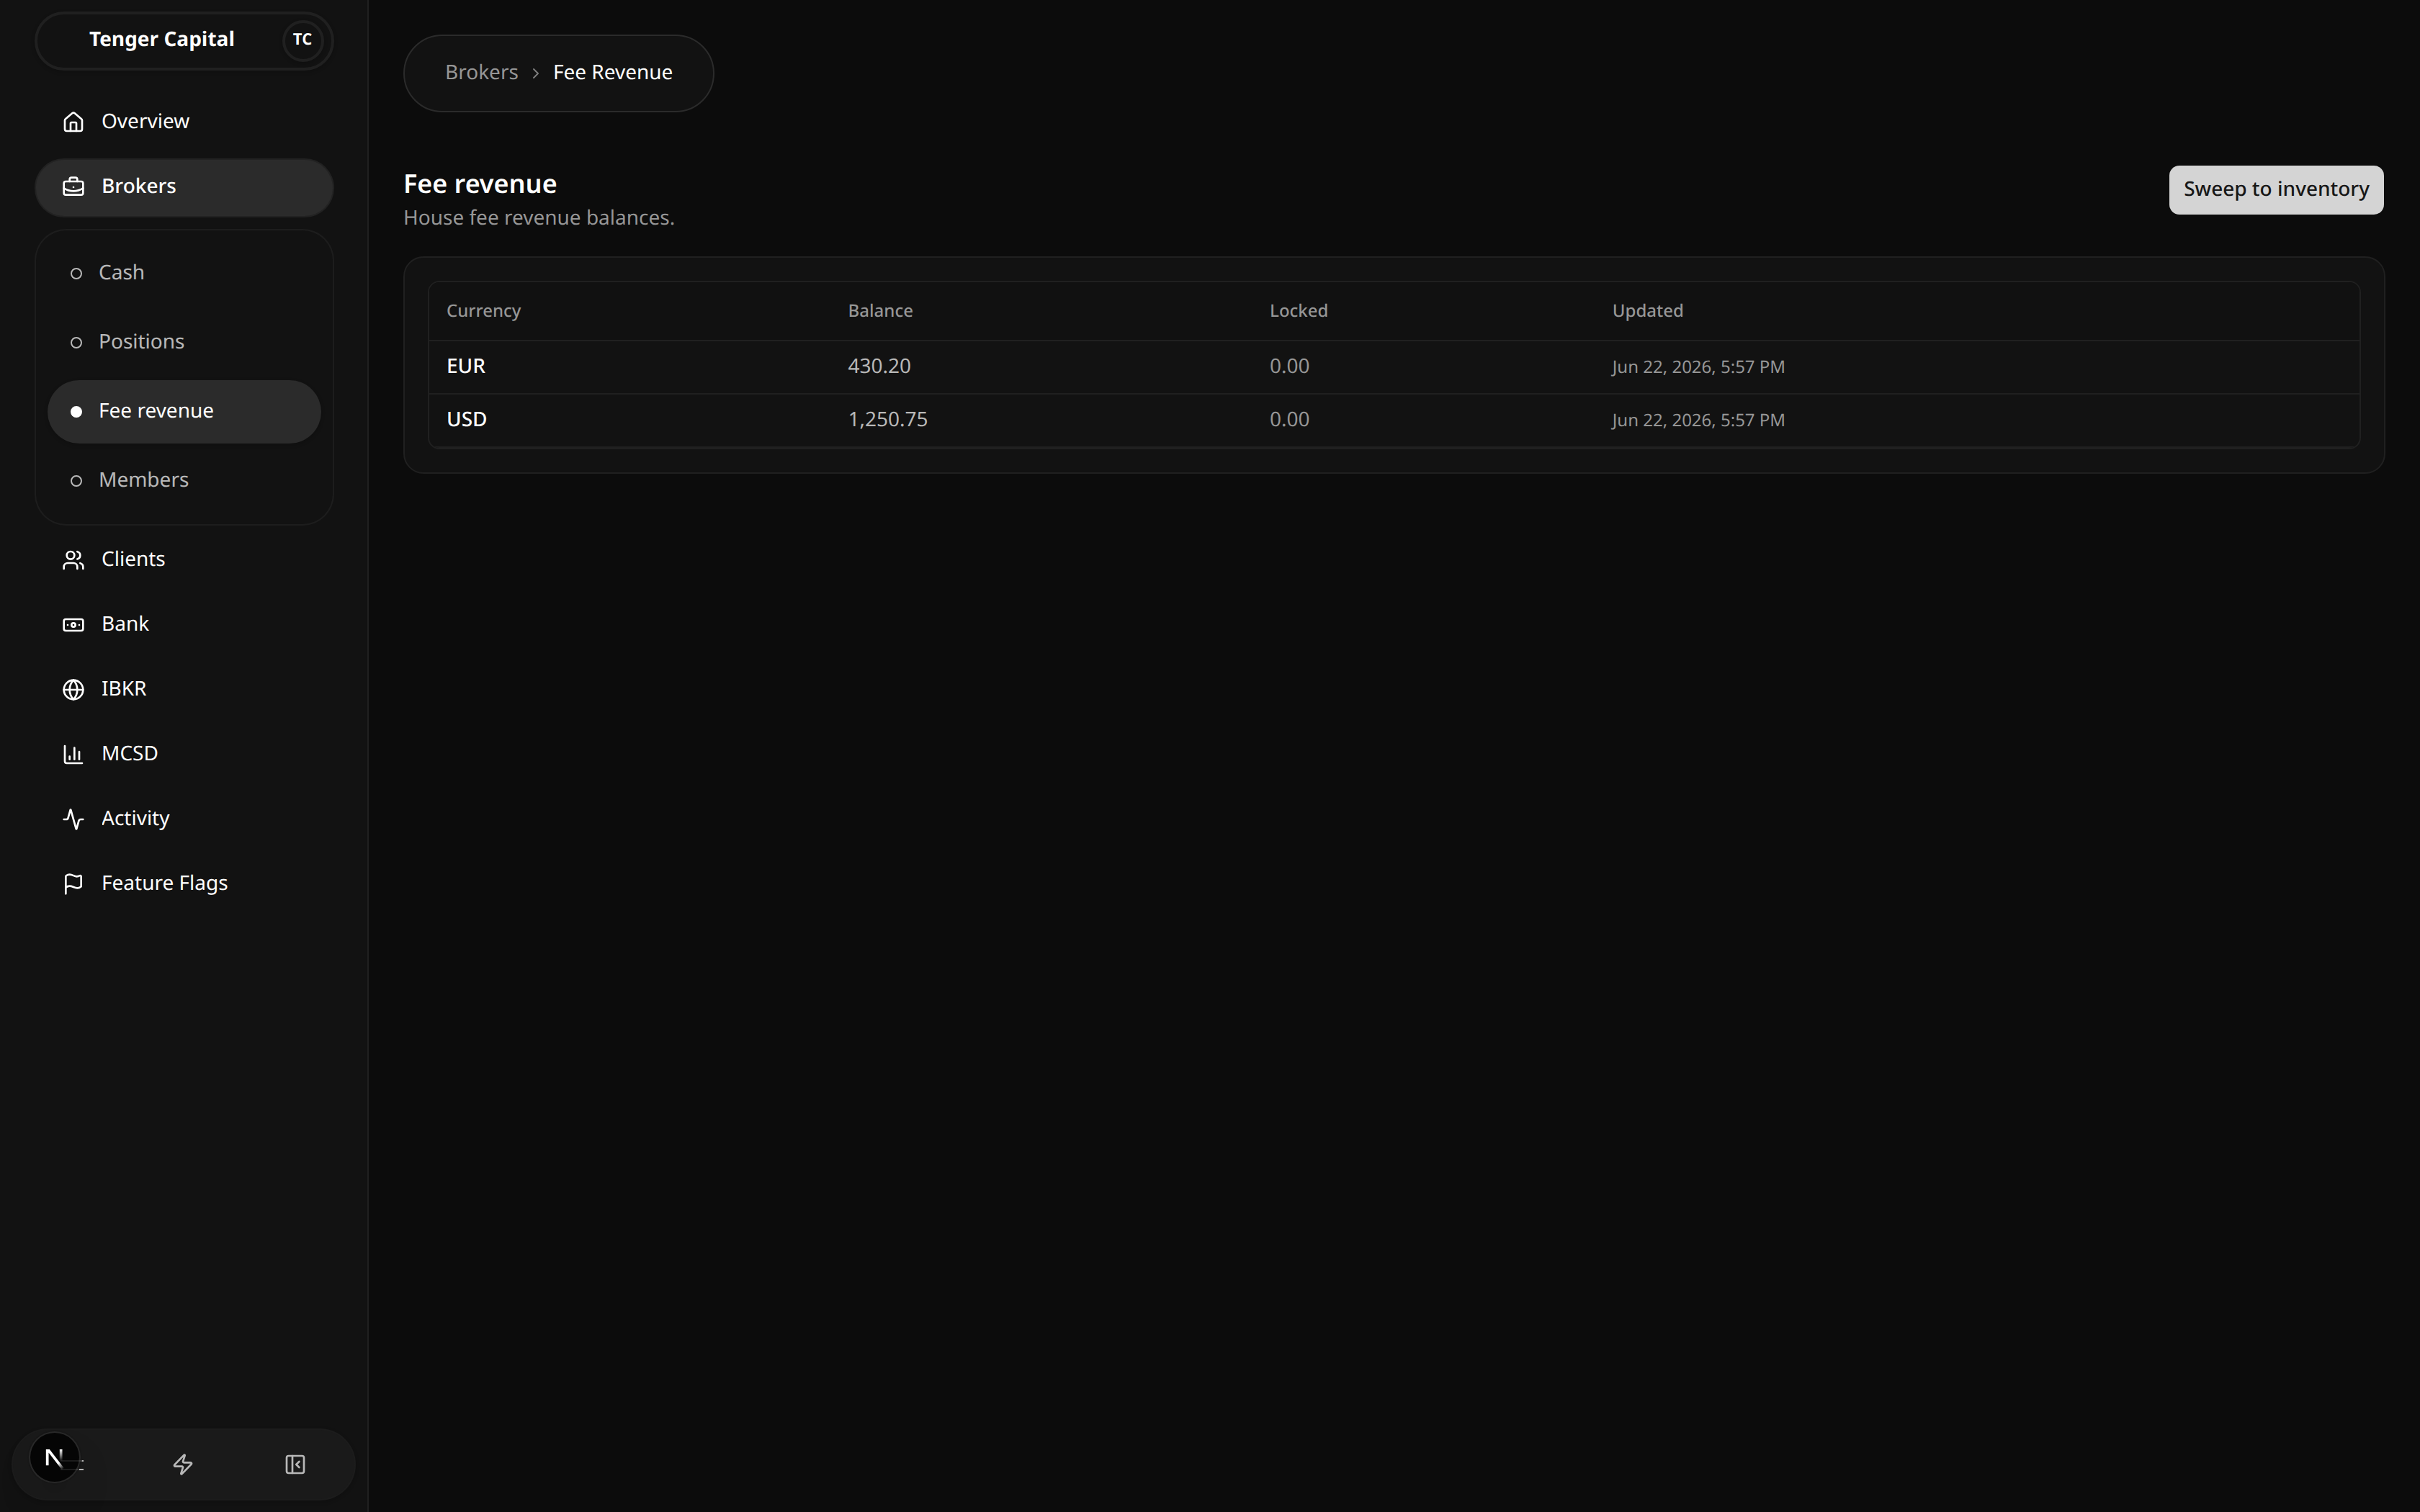
What it does
Shows the fees the firm has collected, held in the house fee-revenue account and broken down by currency. From here you can also sweep that money into the firm's main inventory account when you want to consolidate it.
How to use
Review fee revenue
Open Brokers → Fee revenue from the sidebar and read the table:
- Currency — the currency the fee revenue is held in (for example USD or EUR).
- Balance — total fee revenue collected in that currency.
- Locked — the portion that is reserved and not available to sweep.
- Updated — when the balance last changed.
A currency only appears once there is fee revenue in it, so an empty table simply means nothing has been collected yet.
Sweep fee revenue into inventory
- Click Sweep to inventory (top right). The button is greyed out when there is nothing to sweep.
- A confirmation appears explaining that this moves the entire available balance of every currency into the inventory account.
- Click Sweep to inventory again to confirm, or Cancel to back out.
- On success a message confirms the amounts that were moved, and both this page and Brokers → Cash update to reflect the transfer.
Notes
- A sweep moves all available balances at once — you can't choose a single currency or a partial amount.
- The locked portion of a balance is left behind; only the available part moves.
- A sweep can't be undone automatically. Reversing one means making an offsetting transfer by hand, so confirm the amounts before you proceed.
- After a sweep, the moved money shows up under Broker Cash.
Broker Members
/brokers/members

What it does
Lists the people in your broker organization — the back-office staff who can sign in and work in the platform. From here you can review who has access, open a member to manage their access, and invite new people.
The Members and Invitations tabs sit side by side: Members shows people who have already joined, while Invitations tracks invites that are still outstanding or have been dealt with.
How to use
Review members
Open Brokers → Members from the sidebar and read the table:
- Member — the person's name, with their email shown underneath.
- Role — their level of access (for example owner, admin or member).
- Status — Active for someone who can sign in, or Inactive if their access has been suspended.
- Joined — when they joined the organization.
Click a row to open that member and manage their access.
Invite a new member
- Click the + button (top right).
- Enter the person's email and choose a role (member, admin or owner).
- Click Send invitation. The new invite then appears on the Invitations tab until the person accepts it.
Notes
- Inviting someone does not give them access immediately — they have to accept the emailed invitation first. Track that on the Invitations tab.
- Roles decide what a member can do, so take care when choosing owner or admin.
- An empty table means no one has joined the organization yet.
Member Invitations
/brokers/members/invitations
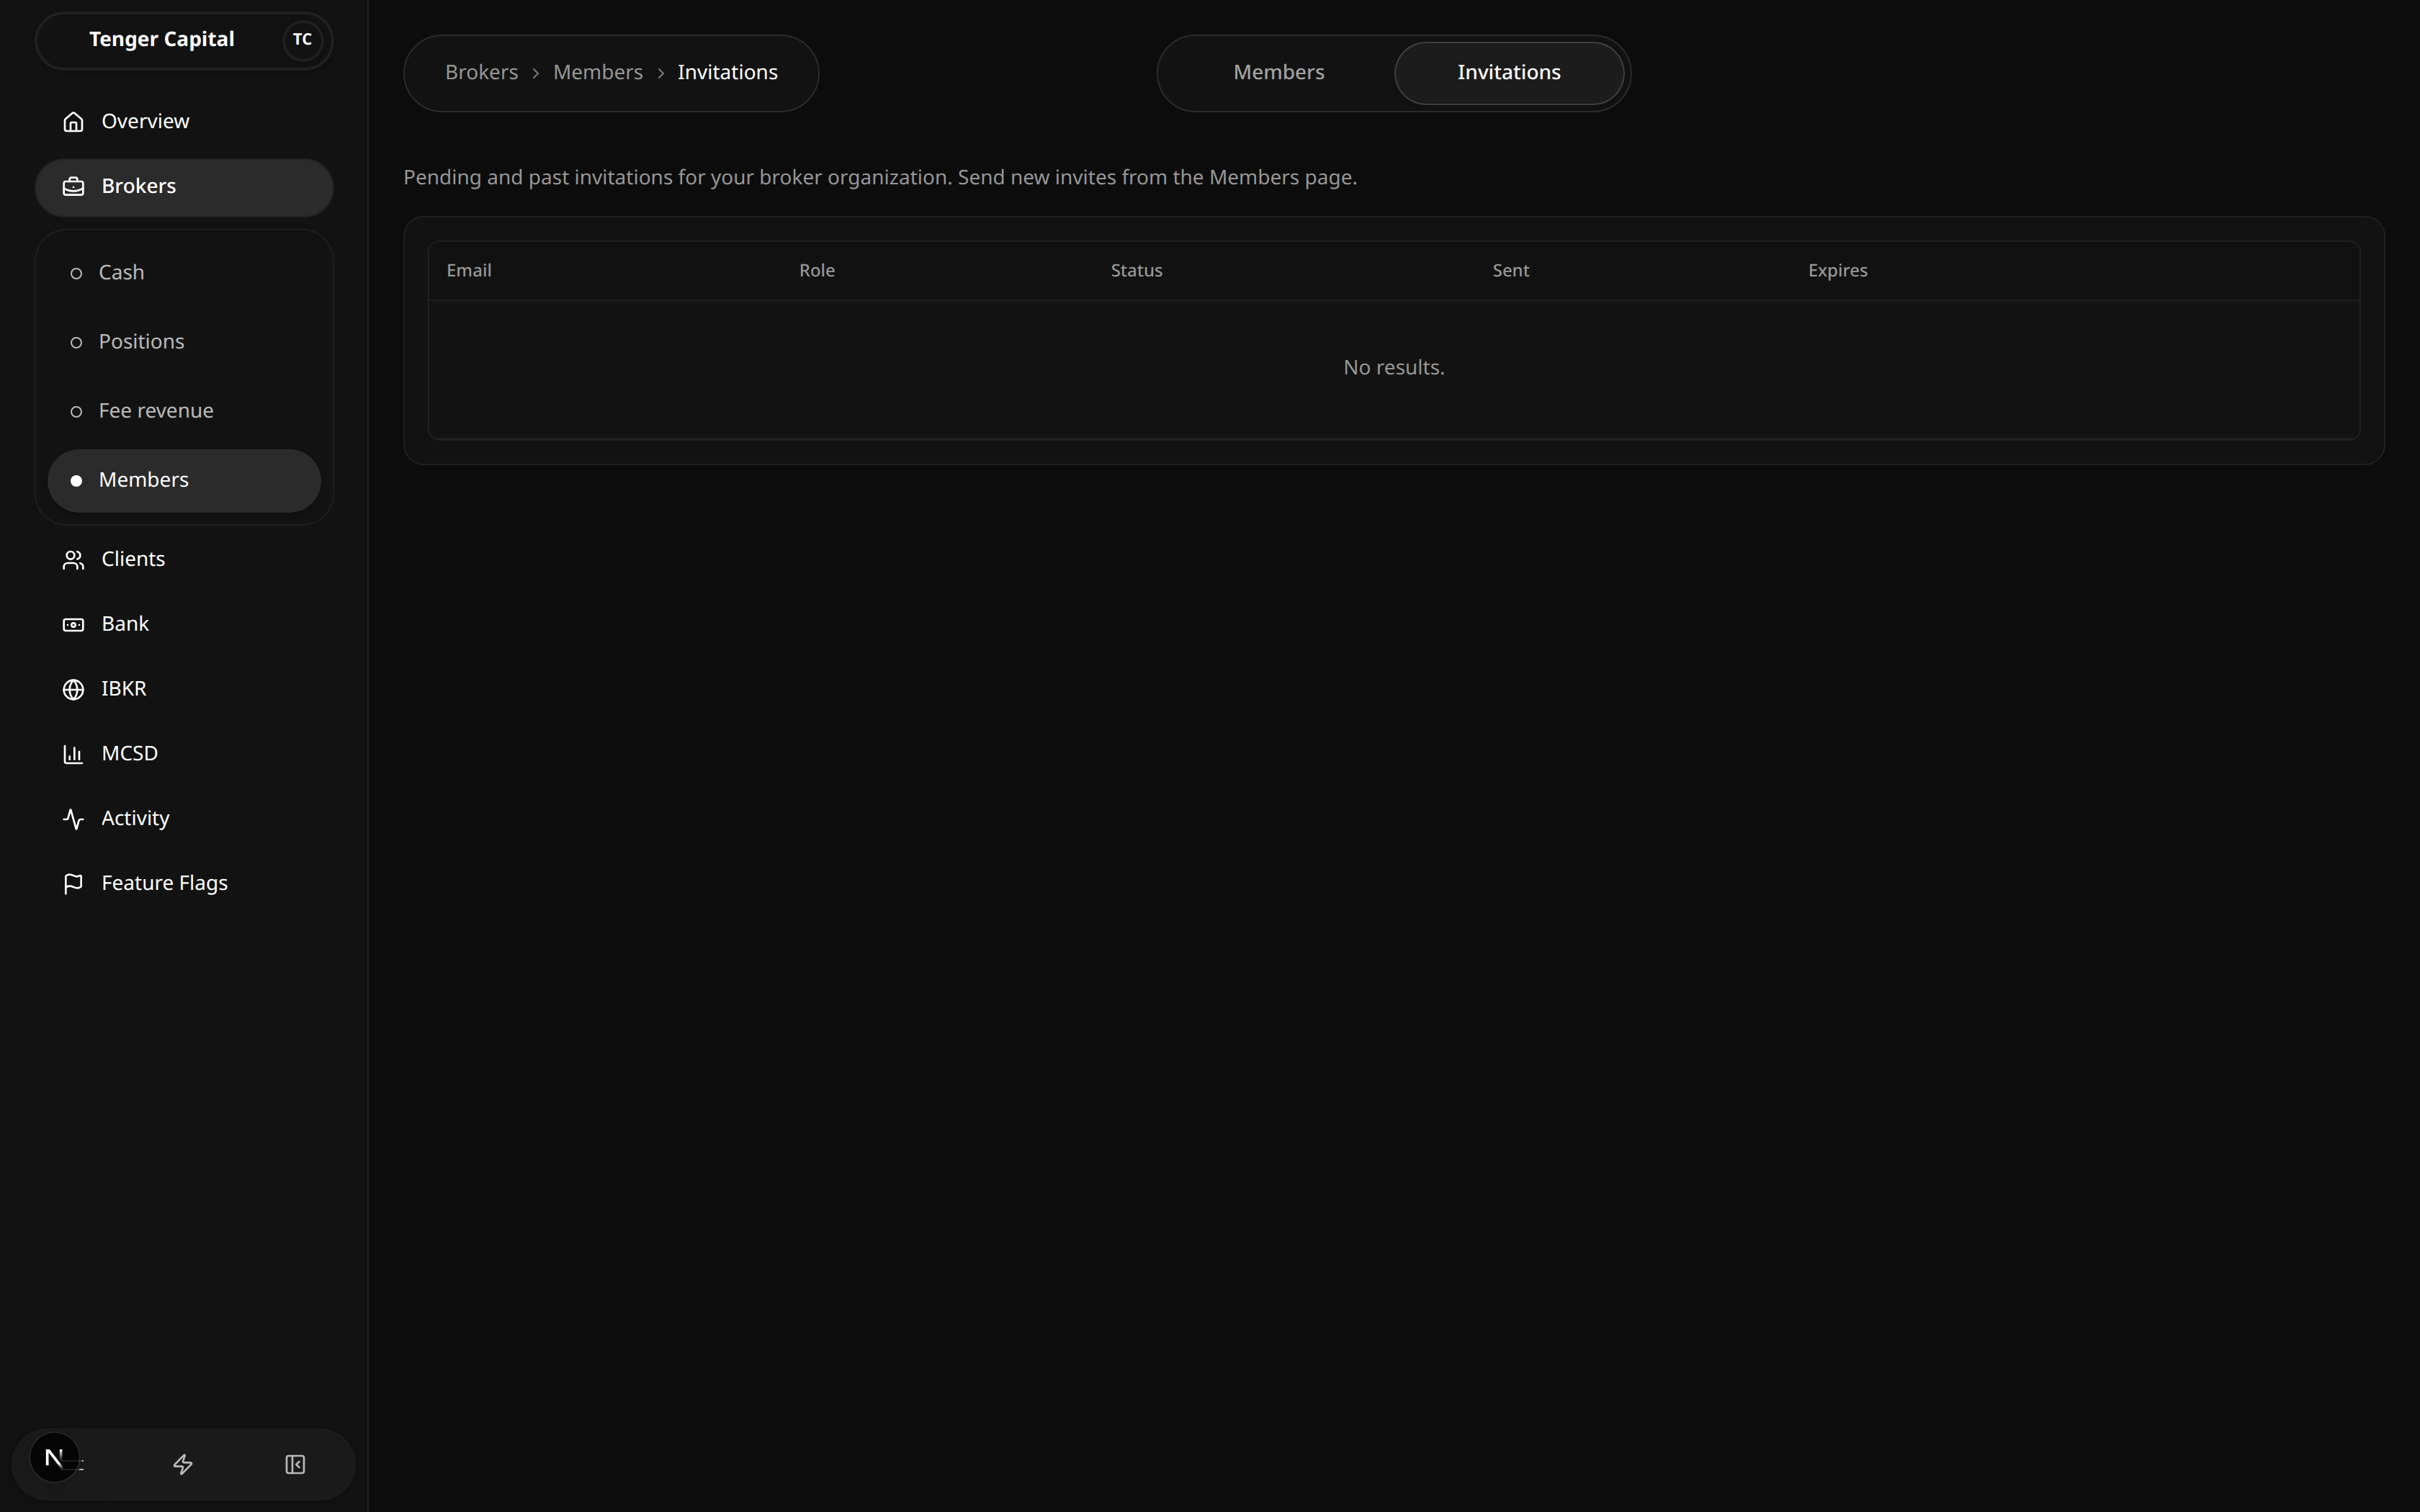
What it does
Tracks invitations sent to people you want to join your broker organization. Each row is one invitation and shows whether it is still waiting to be accepted, has been accepted, or has lapsed. From here you can chase up or withdraw invitations that are still pending.
New invitations are sent from the Members page; this page is where you follow what happens to them afterwards.
How to use
Open Brokers → Members and switch to the Invitations tab. Read the table:
- Email — the address the invitation was sent to.
- Role — the access level the person will get once they accept.
- Status — where the invitation stands:
- Pending — sent and still waiting to be accepted.
- Accepted — the person has joined; they now appear on the Members tab.
- Expired — the invitation lapsed before it was accepted.
- Revoked / Canceled — the invitation was withdrawn and can no longer be accepted.
- Sent — when the invitation was first sent.
- Expires — when it stops being valid.
For invitations that are still Pending, two actions appear at the end of the row:
- Resend — sends the invitation email again and refreshes its expiry, handy if the person never received it or it is about to lapse.
- Cancel — withdraws the invitation so it can no longer be accepted. You are asked to confirm first.
Notes
- Resend and Cancel only apply to Pending invitations. Accepted, expired or canceled rows show no actions.
- An empty table ("No results") means there are no invitations to show — either none have been sent, or they have all been accepted and moved to the Members tab.
- Canceling an invitation is final; to re-invite the same person, send a fresh invitation from the Members page.
Account Claims
/account-claims
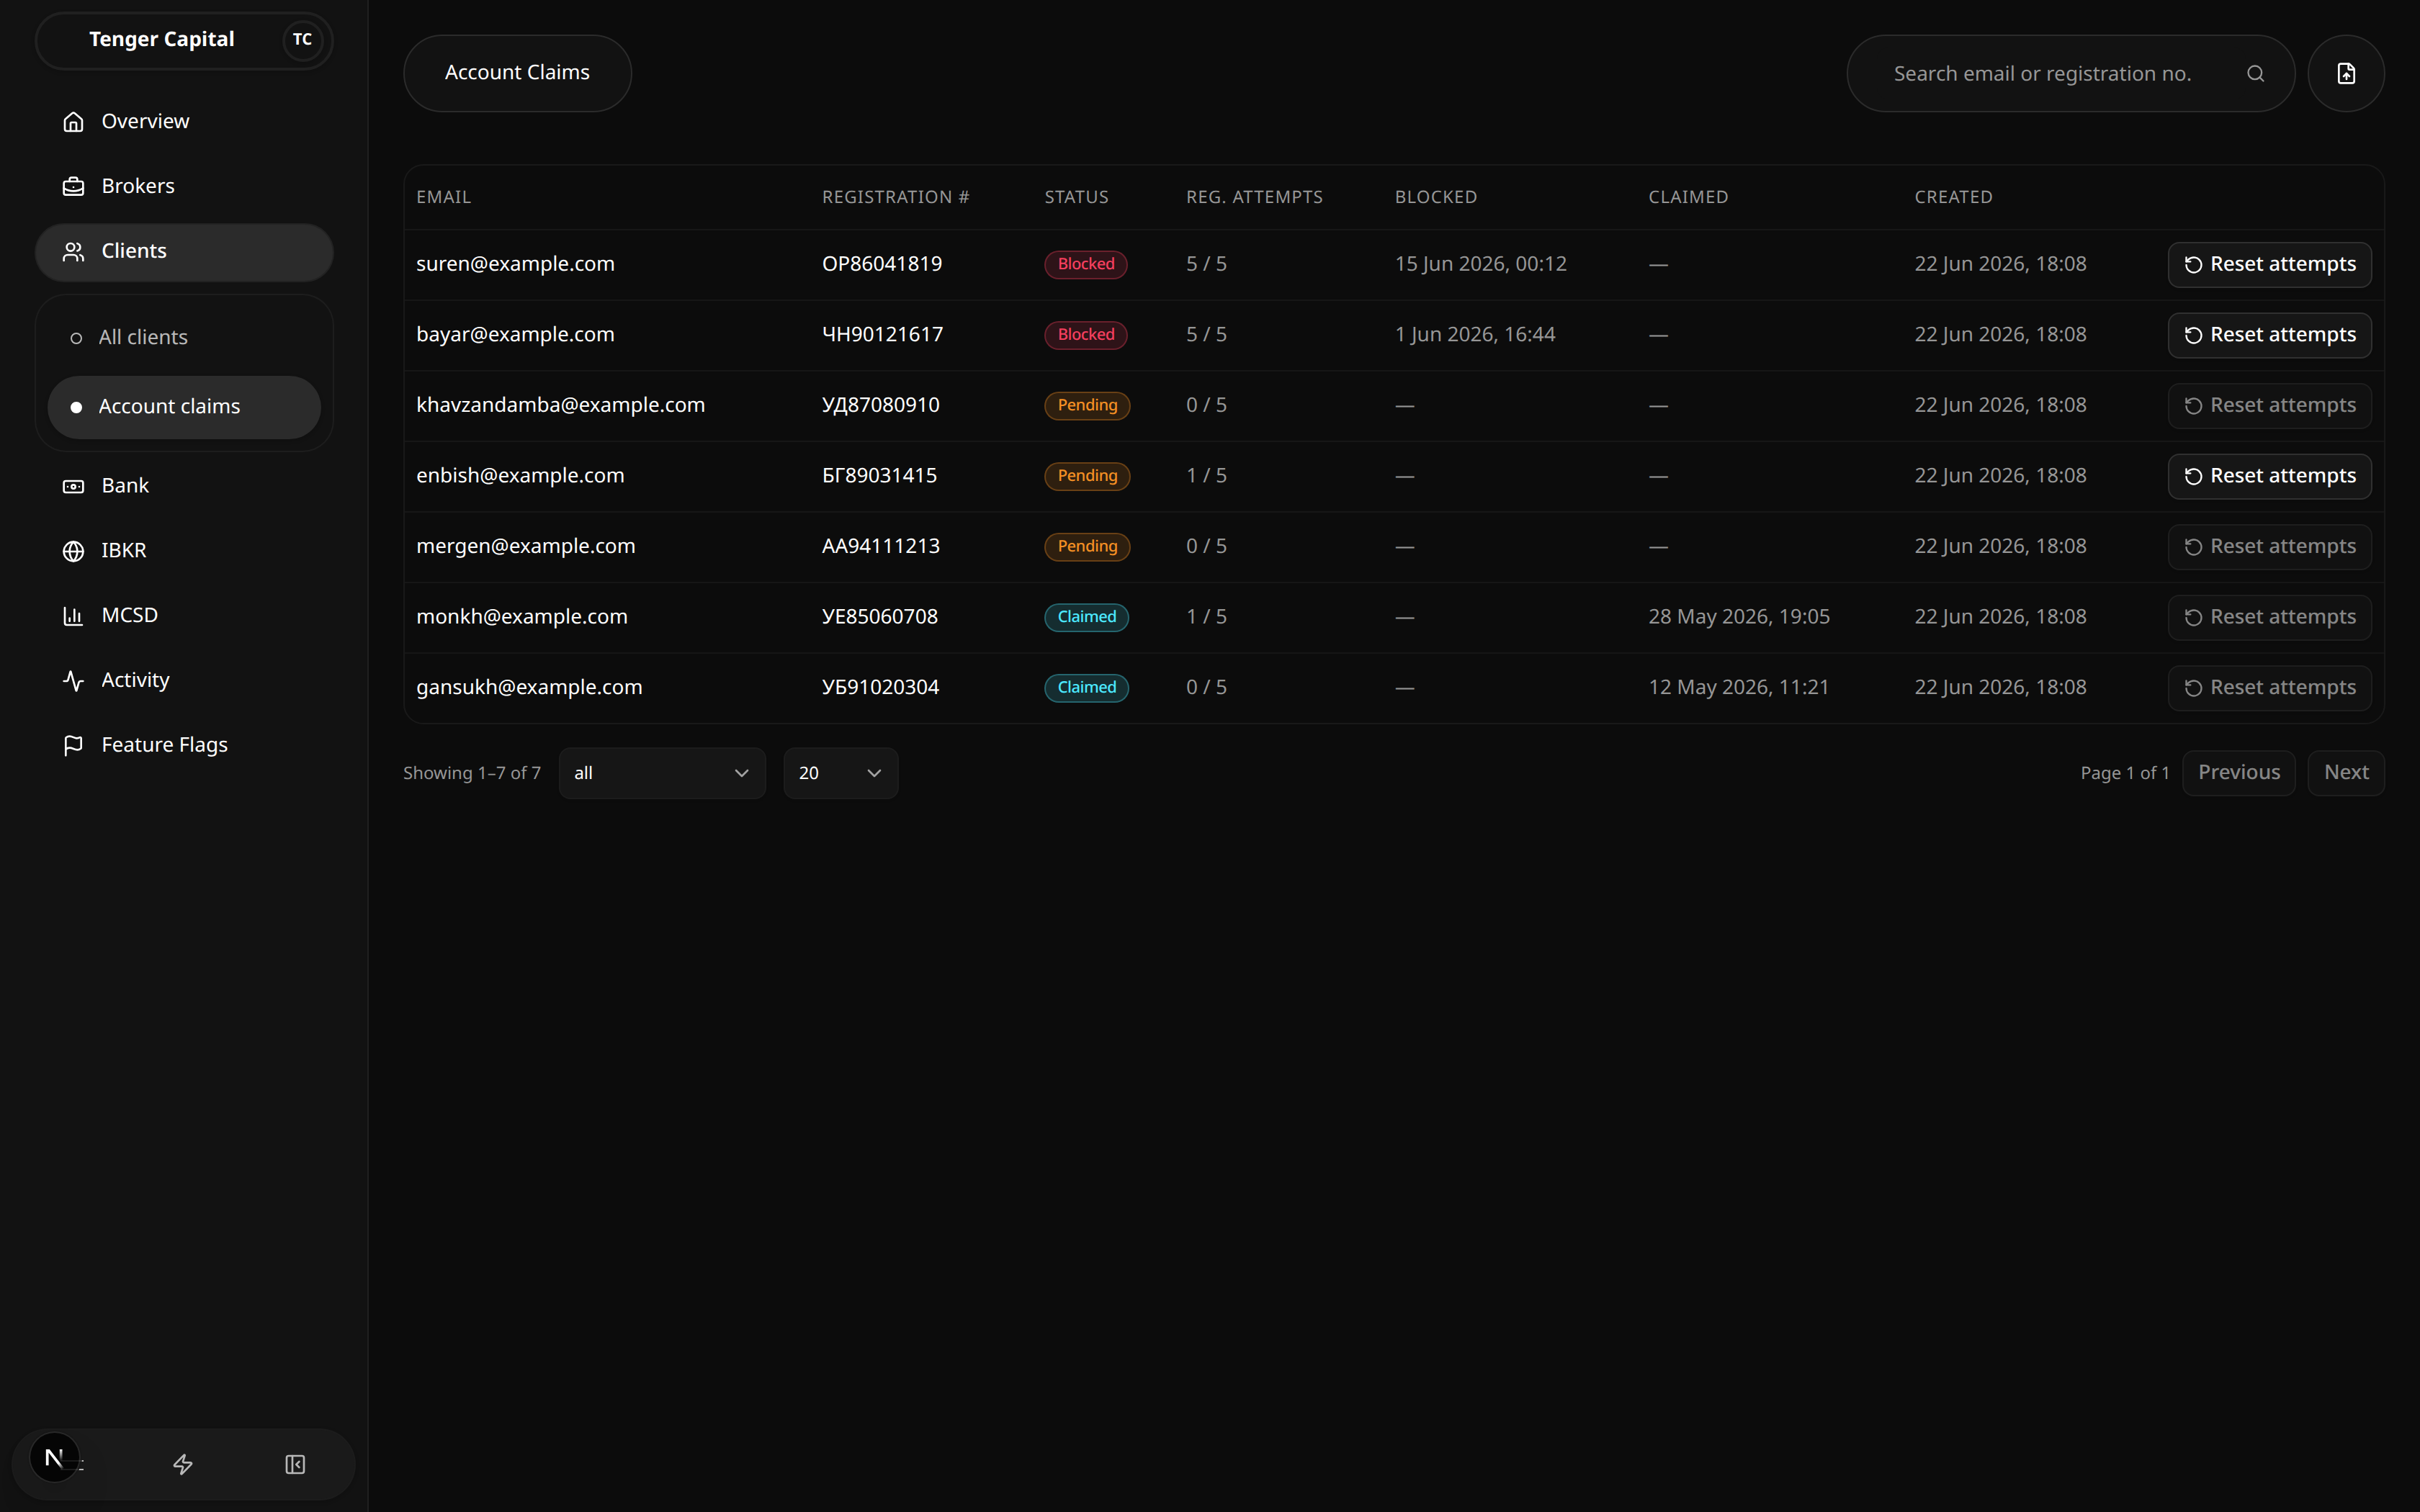
What it does
Manages the list of migrated customers who are entitled to claim their account on the new platform. Each row links a customer's email and registration number to a claim, and tracks whether they have successfully claimed it, are still trying, or have been blocked after too many failed attempts. From here you can import a batch of customers and reset a blocked customer so they can try again.
How to use
Review claims
Open Clients → Account claims from the sidebar and read the table:
- Email — the customer's email.
- Registration # — their registration number.
- Status:
- Pending — the account hasn't been claimed yet.
- Claimed — the customer has successfully taken over their account.
- Blocked — too many failed attempts have locked the customer out.
- Reg. attempts — how many registration attempts have been used out of the allowed maximum (for example "5 / 5").
- Blocked — when the record was blocked, if it has been.
- Claimed — when the account was claimed, if it has been.
- Created — when the claim record was added.
Filter and search
- Use the status dropdown at the bottom left to show only Pending, Blocked or Claimed records, or All statuses.
- Use the search box at the top right to find a customer by email or registration number.
- Use Previous / Next and the page-size dropdown at the bottom to move through the list.
Reset attempts
When a customer is blocked (or has used some attempts), the Reset attempts button at the end of the row becomes available:
- Click Reset attempts on the customer's row.
- A dialog confirms the customer and shows their current status and attempt count.
- Click Reset attempts to confirm. This sets their attempt counter back to zero, clears the block, returns the record to Pending, and lifts the one-time-code lockout so the customer can try claiming again right away.
Import claims
- Click the import button (top right).
- Either choose a CSV file or paste the rows directly into the box. A Download example CSV button shows the expected layout.
- Only email and registration number are required for each row; other details (phone, name, date of birth, and so on) are optional.
- Click Import. A message confirms how many records were added.
Notes
- Importing is safe to re-run: rows whose email already has a claim are skipped, so you won't create duplicates.
- If any row in an import is invalid, nothing is imported — the dialog lists the offending lines so you can fix them and try again.
- Reset attempts is greyed out when there is nothing to reset — a record with zero attempts, or one that has already been Claimed (claimed records are final).
- An empty table means no claim records match the current filters — clear the search or status filter to widen the list.
Clients
/clients
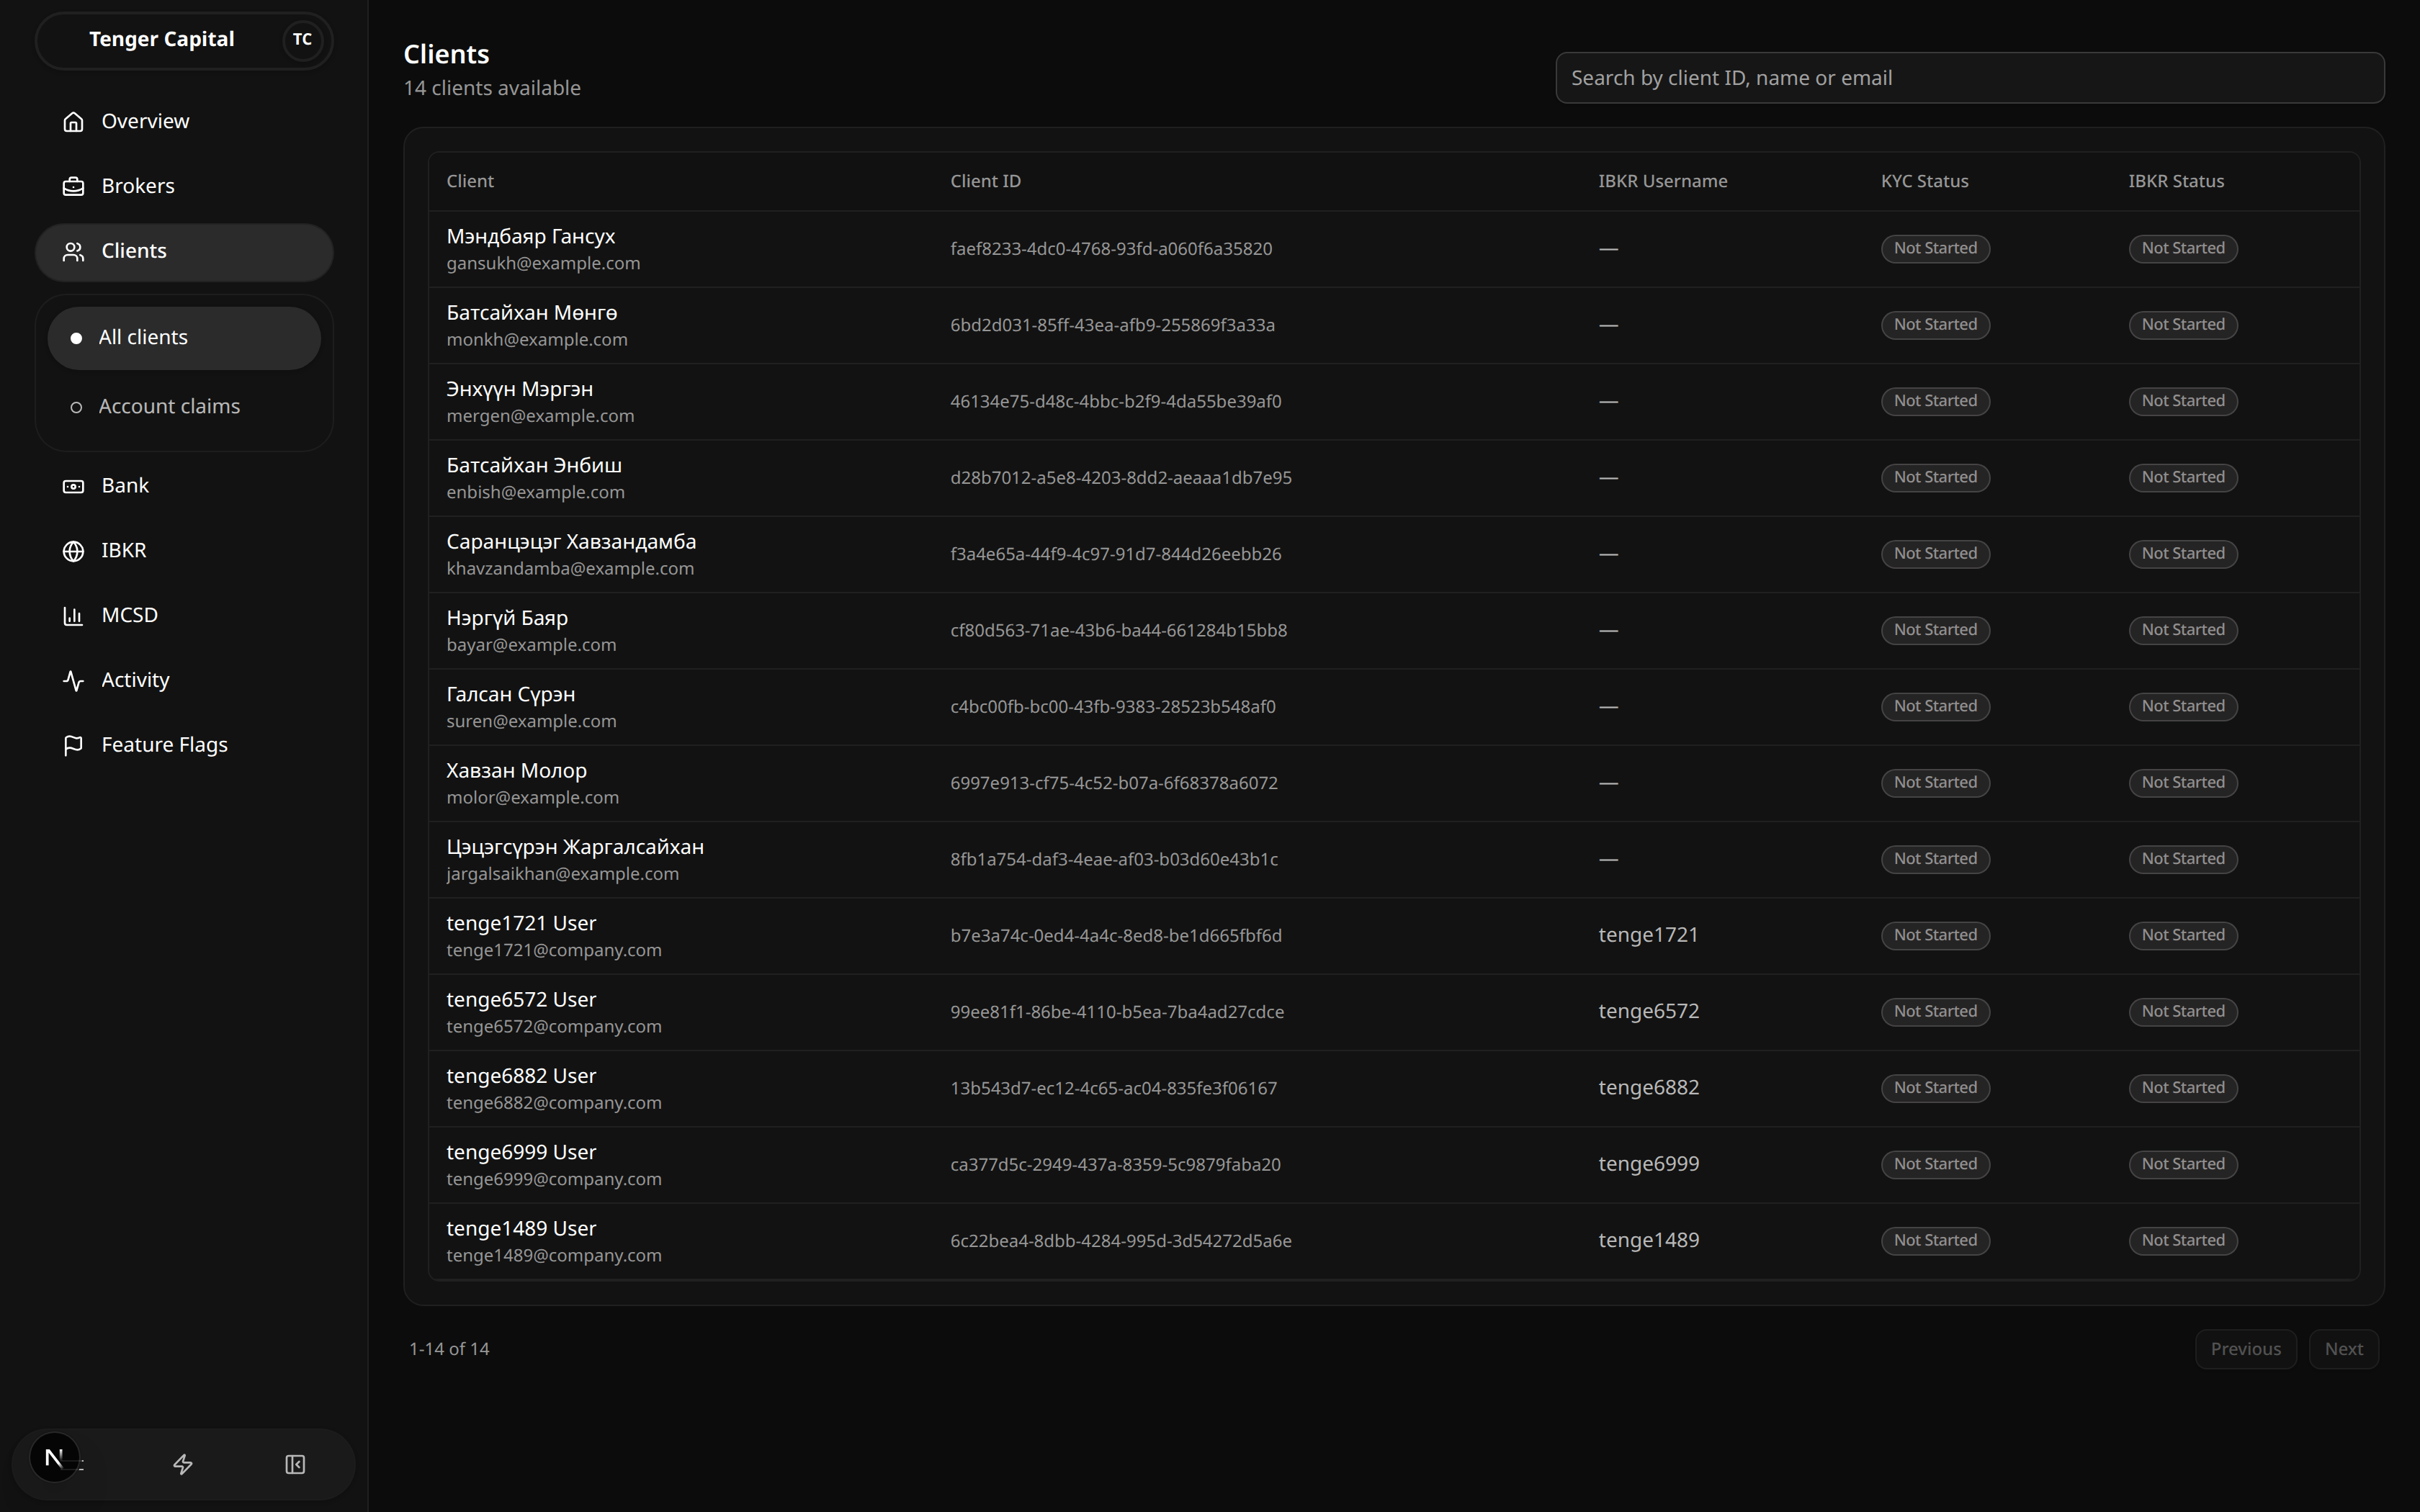
What it does
The client directory — a searchable list of every customer on the platform. It gives you a quick read on each client's verification progress and is the starting point for opening an individual client to manage their account.
How to use
Open Clients → All clients from the sidebar. The heading shows how many clients are available. Read the table:
- Client — the client's name and email. A red Banned badge appears next to anyone whose account is restricted.
- Client ID — the client's unique identifier.
- IBKR Username — their Interactive Brokers login, or a dash if they don't have one yet.
- KYC Status — progress on local identity verification (for example Not Started, Pending, Verified or Rejected).
- IBKR Status — progress on Interactive Brokers verification, shown the same way.
To find someone, type into the search box at the top right — you can search by client ID, name or email. The list filters as you type.
Click any row to open that client's detail page, where you can review and manage their account across all areas.
When you are not searching, use Previous and Next at the bottom to move through the full directory; the count (for example "1-25 of 140") tells you which rows you are viewing.
Notes
- Searching switches the list to matching results and hides the page controls; clear the search box to return to the full, paged directory.
- If a search returns nothing you'll see "No clients found" — check the spelling or try a different detail.
- KYC and IBKR statuses are summaries; open the client to see the full picture on their detail page.
Client Detail
/clients/view
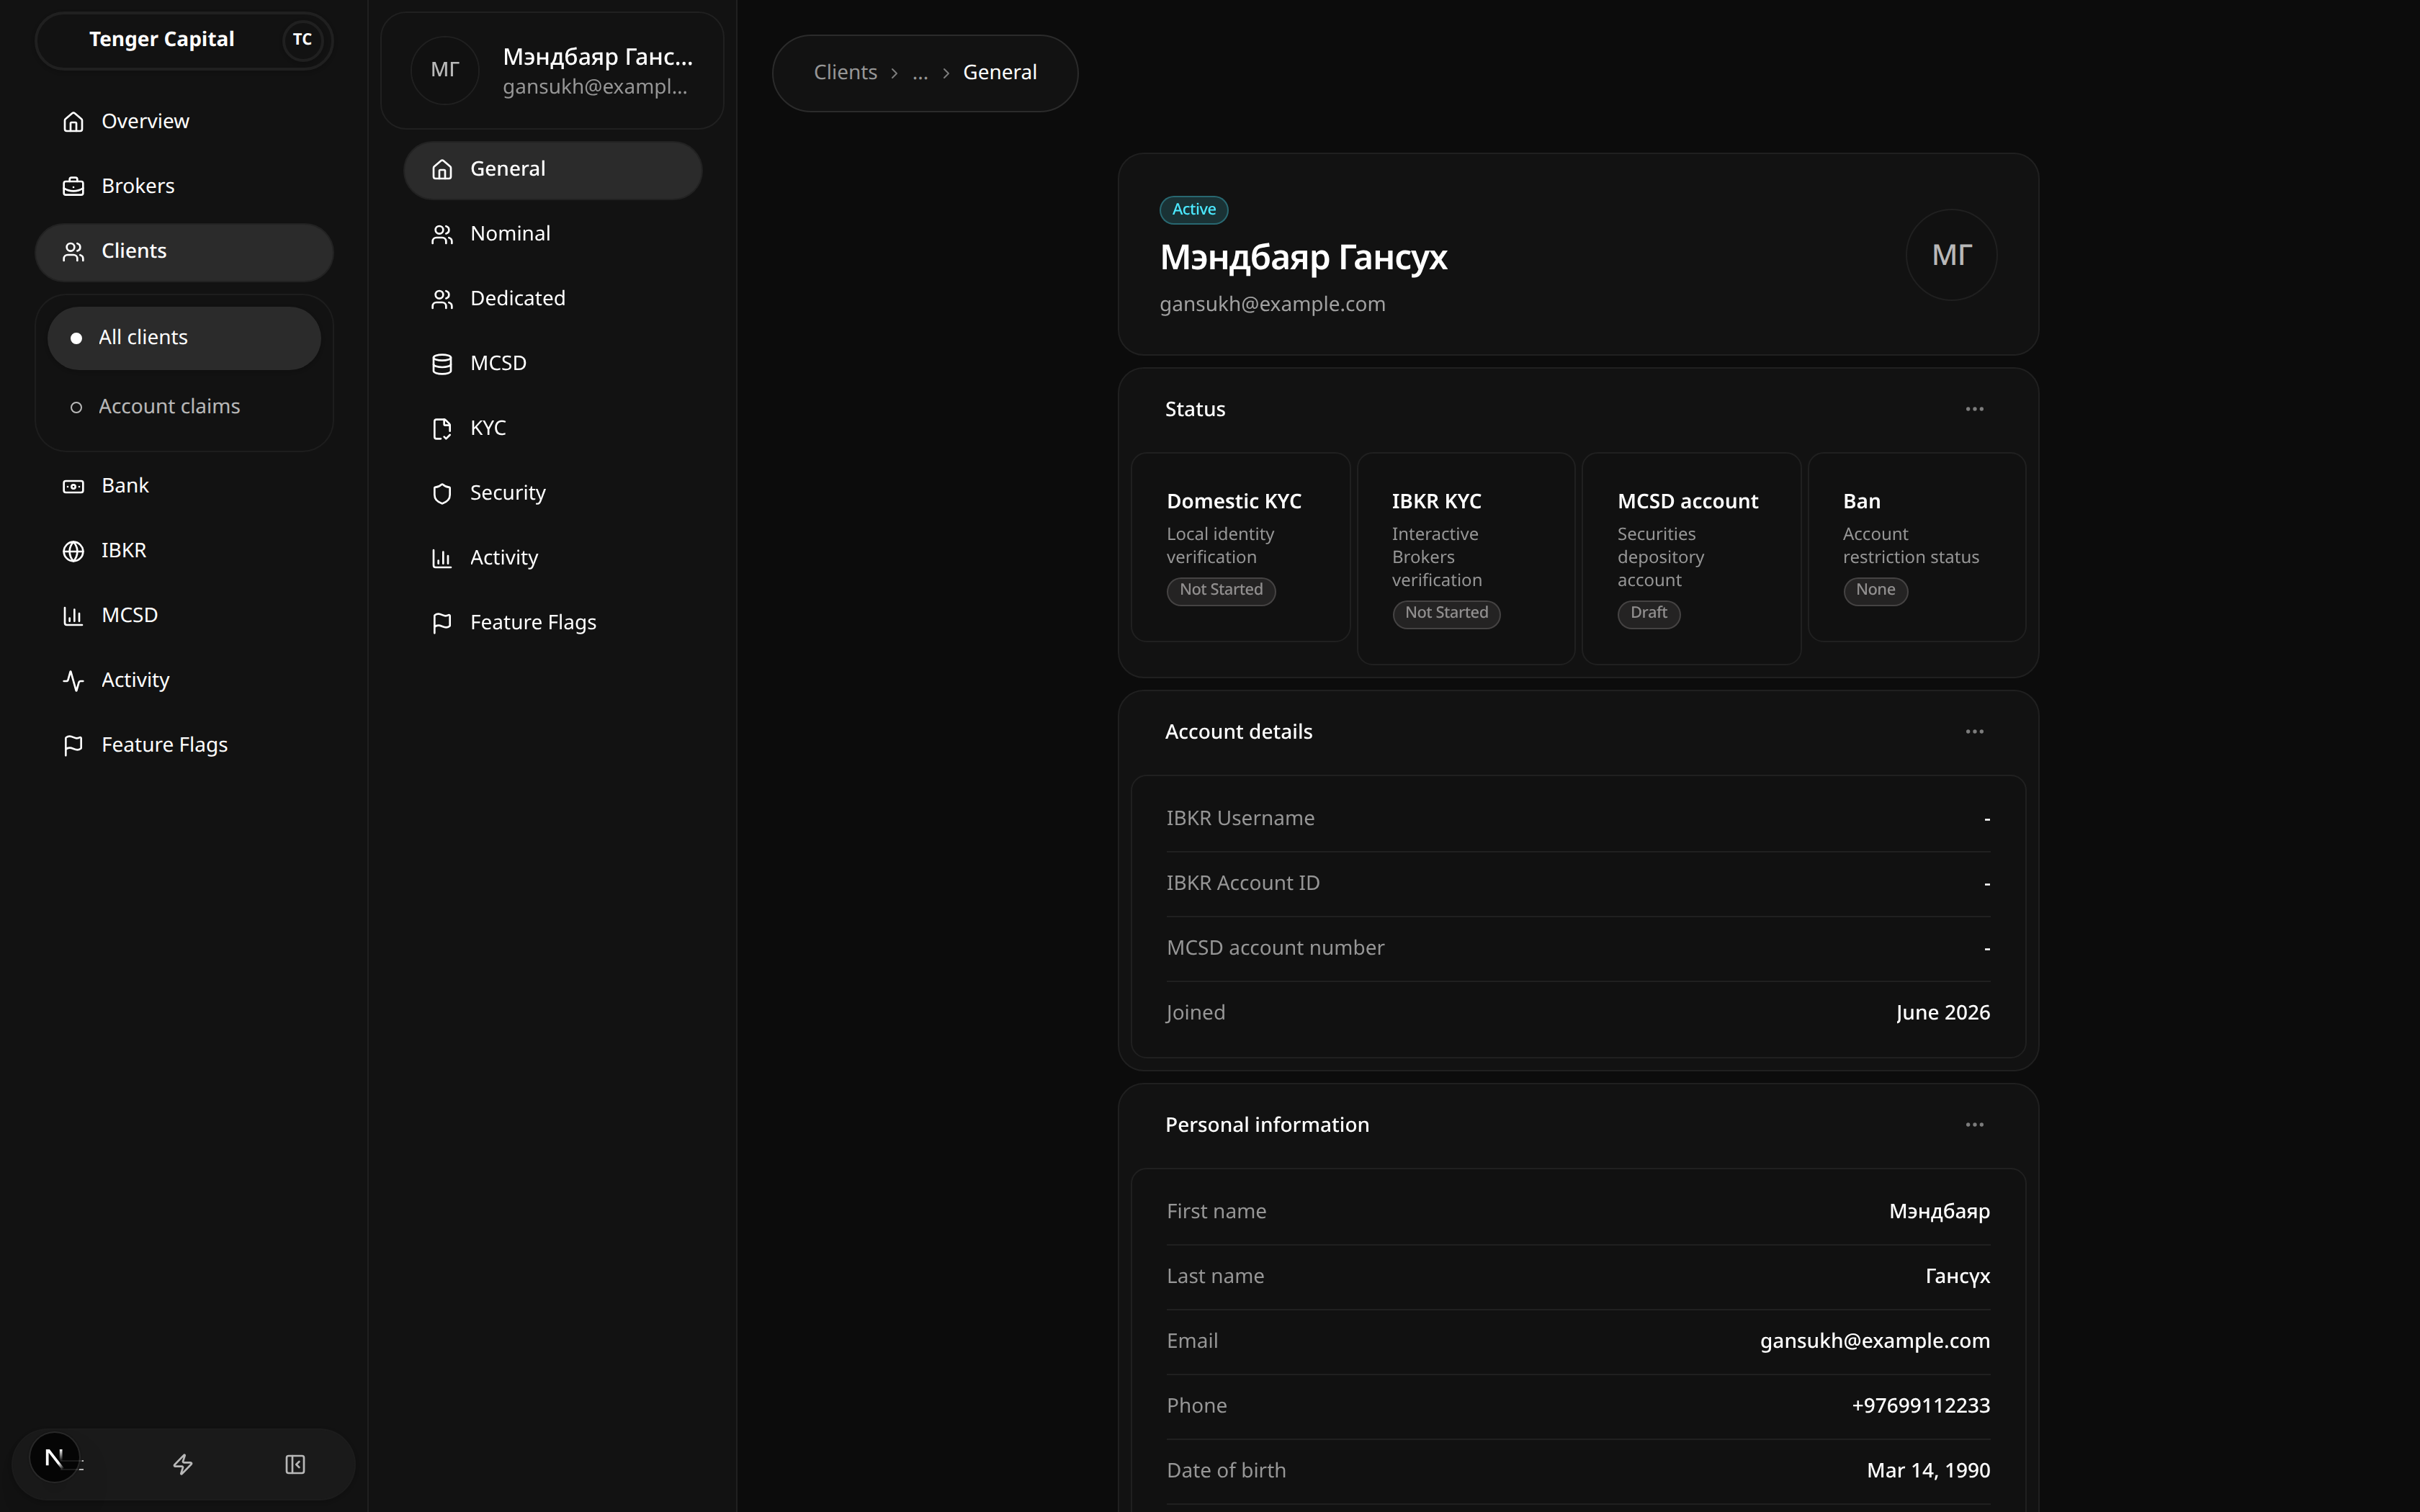
What it does
The full profile for a single client. It opens on a General overview with the client's name, contact details and a row of status cards, and a sidebar of tabs that group everything you can manage for that client — their accounts, trading, depository records, verification, security and activity.
You reach this page by clicking a client on the Clients directory.
How to use
Read the overview
The General tab is the at-a-glance summary:
- A header card with the client's name, email and an Active badge.
- A Status row of four cards:
- Domestic KYC — local identity verification progress.
- IBKR KYC — Interactive Brokers verification progress.
- MCSD account — the securities-depository account (for example Draft, Submitted, Opened or Failed).
- Ban — whether the account is under any restriction.
- Account details — IBKR username and account ID, MCSD account number, and when the client joined.
- Personal information — name, email, phone, date of birth and registration number.
Move between tabs
Use the sidebar on the left to switch areas. At a high level:
- General — the overview described above.
- Nominal — the client's pooled-account view: their Account (cash, positions, deposits, withdrawals, conversions), Trade (order requests and trade history) and Ledger of movements.
- Dedicated — the client's own dedicated Interactive Brokers account, with its Account and Trade views.
- MCSD — the client's records at the local securities depository: account, settlement bank, balance, transactions and repayments.
- KYC — the verification forms and their status, split into Domestic KYC and IBKR KYC.
- Security — sign-in and access controls for the client.
- Activity — a history of the client's actions on the platform.
Notes
- A dash ("-") in Account details or Personal information means that detail hasn't been provided or set up yet — for example a client without an Interactive Brokers account shows no IBKR username or account ID.
- The status cards are summaries; open the matching tab (KYC, MCSD, and so on) to see the full detail behind each one.
- Some empty values fall back to information from the client's KYC submission when their main profile doesn't have it.
- If you reach this page with a client that can't be found, you'll see a "Client not found" message with a link back to the directory.
Nominal · Account · Cash
/clients/view?menu=nominal-account&tab=Cash
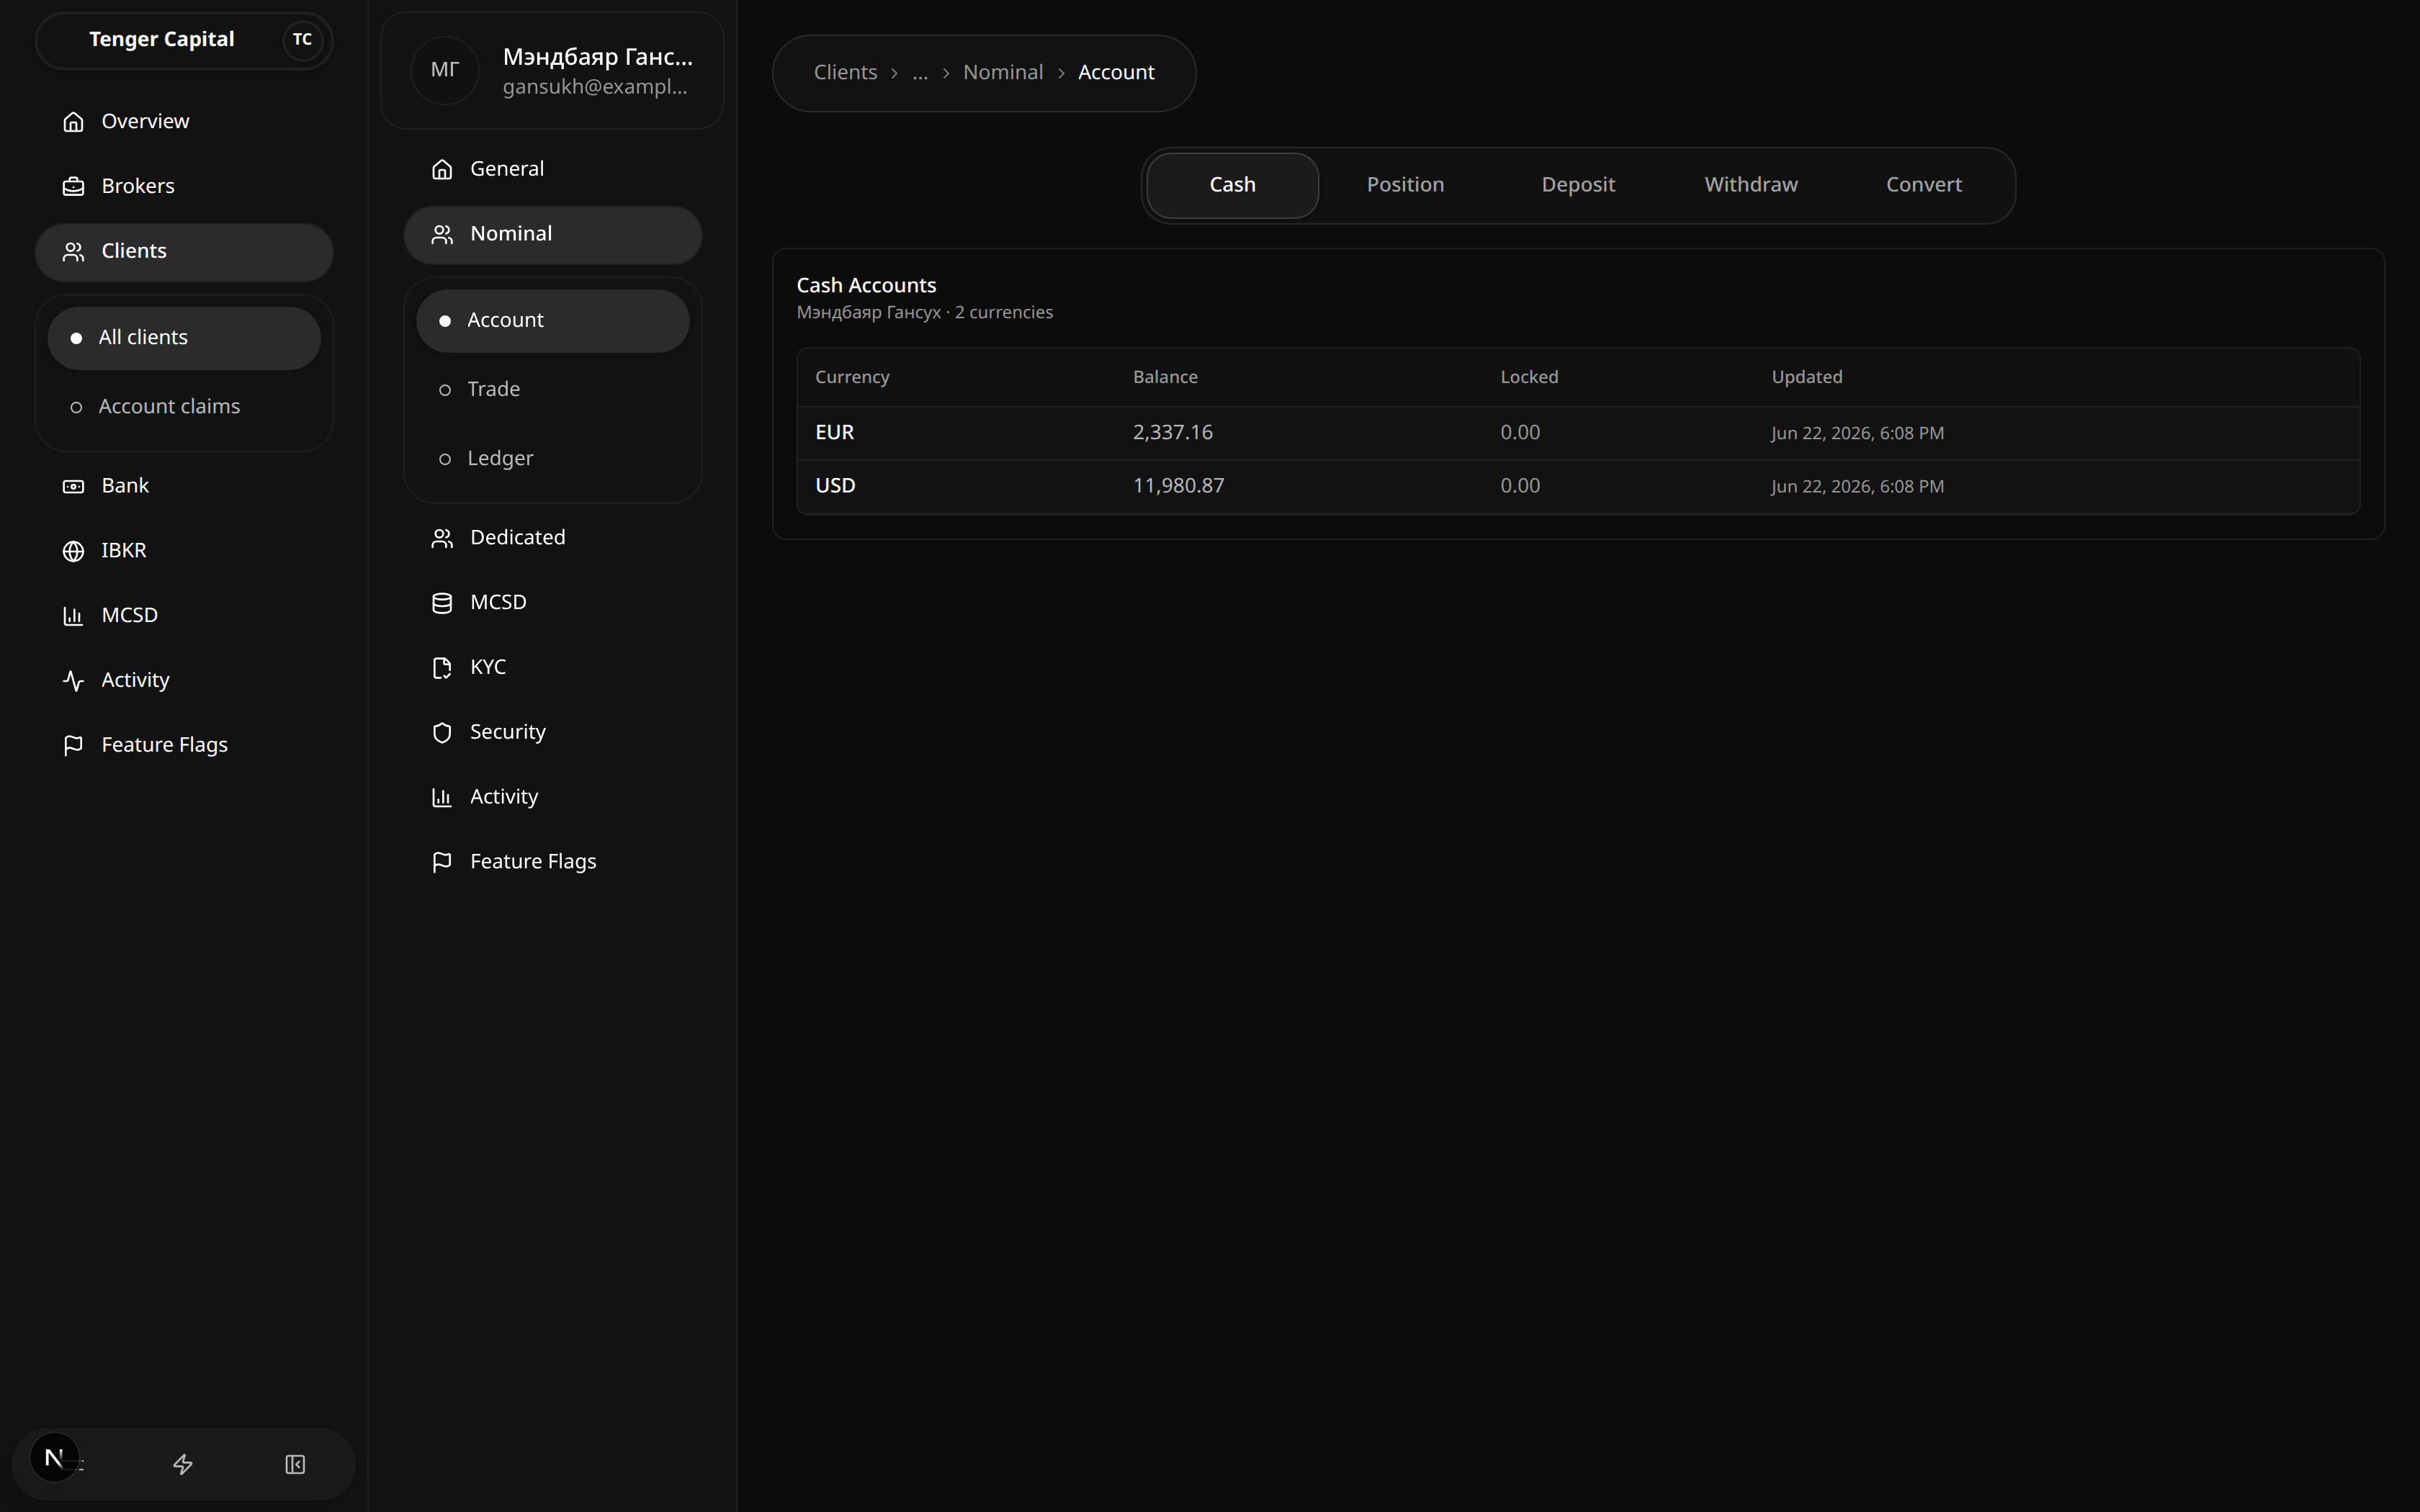
What it does
A tab within a client's Nominal → Account section. It shows the client's cash balances on their nominal account, one row per currency.
How to use
Read the table:
- Currency — the currency of the balance (for example USD or EUR).
- Balance — total cash the client holds in that currency.
- Locked — the portion reserved and not available to use.
- Updated — when the balance last changed.
Notes
- A currency only appears once the client holds cash in it.
- Available cash is Balance − Locked — read the two columns together.
- The neighbouring tabs cover positions, deposits, withdrawals and conversions.
Nominal · Account · Position
/clients/view?menu=nominal-account&tab=Position
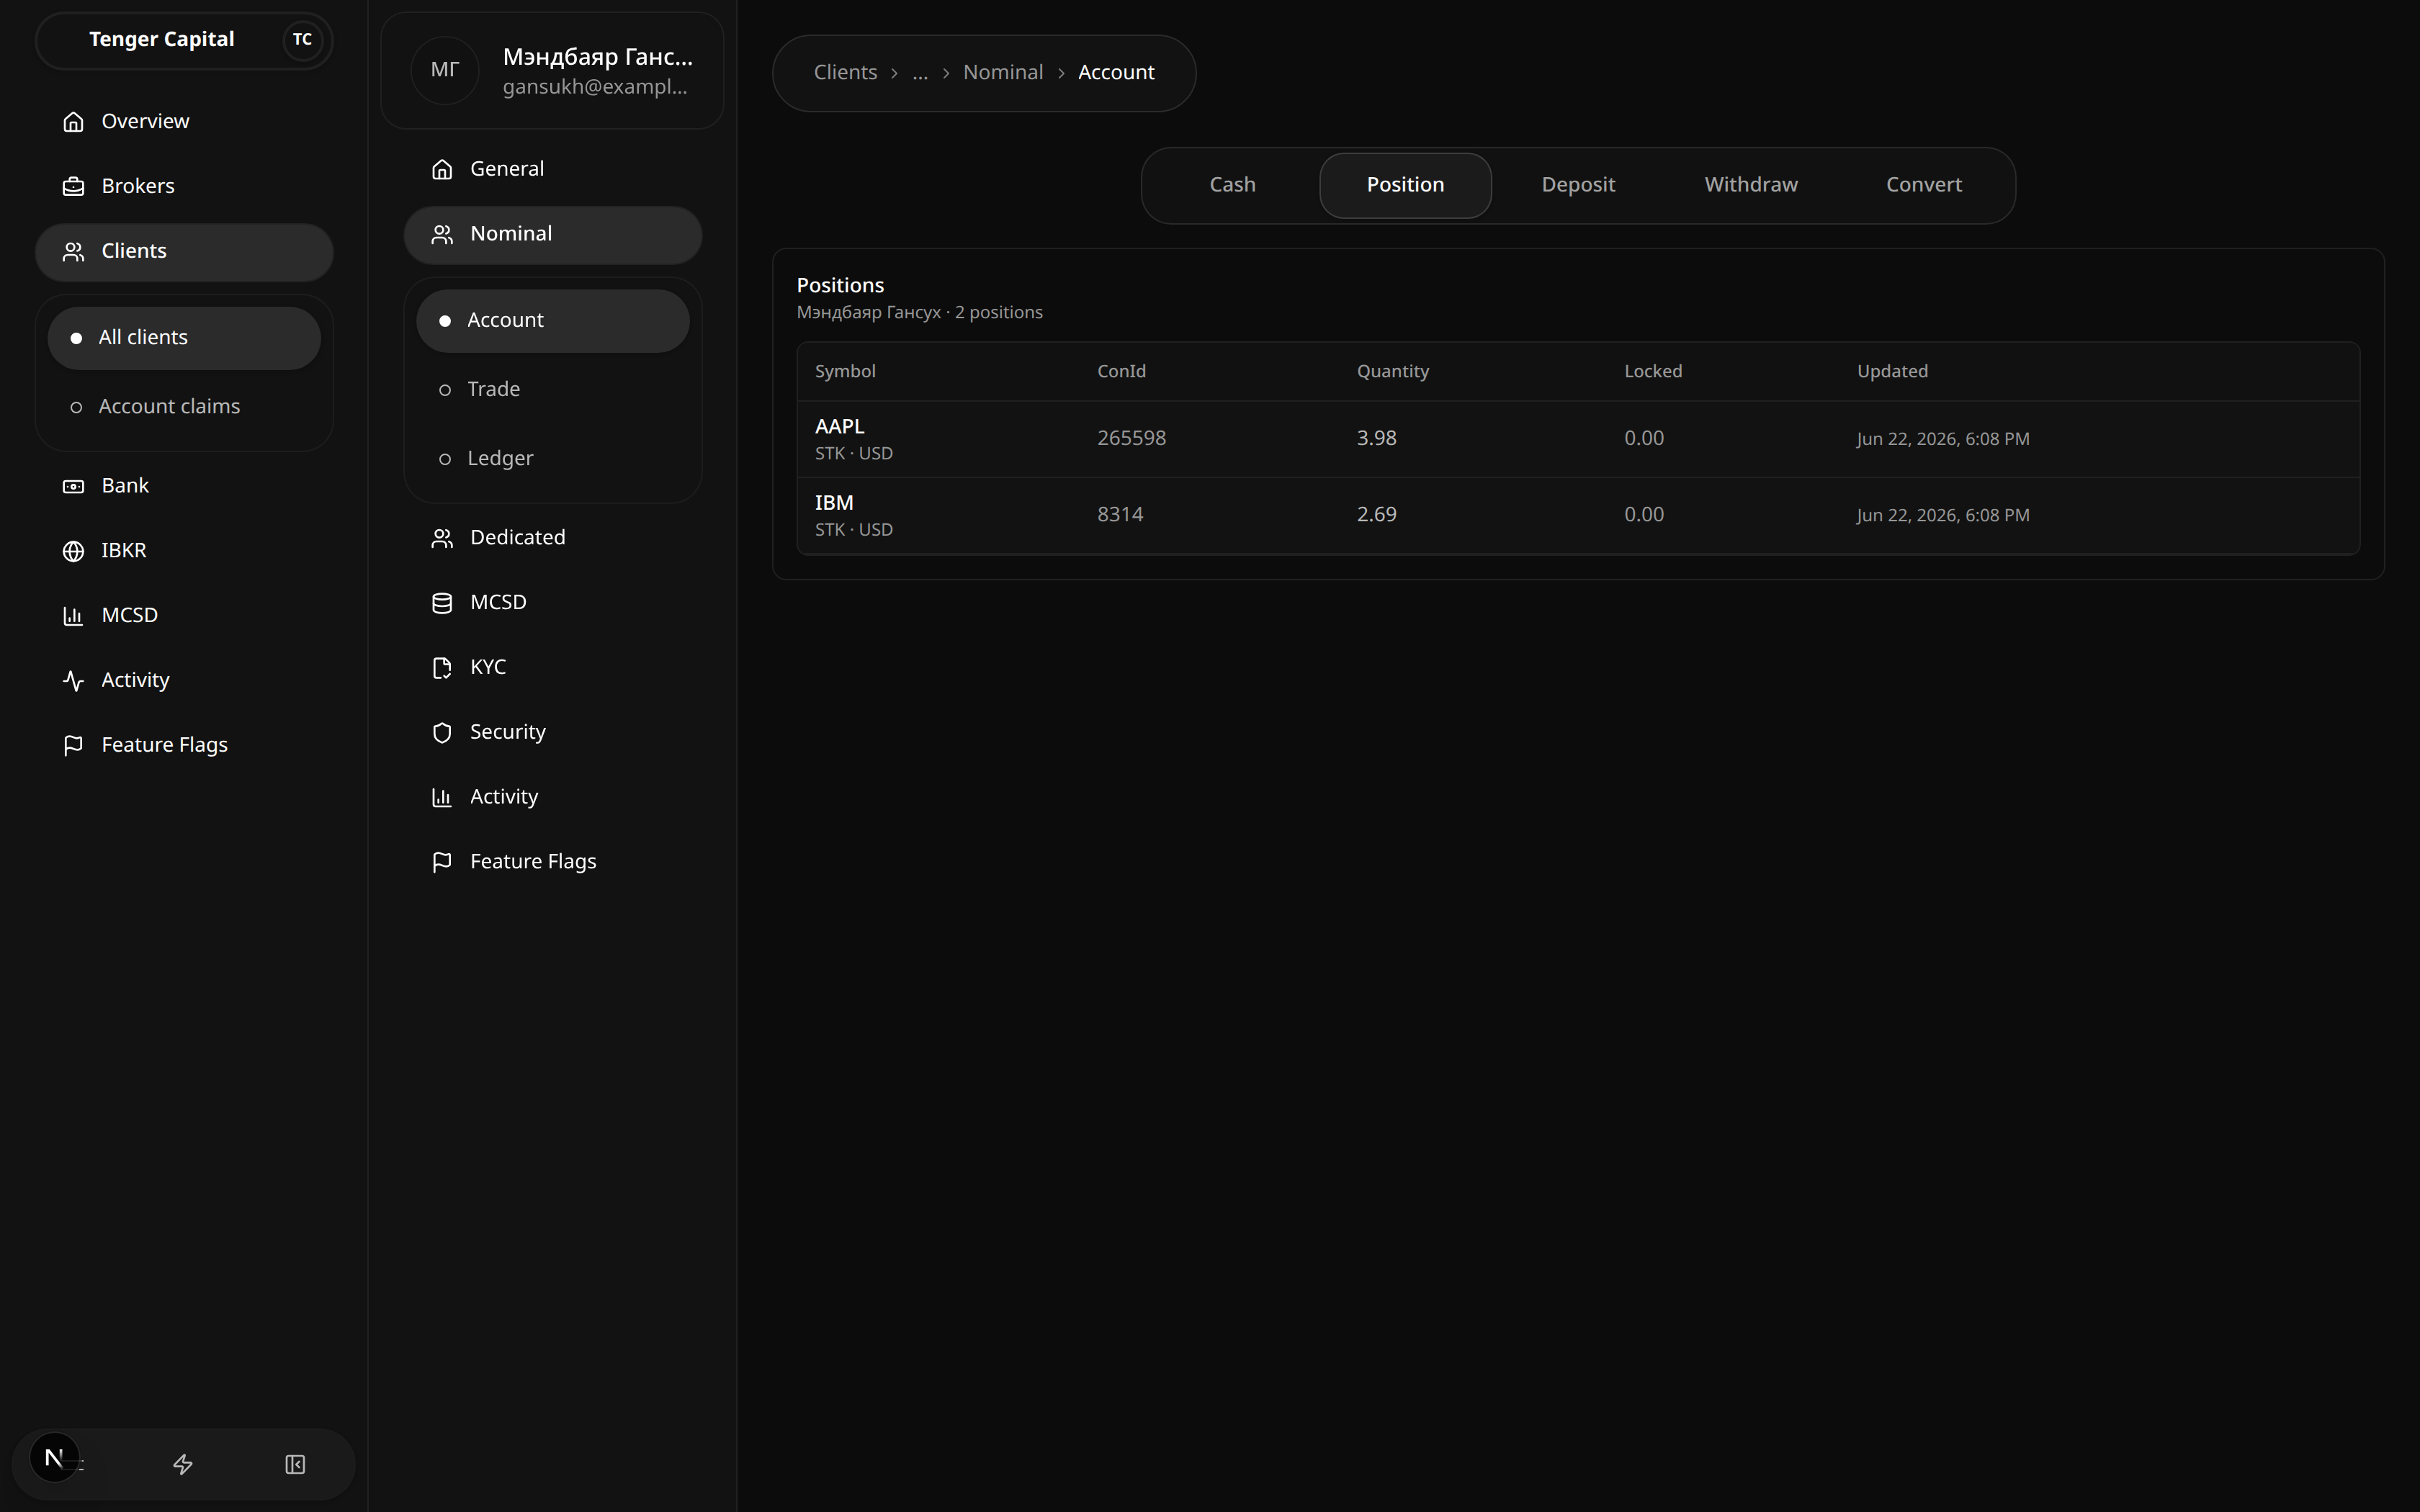
What it does
A tab within a client's Nominal → Account section. It lists the securities the client holds on their nominal account.
How to use
Read the table:
- Symbol — the security's ticker, with its market and currency.
- Contract ID — the broker's identifier for that security.
- Quantity — how many units the client holds.
- Locked — the portion reserved (for example against a pending sell).
- Updated — when the position last changed.
Notes
- A security only appears once the client actually holds it, so an empty table just means no holdings yet.
Nominal · Account · Deposit
/clients/view?menu=nominal-account&tab=Deposit

What it does
A tab within a client's Nominal → Account section for recording money coming into the client's nominal account, and reviewing past deposit requests.
How to use
- Under Create Deposit Request, enter an Amount and choose the currency.
- Add an optional note if useful.
- Click Create Deposit.
- Past requests appear below under History, with their amount, channel, note and status. The Total of requests is shown top right.
Notes
- "No results." under History simply means no deposits have been recorded for this client yet.
- This records the deposit on the client's account; it doesn't itself move money at the bank.
Nominal · Account · Withdraw
/clients/view?menu=nominal-account&tab=Withdraw
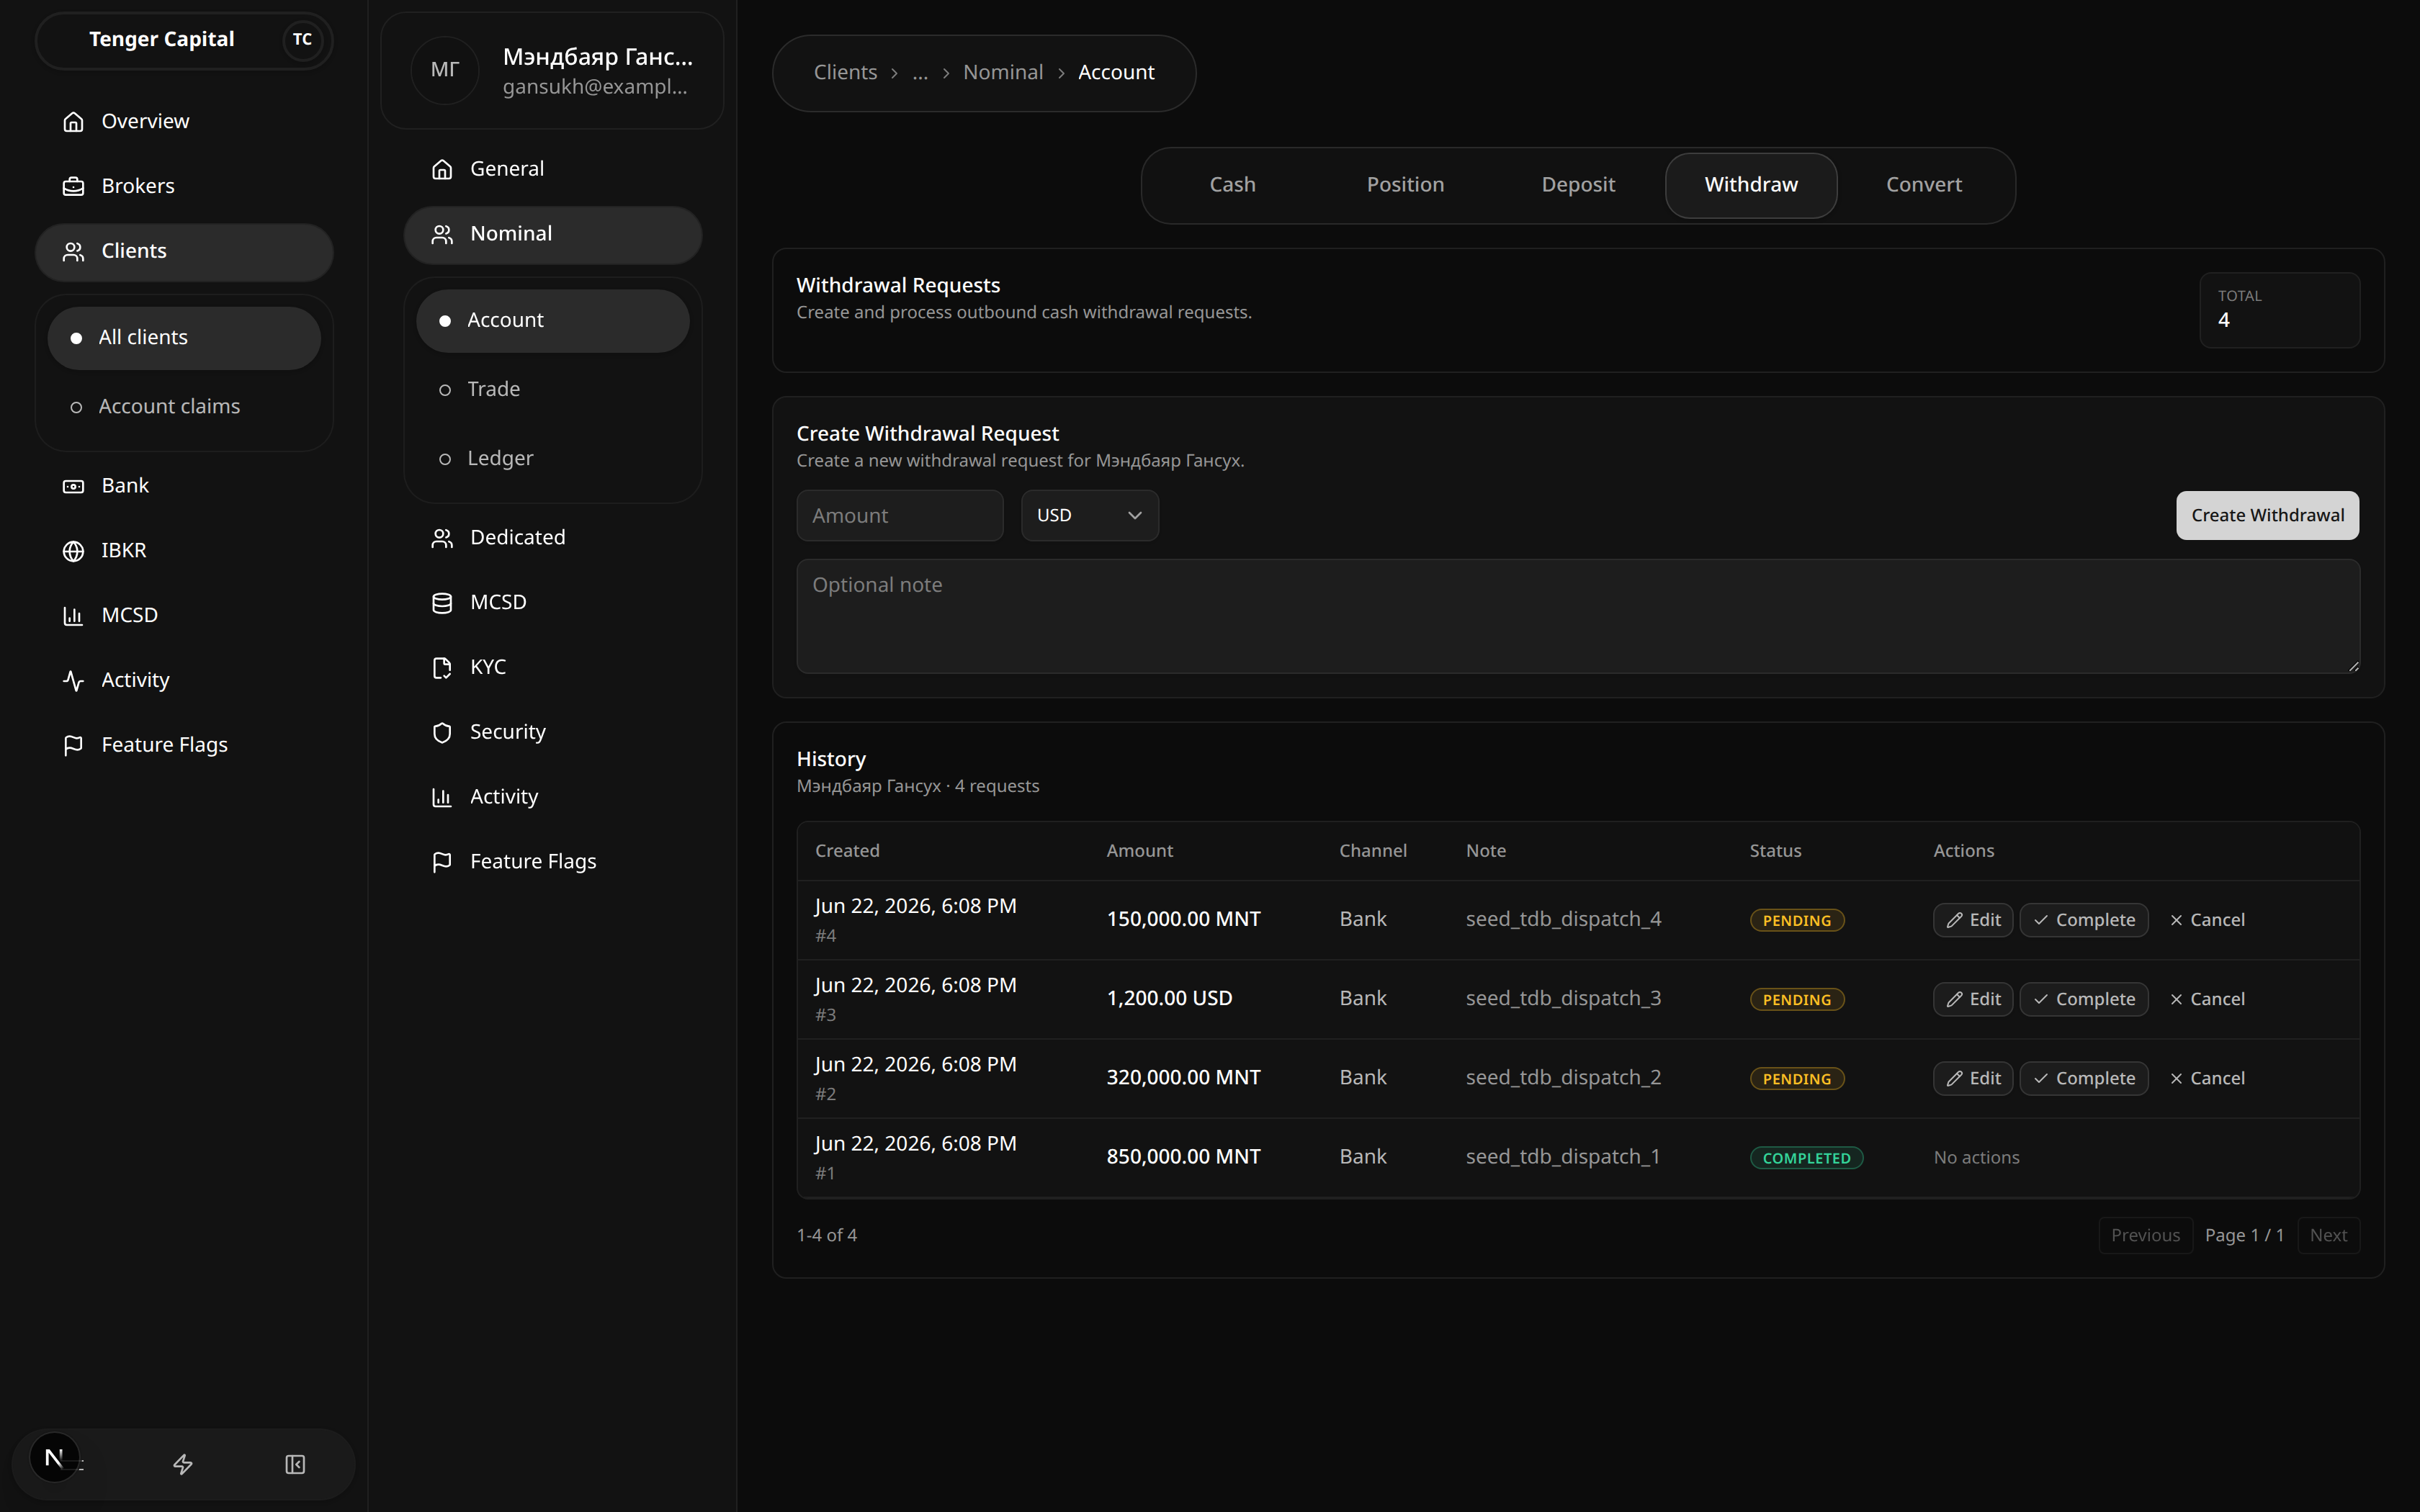
What it does
A tab within a client's Nominal → Account section for recording money paid out of the client's nominal account, and managing existing withdrawal requests.
How to use
- Under Create Withdrawal Request, enter an Amount and currency (with an optional note), then Create Withdrawal.
- Existing requests appear under History with their amount, channel, note and status (for example Pending or Completed).
- On a pending request you can Edit it, mark it Complete, or Cancel it from the Actions column. Completed requests have no further actions.
Notes
- The Total count of requests is shown top right.
- Statuses reflect where the payout is in its lifecycle — a completed request has already been paid out.
Nominal · Account · Convert
/clients/view?menu=nominal-account&tab=Convert
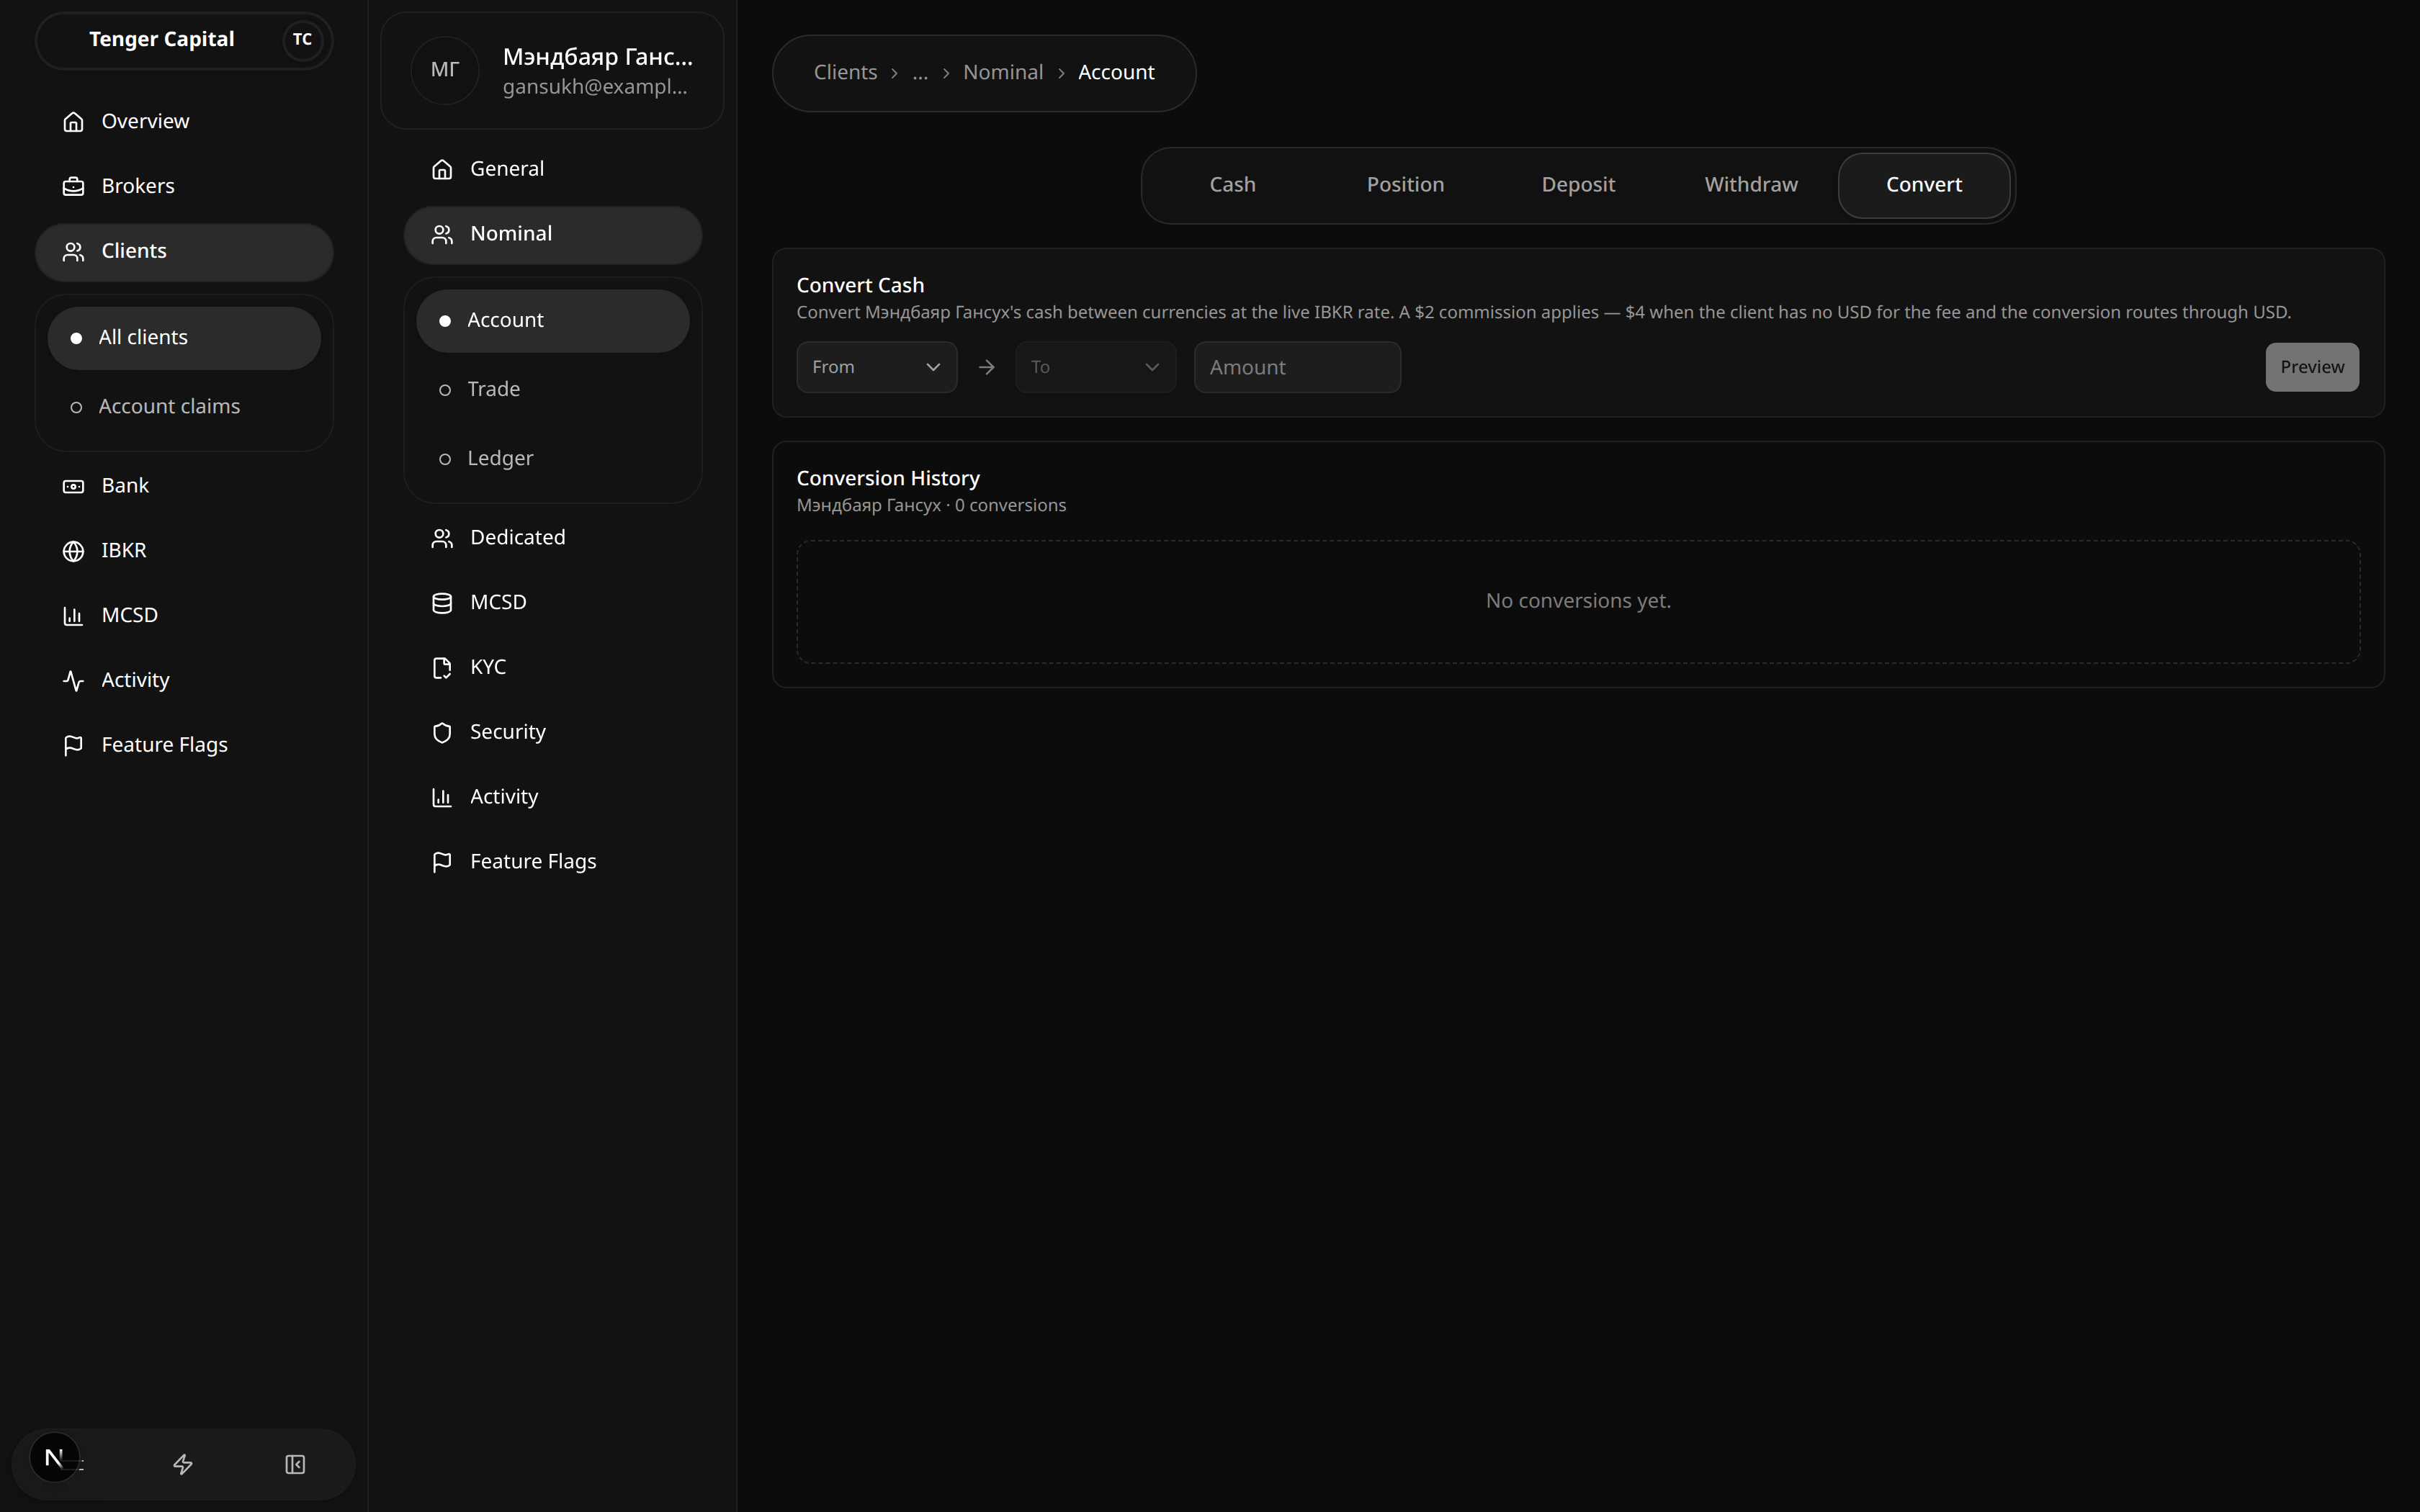
What it does
A tab within a client's Nominal → Account section for converting the client's cash between currencies (for example MNT to USD), and reviewing past conversions.
How to use
- Choose the From and To currencies and enter an Amount.
- Click Preview to see the resulting amount at the current rate before anything is applied.
- Past conversions are listed below under Conversion History.
Notes
- Conversions use the live exchange rate, and a commission applies — the page notes the commission (for example a small fee added when the client doesn't already hold the target currency).
- "No conversions yet." simply means none have been done for this client.
Nominal · Trade · Order Requests
/clients/view?menu=nominal-trade&tab=Order Requests

What it does
A tab within a client's Nominal → Trade section listing the orders placed for this client on their nominal account, and letting you place new ones.
How to use
- Read the table: Contract, Side (buy/sell), Quantity, Cash Amount, Filled / Target, Status, IBKR Status and Actions.
- Click Create order request (top right) to place a new order on the client's behalf — see below.
Creating an order request
Clicking Create order request opens the order form inline:
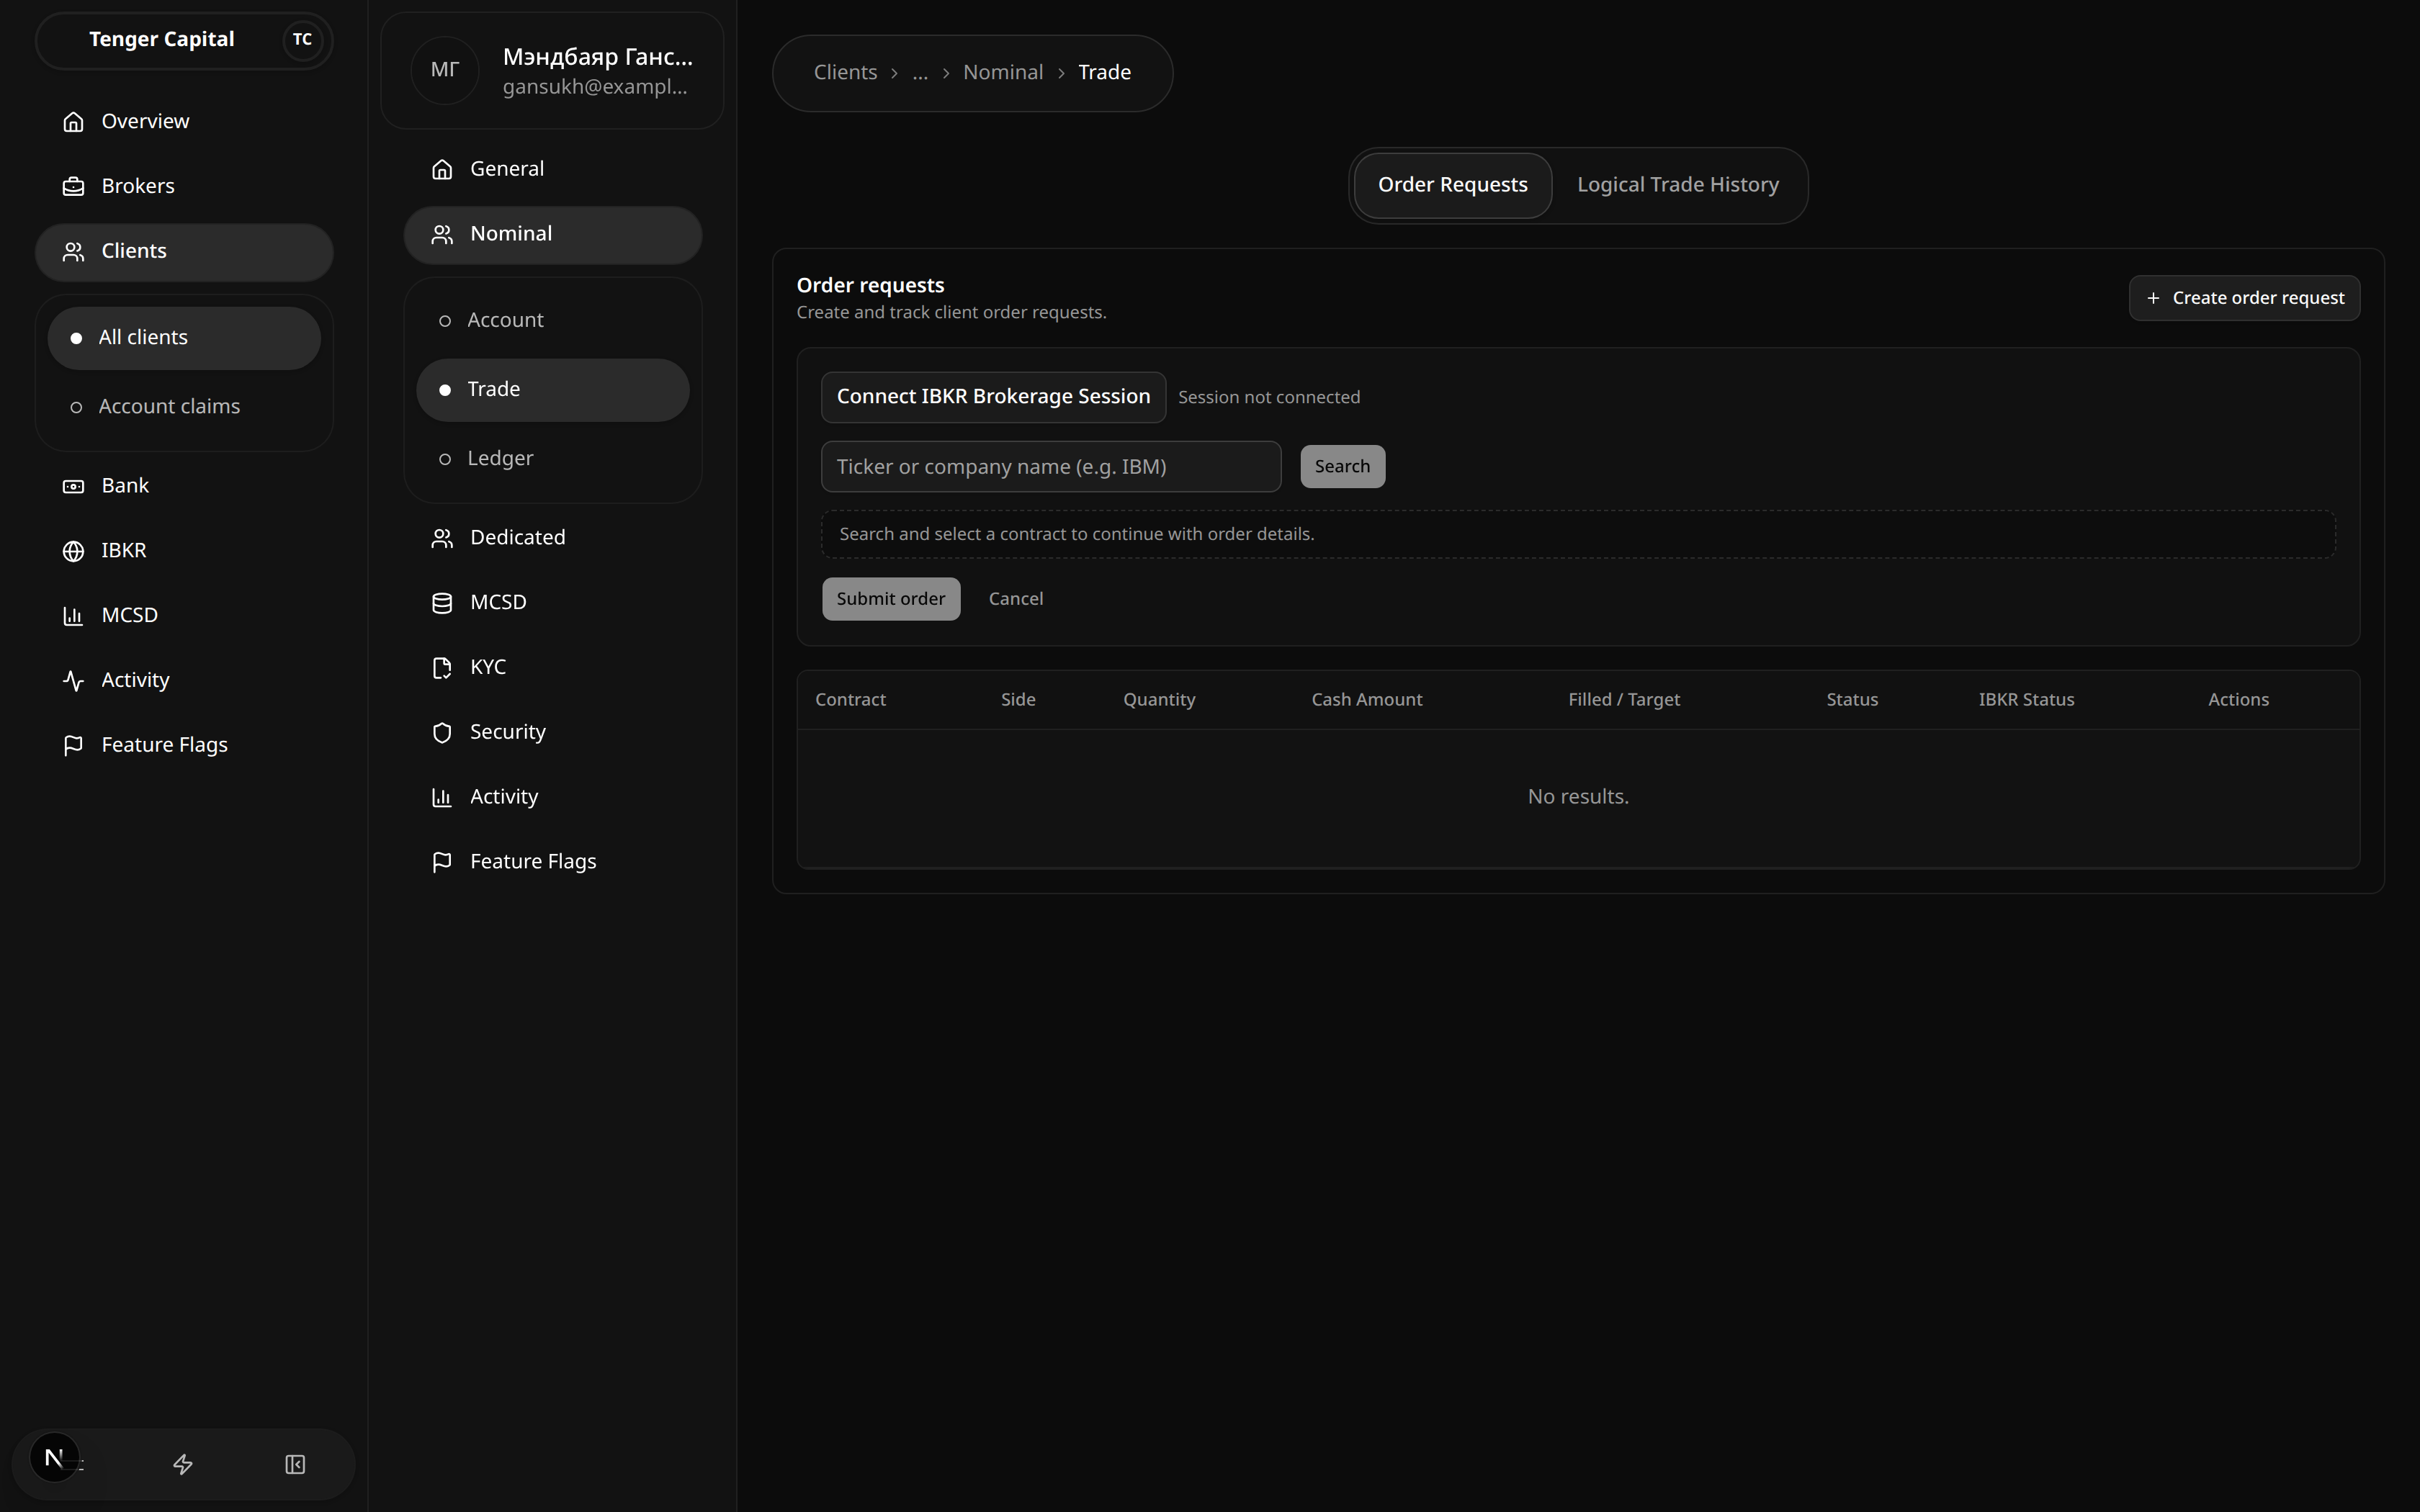
- Connect IBKR Brokerage Session. The form starts with the session disconnected ("Session not connected") — connect it first; you can't search contracts until it's ready.
- Find the security. Type a ticker or company name (for example
IBM) and Search, then pick the contract you want from the results. - Fill in the order. Once a contract is selected, the order fields appear:
- Side — BUY or SELL.
- Order type — Market or Limit.
- TIF (time in force) and RTH only / Allow outsideRTH.
- For a market buy, enter a Cash Amount; for a sell or limit order, enter a Quantity (fractional where the security allows it).
- For a limit order, also enter a Limit Price. The client's available cash is shown to help size the order.
- Submit order. The new request appears in the table below. Cancel backs out without creating anything.
Notes
- "No results." means the client has no orders yet.
- IBKR Status reflects where the order currently sits with the broker, which can briefly lag the platform's own status.
- After submitting, IBKR sometimes asks for confirmation. Such orders show under "IBKR replies needed", where you Confirm or reject the prompt to let order placement continue.
- Completed trades resulting from these orders appear on the Logical Trade History tab.
Nominal · Trade · Logical Trade History
/clients/view?menu=nominal-trade&tab=Logical Trade History
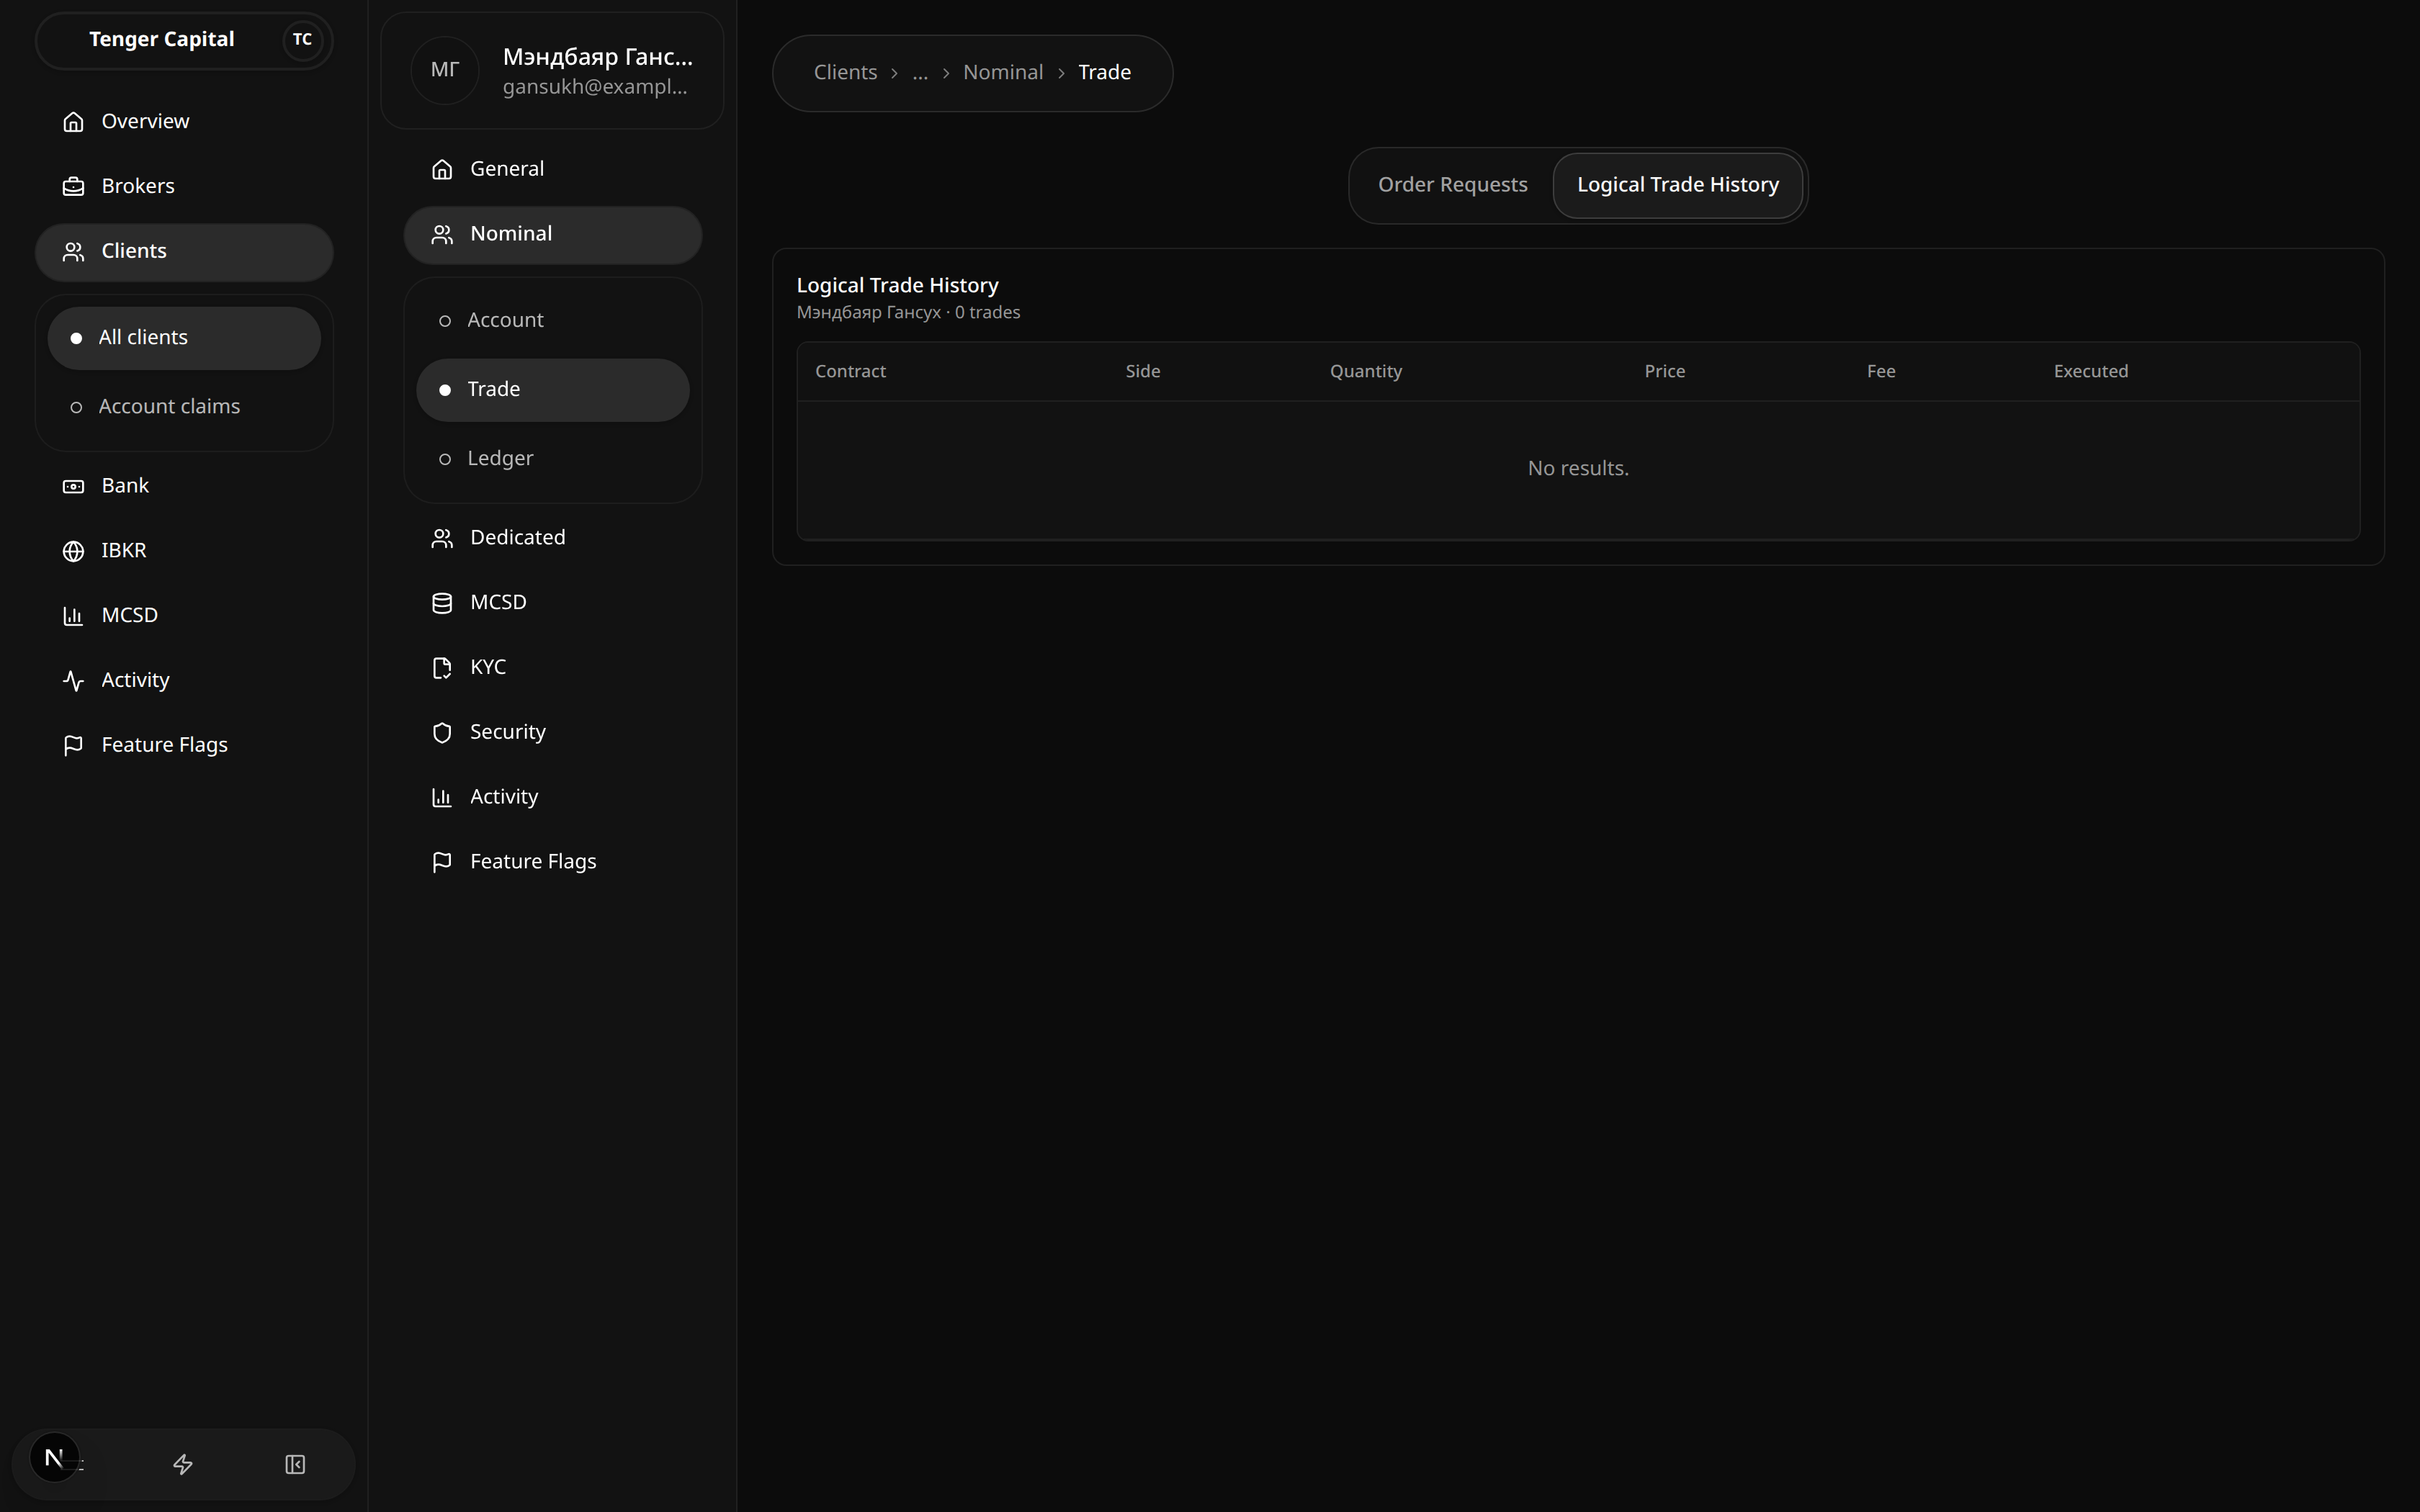
What it does
A tab within a client's Nominal → Trade section showing the client's completed trades — the fills that resulted from their orders, grouped the way the platform records them.
How to use
Read the table: Contract, Side, Quantity, Price, Fee and Executed (when the trade went through). It's a read-only history.
Notes
- "No results." means the client has no completed trades yet.
- Orders that haven't filled yet live on the Order Requests tab, not here.
Nominal · Ledger
/clients/view?menu=nominal-ledger
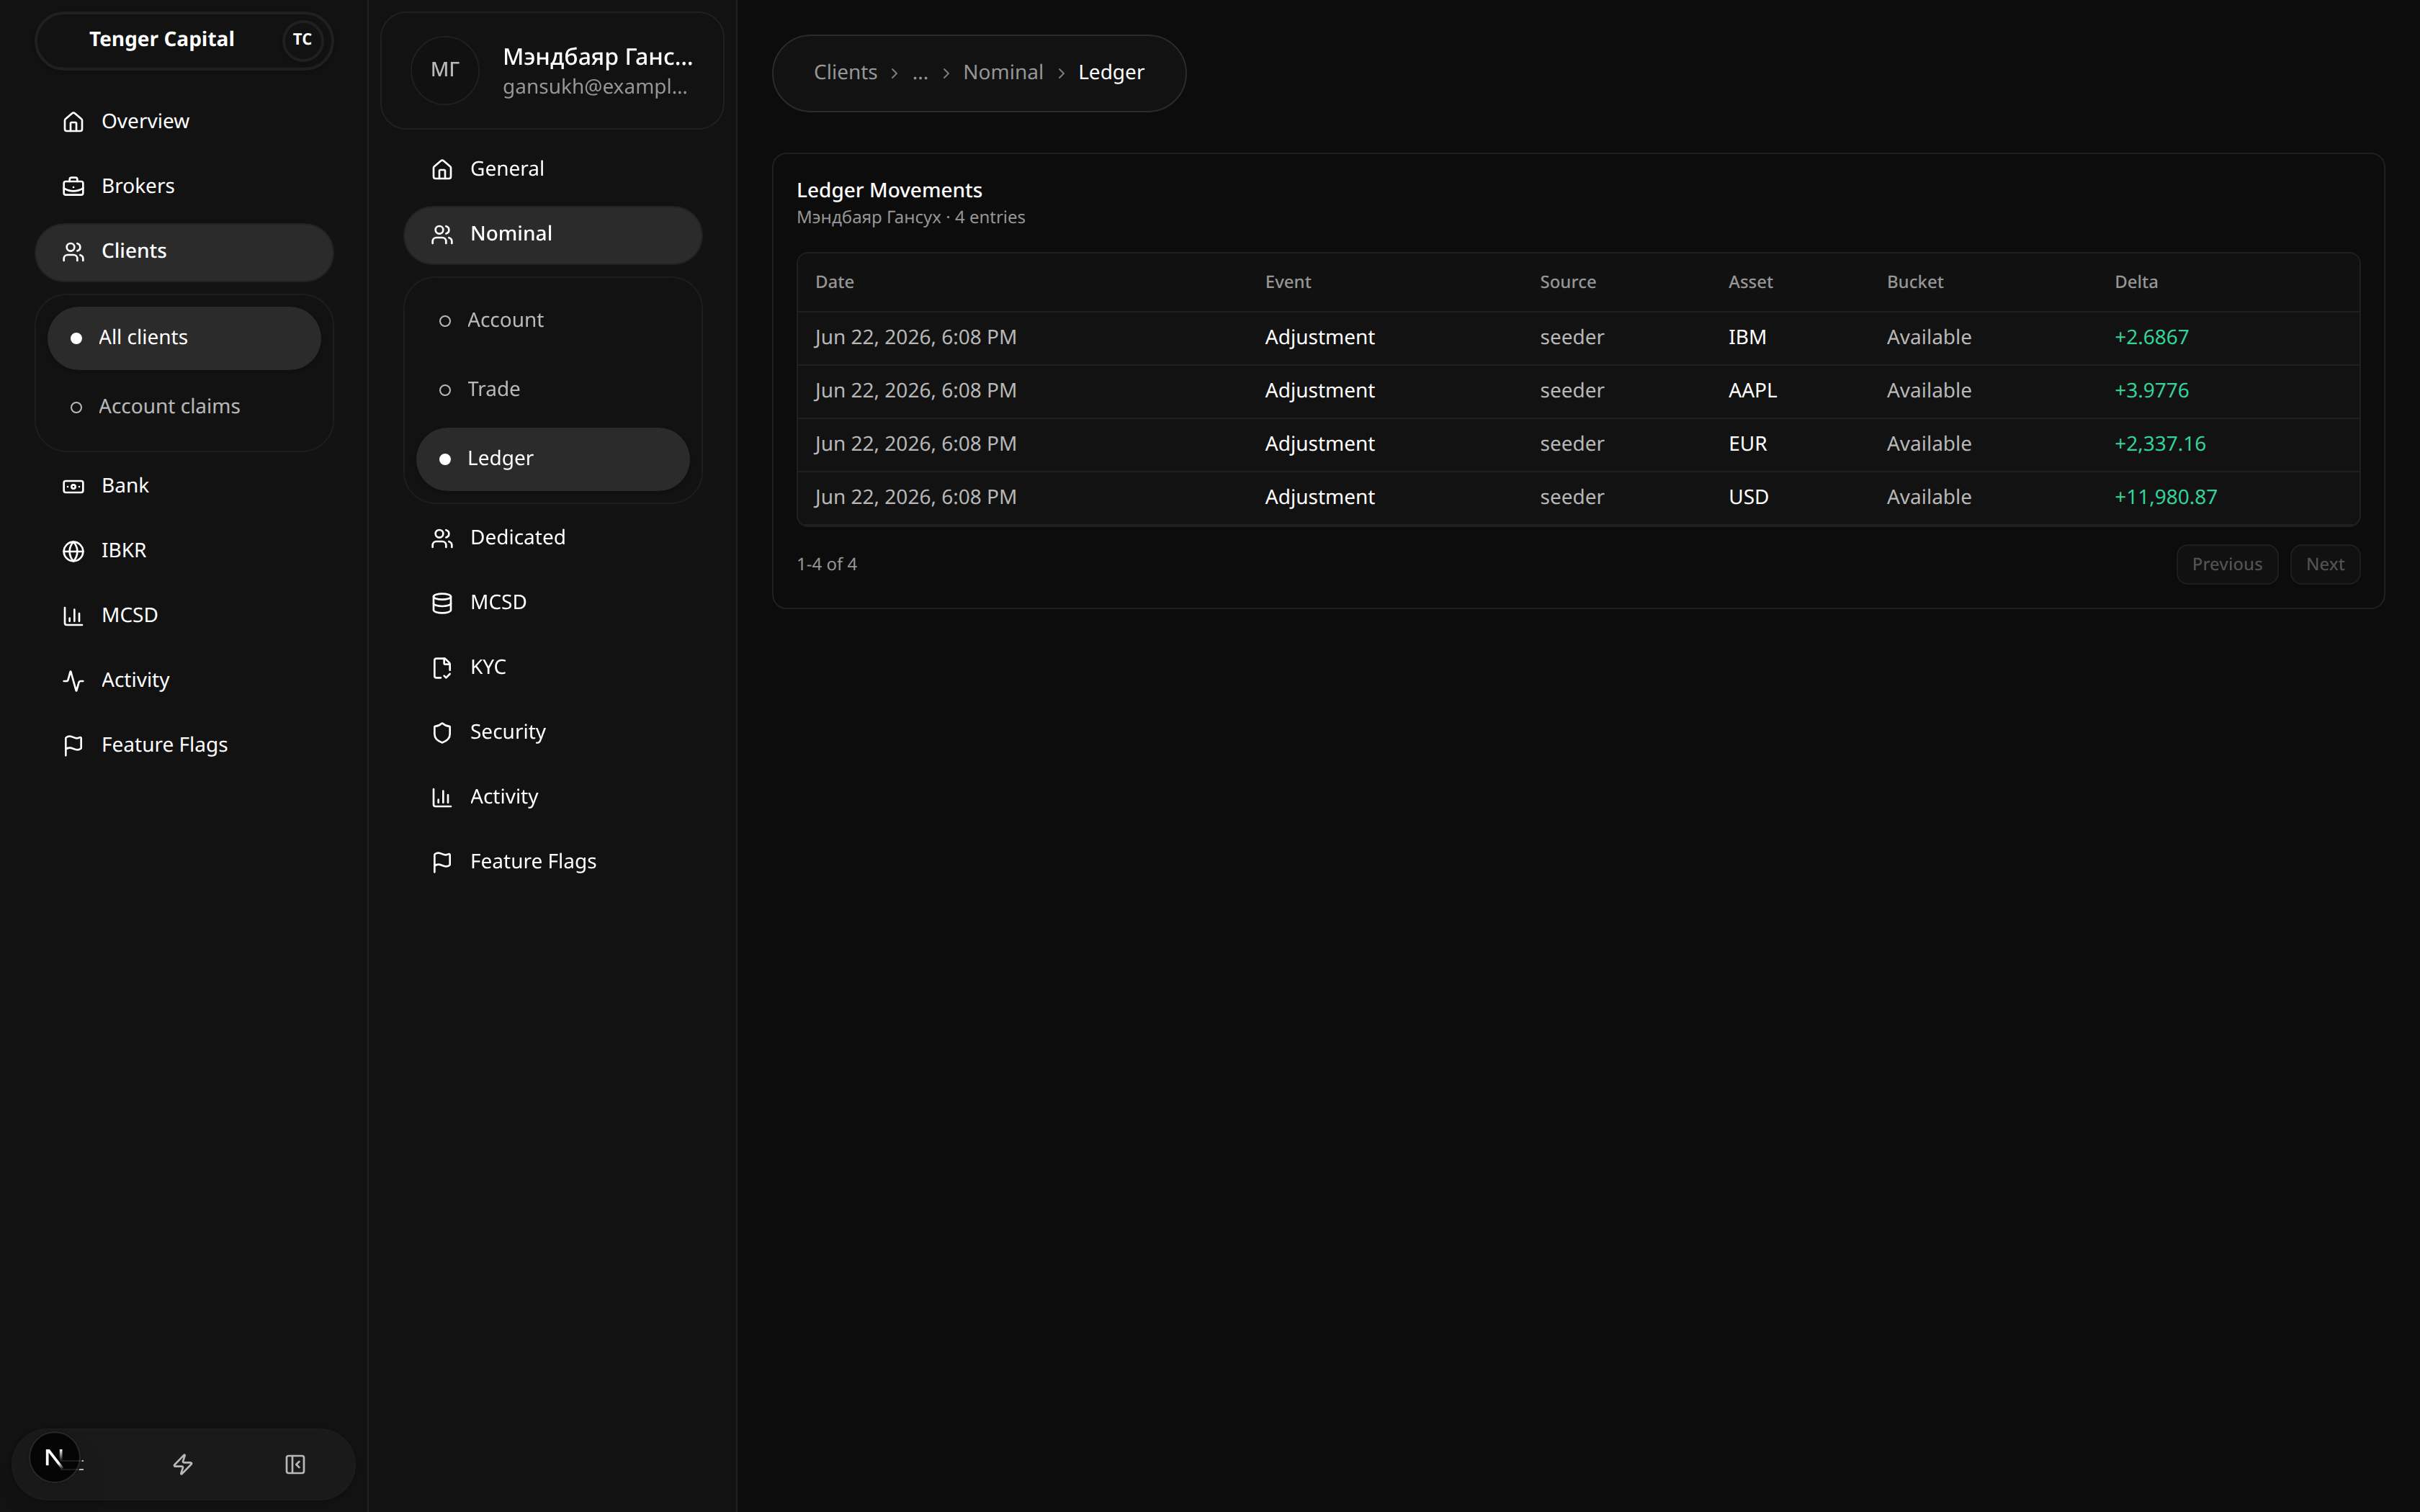
What it does
A section of an individual client's detail page showing the full movement history of the client's nominal account — every change to their cash and positions, in order. Open it from a client's left menu under Nominal → Ledger.
How to use
Read the Ledger Movements table:
- Date — when the movement happened.
- Event — the kind of movement (for example an adjustment or a trade).
- Source — what caused it.
- Asset — the currency or security affected.
- Bucket — which part of the balance moved (for example available).
- Delta — the amount of the change; positive adds, negative subtracts.
Use Previous / Next to page through older movements.
Notes
- This is the underlying record the Cash and Position views are built from, so it always reconciles with them.
- Movements are history — they are never edited or removed, only added to.
Dedicated · Trade
/clients/view?menu=dedicated-trade
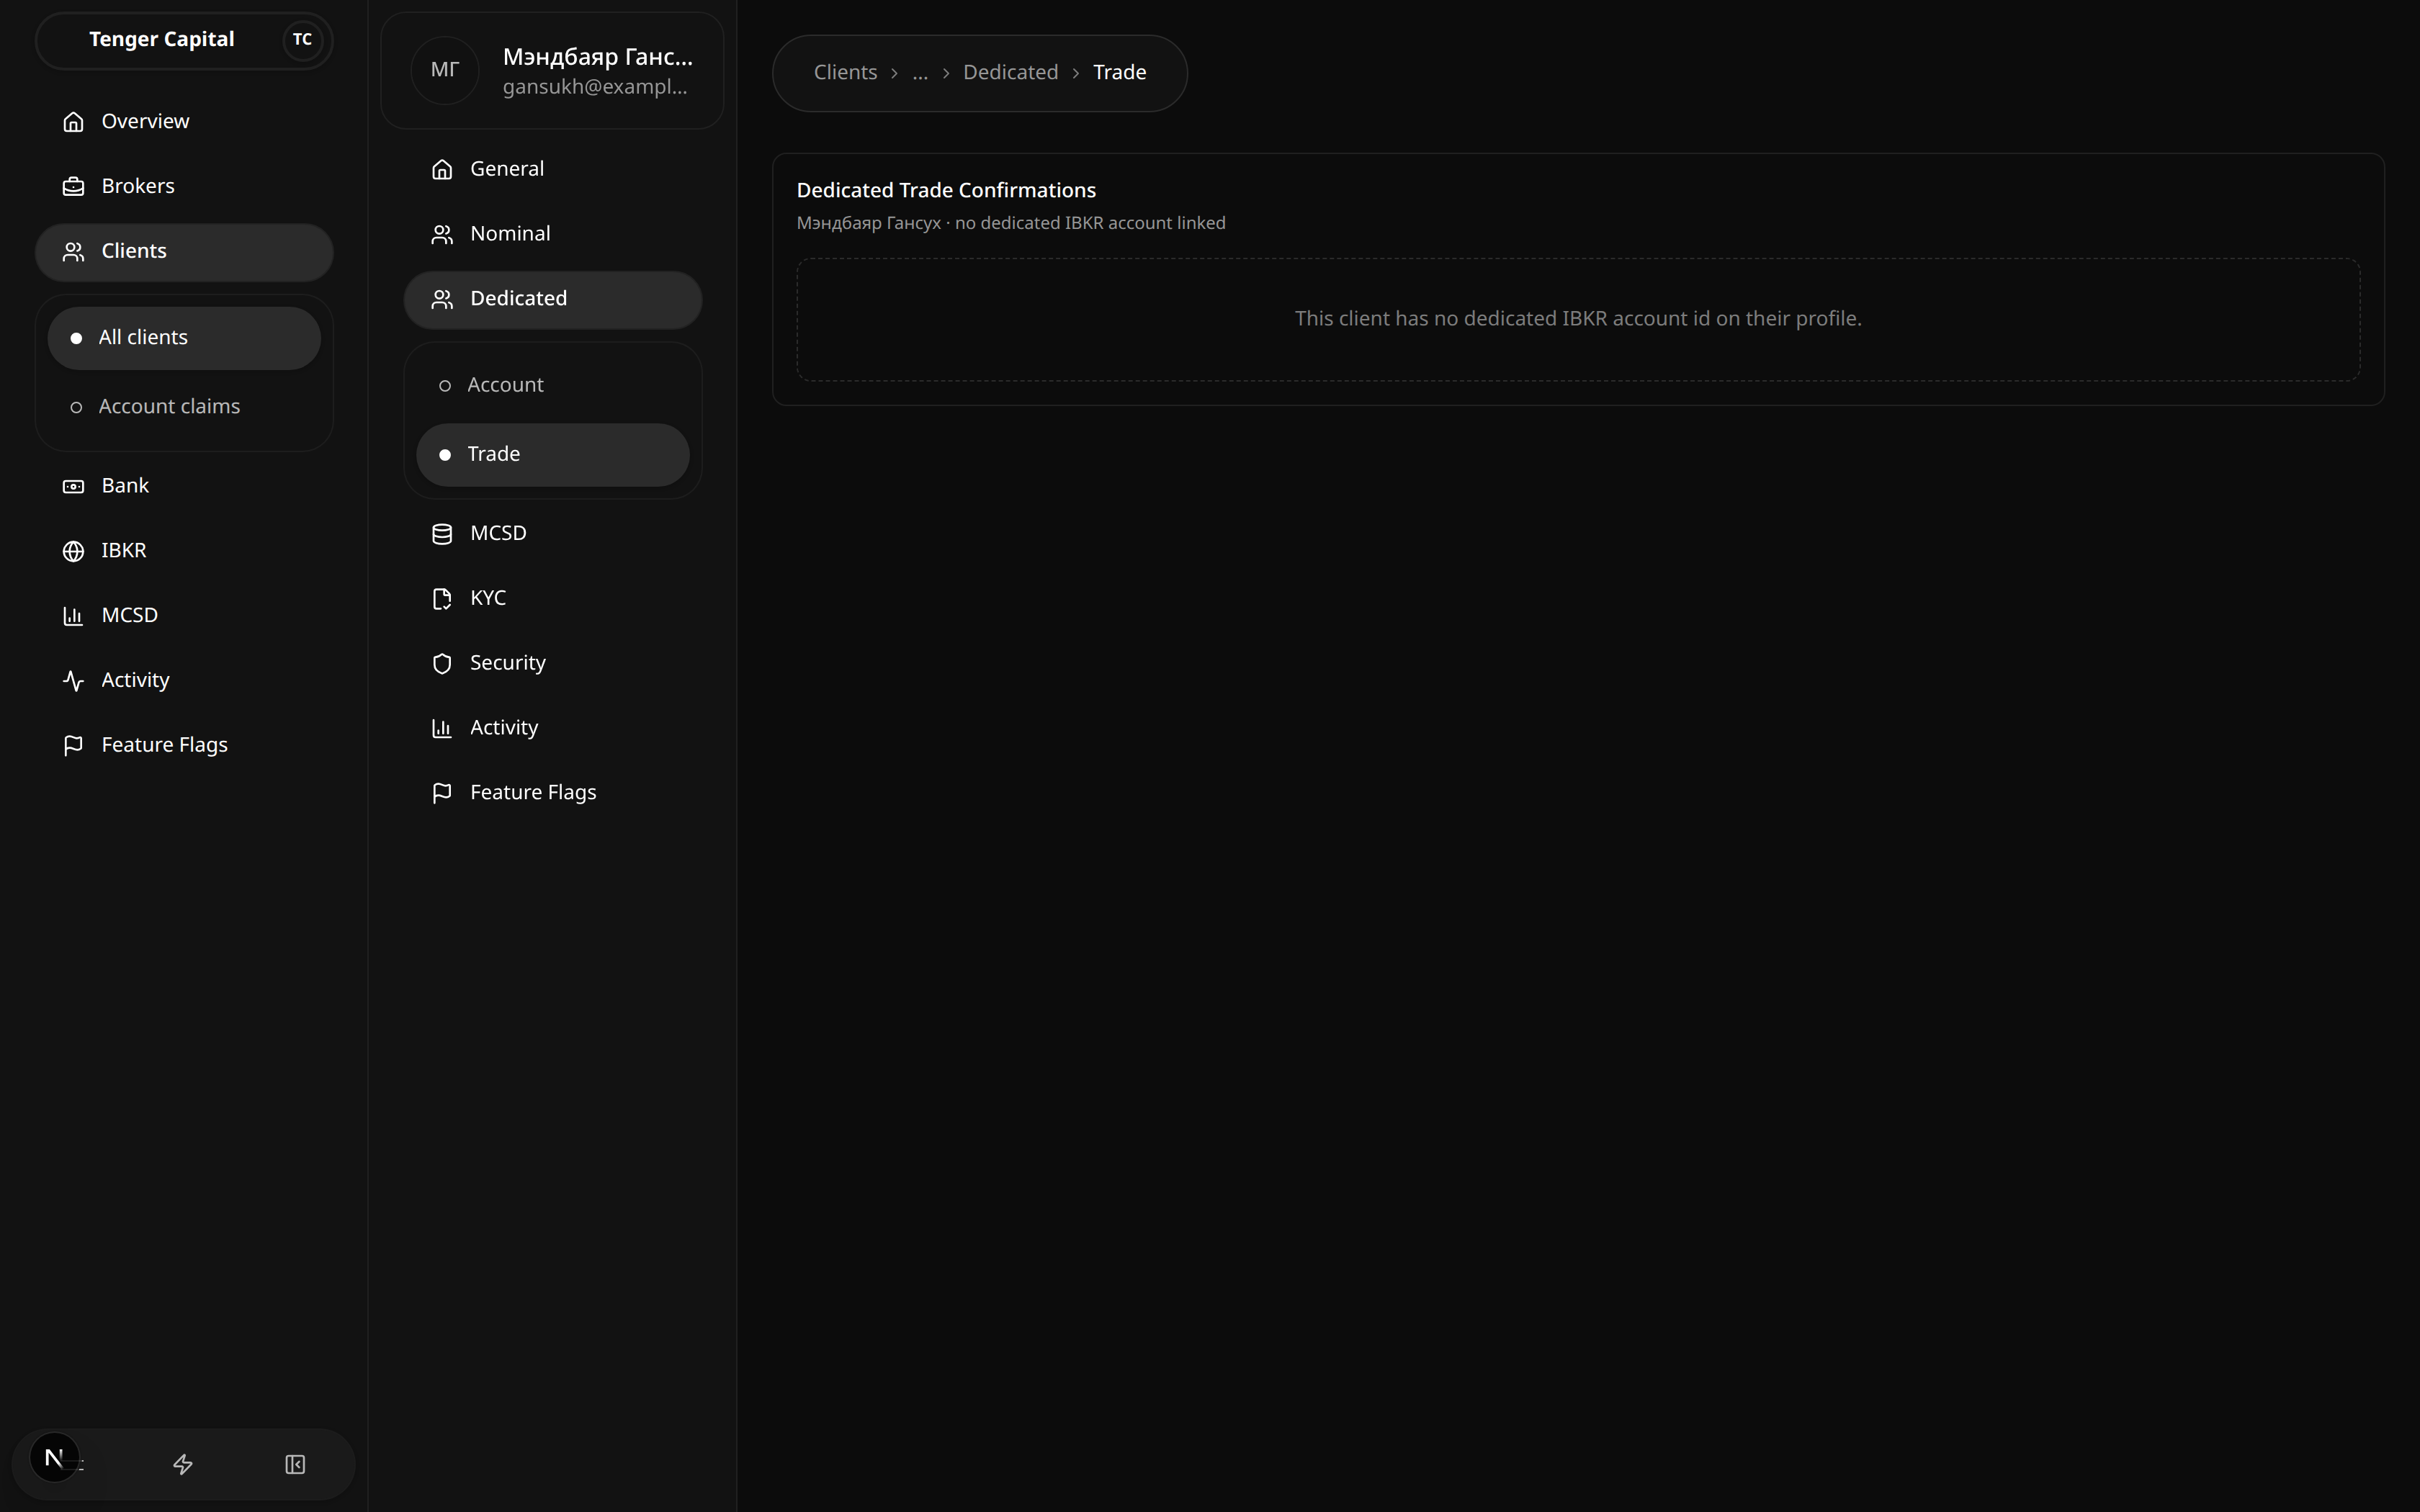
What it does
A section of an individual client's detail page that shows trade confirmations for the client's dedicated IBKR account — the separate account some clients hold directly with Interactive Brokers. Open it from a client's left menu under Dedicated → Trade.
How to use
If the client has a dedicated IBKR account, this lists their trade confirmations. There is nothing to set up here — it's a record of what came back from the broker.
Notes
- Only clients who have a dedicated IBKR account see data here. For everyone else the page reads "This client has no dedicated IBKR account id on their profile." — that's expected, not an error.
MCSD · Account
/clients/view?menu=mcsd-account
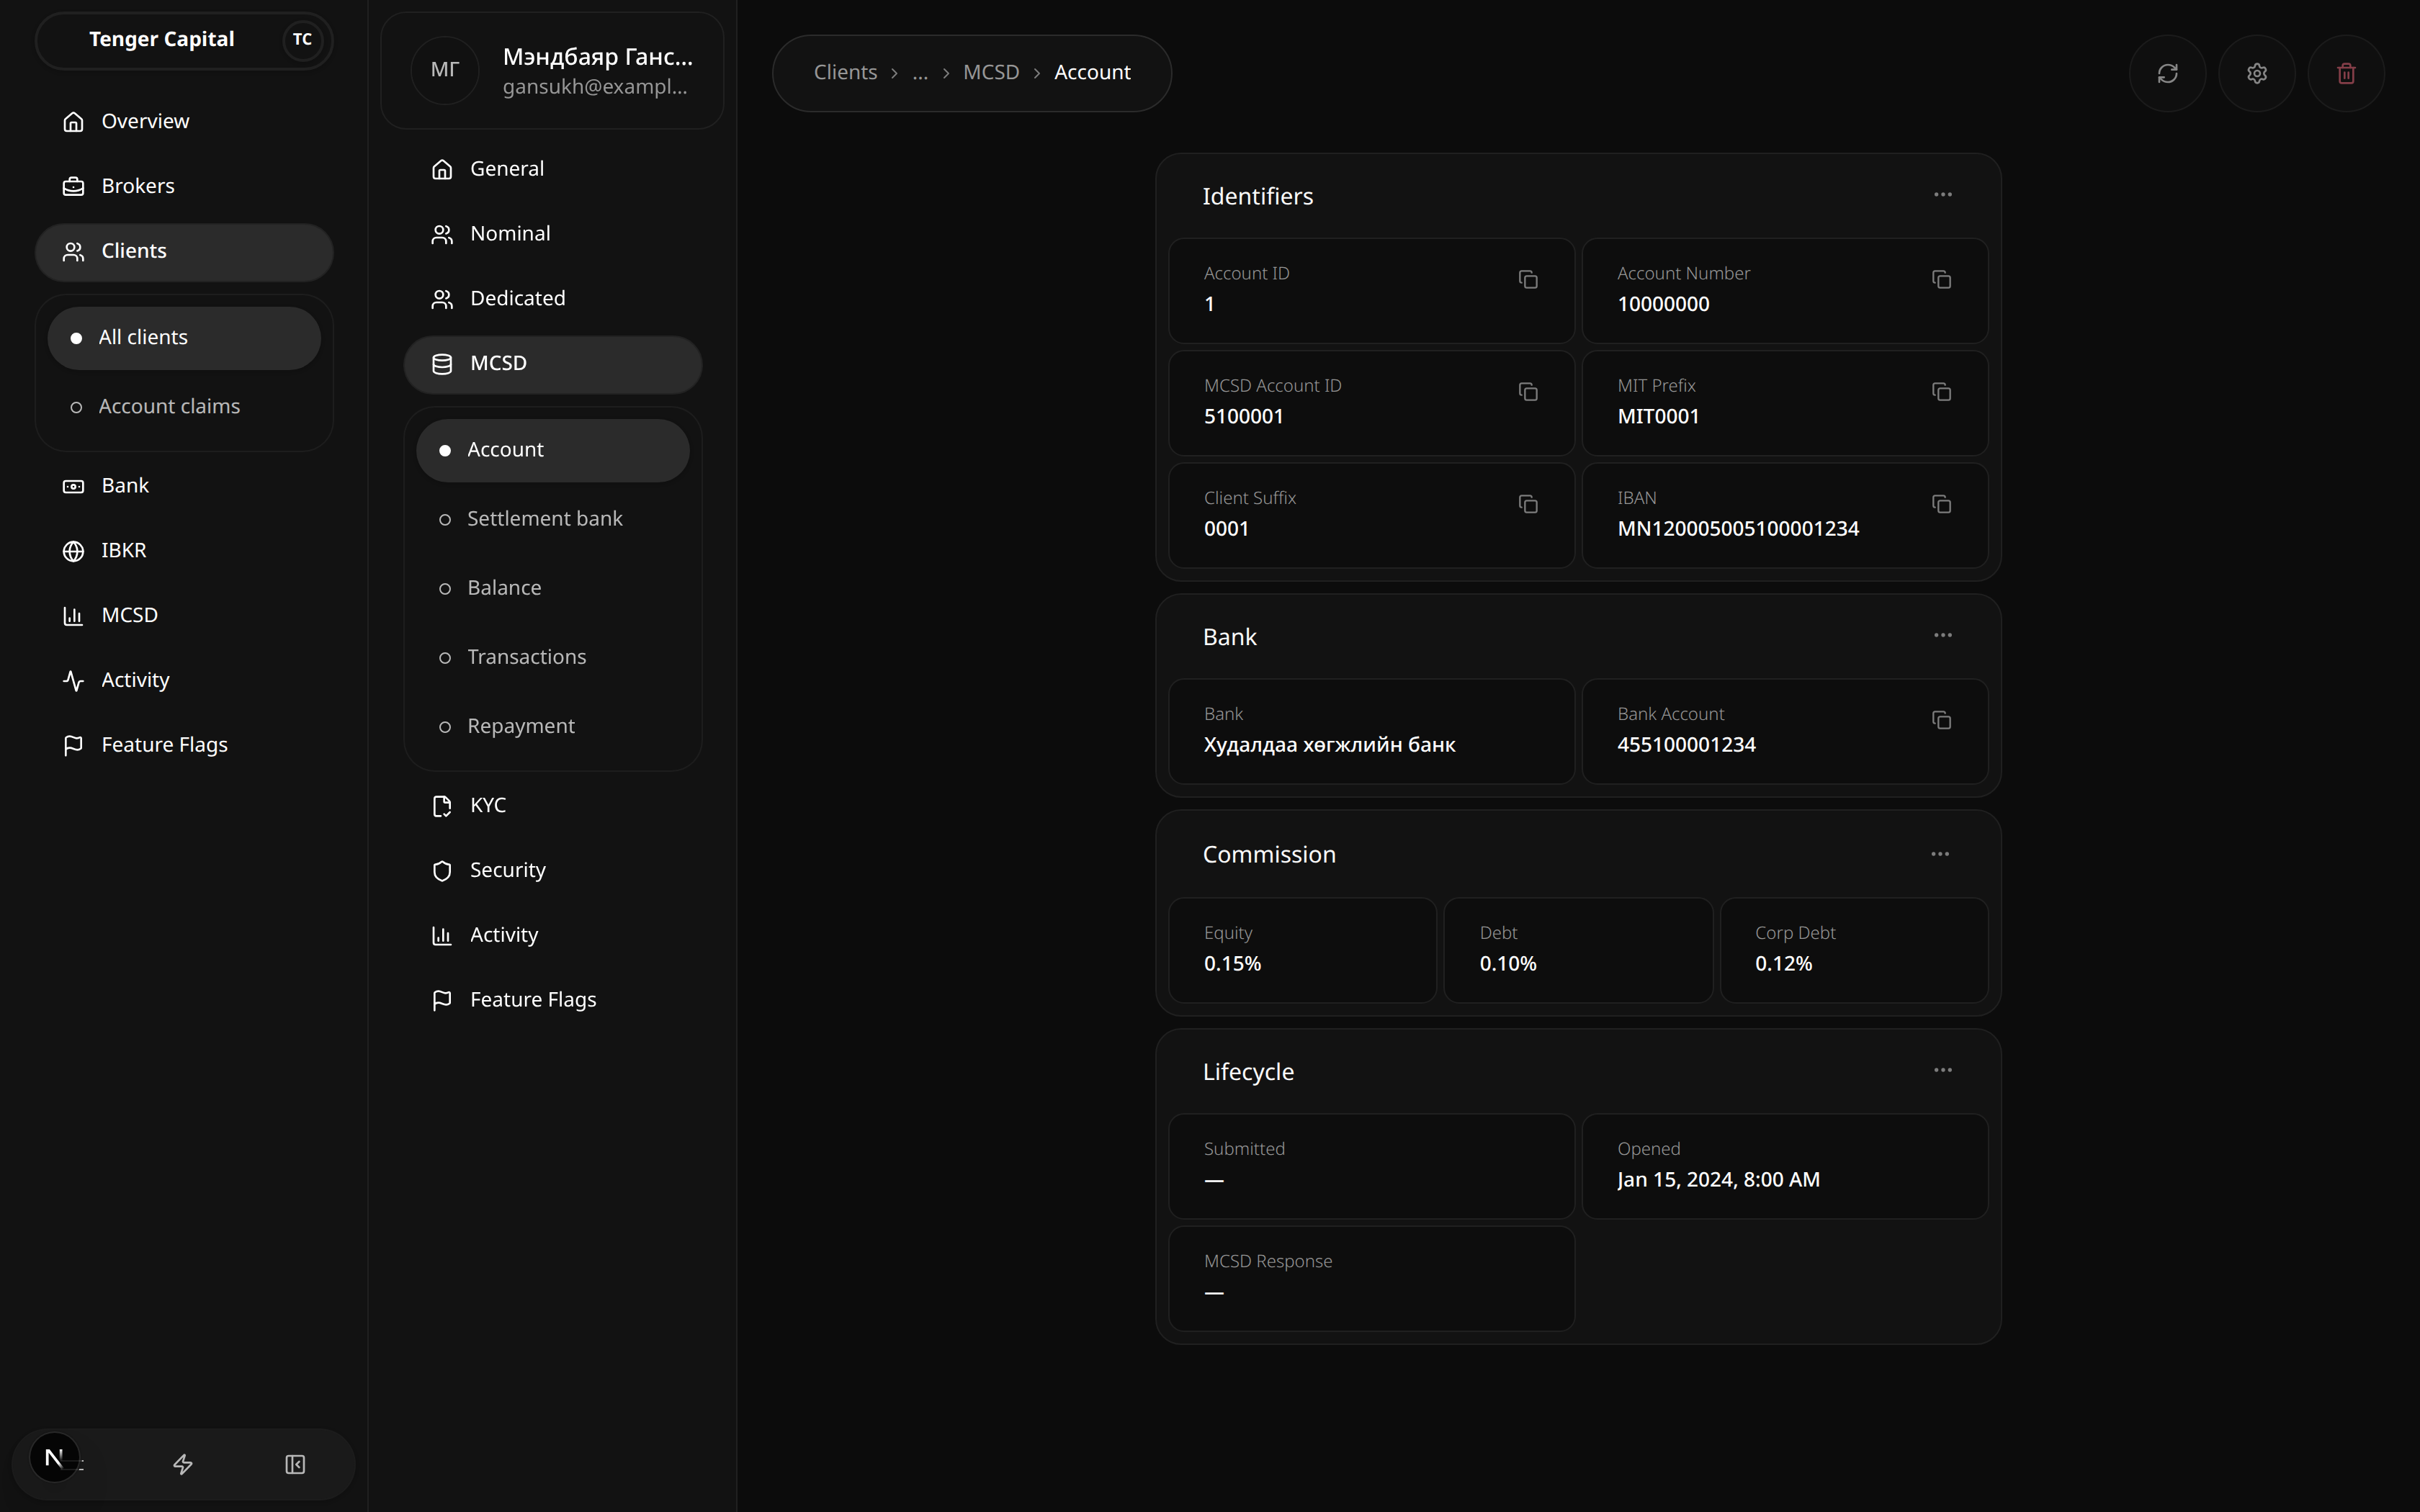
What it does
A section of an individual client's detail page showing the client's MCSD account — their securities-depository account for the domestic market. Open it from a client's left menu under MCSD → Account.
How to use
Read the account details, grouped into cards:
- Identifiers — Account ID, account number, MCSD account ID, MIT prefix, client suffix and IBAN. Each value has a copy button.
- Bank — the settlement bank and bank account tied to this MCSD account.
- Commission — the client's commission rates (equity, debt, corporate debt).
- Lifecycle — when the account was submitted and opened.
The buttons at the top right let you refresh the account from MCSD, open its settings, or delete it.
Notes
- A dash (—) means no value has been recorded for that field yet.
- The other MCSD menu items (Settlement bank, Balance, Transactions, Repayment) are different views of this same account.
MCSD · Settlement bank
/clients/view?menu=mcsd-settlement-bank
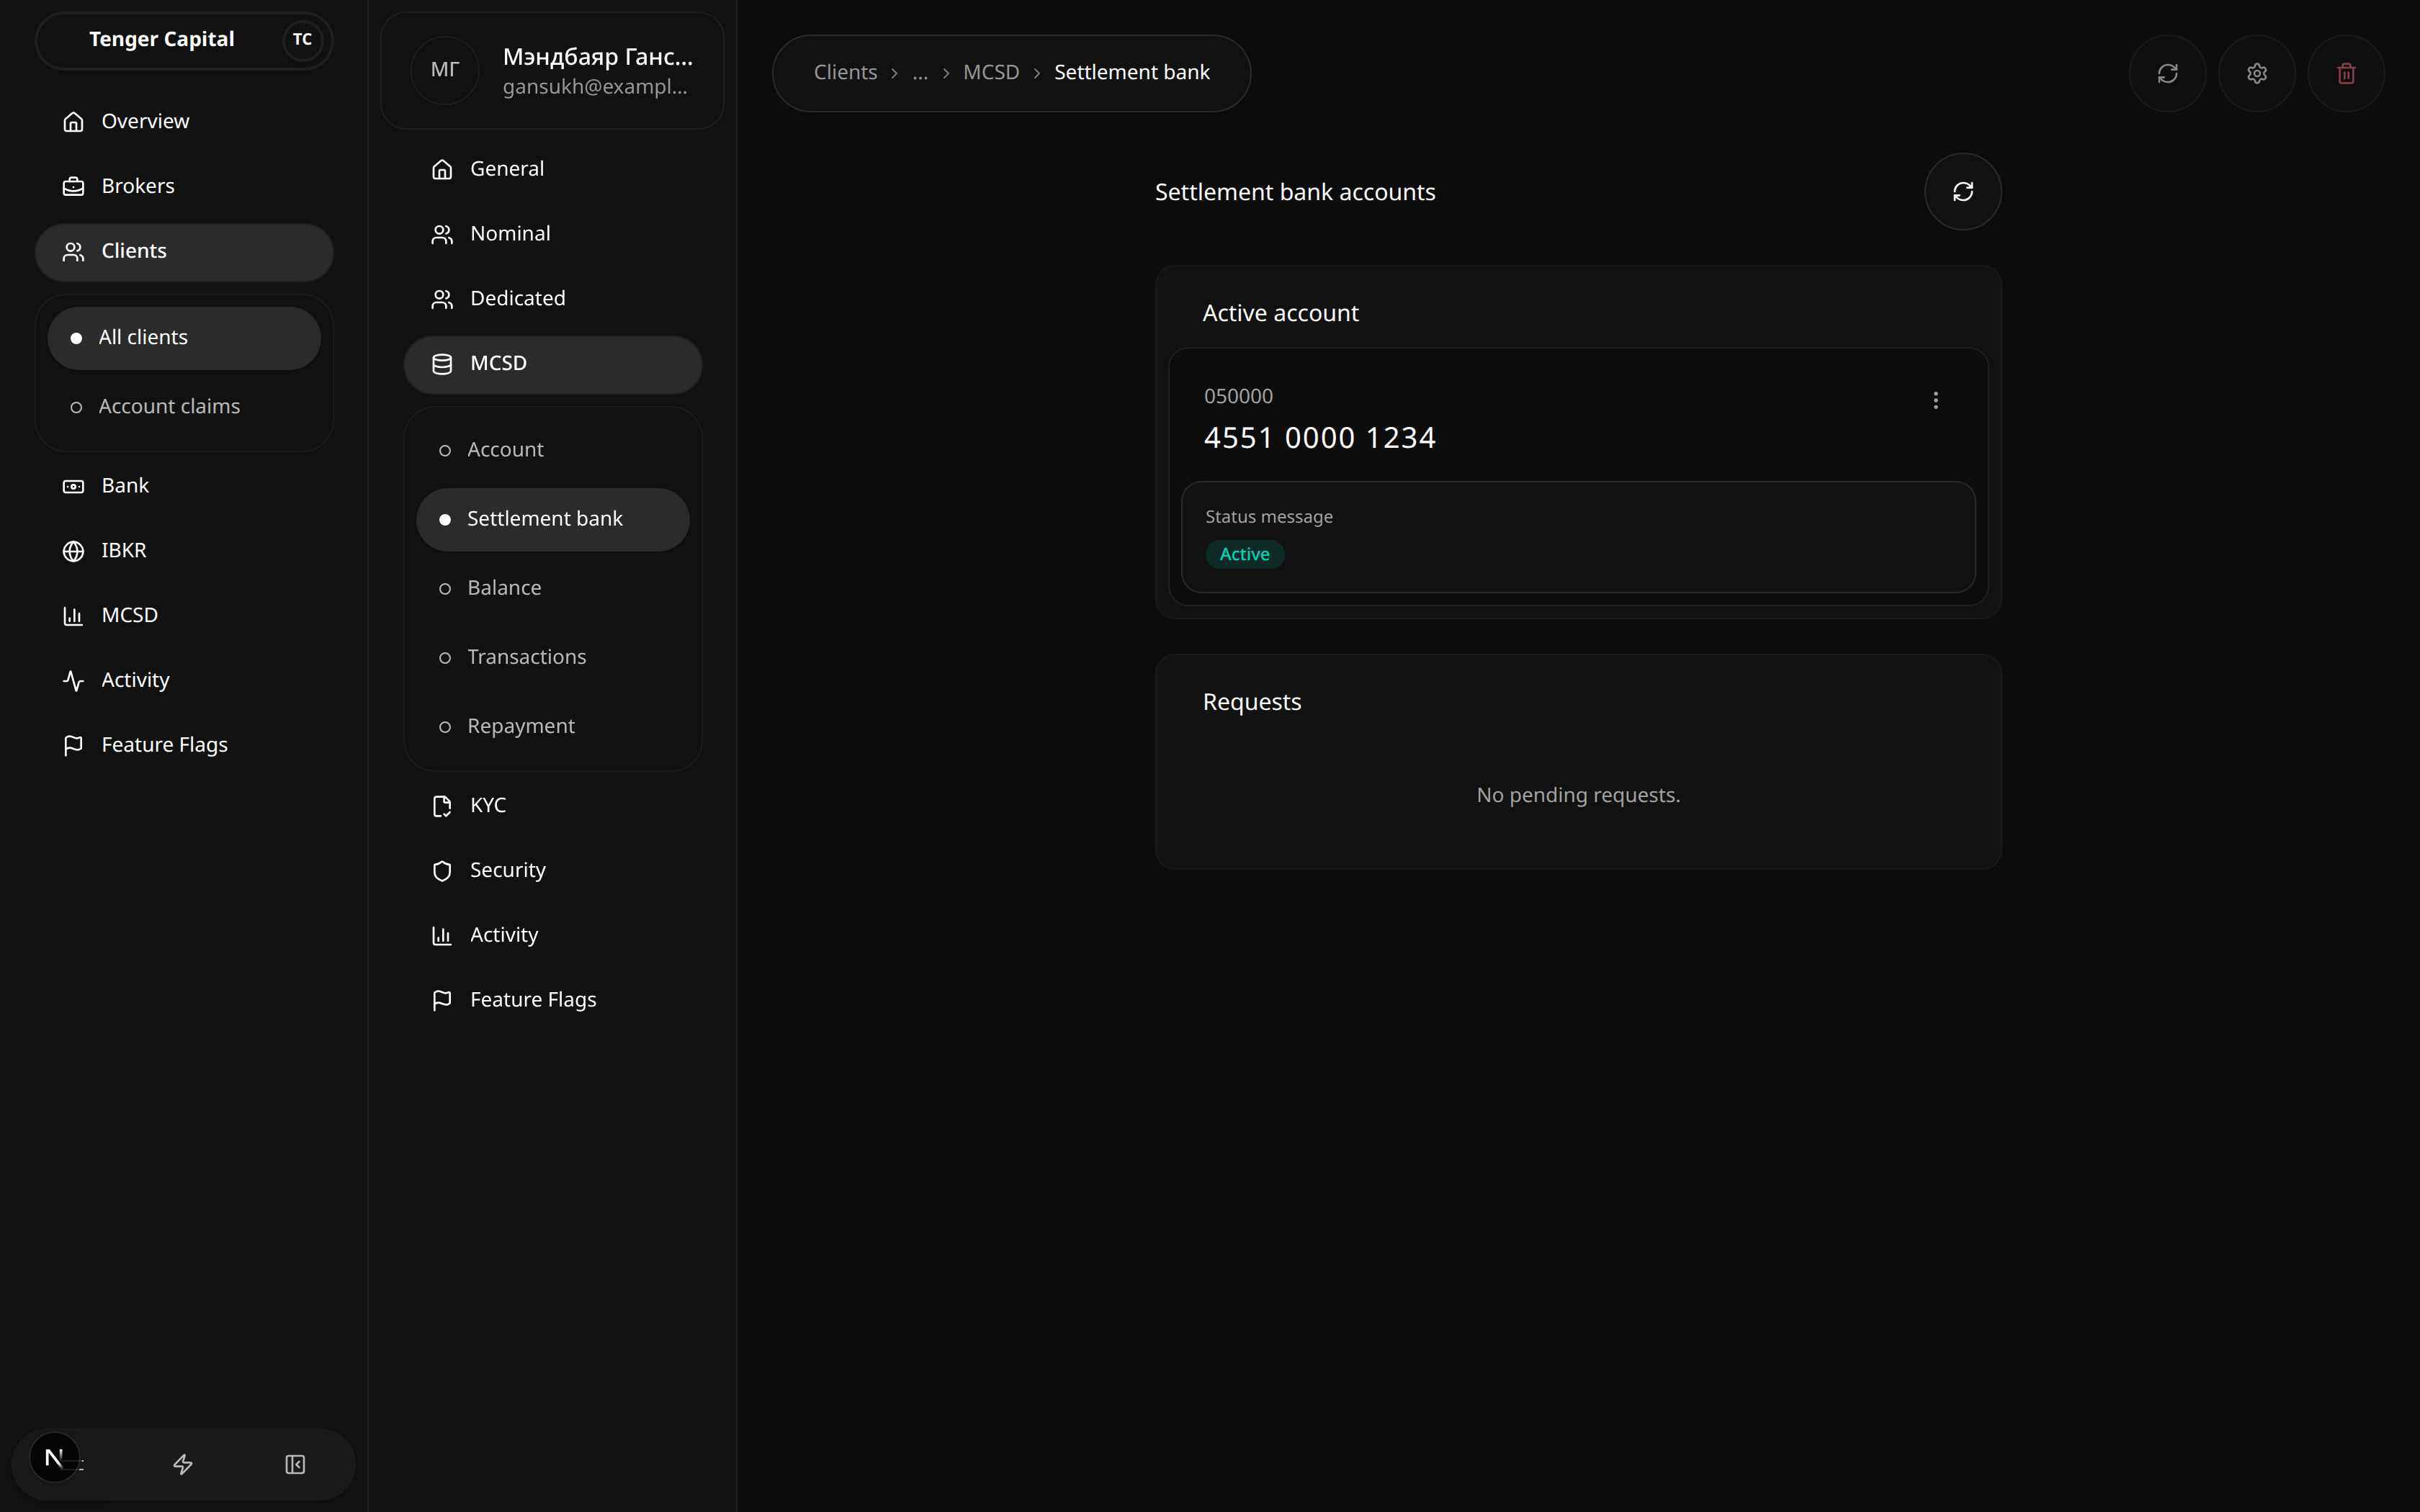
What it does
A section of an individual client's detail page showing the bank account used to settle the client's MCSD activity — where money for their domestic-market trades moves to and from. Open it from a client's left menu under MCSD → Settlement bank.
How to use
- Active account — the settlement bank account currently in use, with its number and status.
- Requests — any pending changes to the settlement bank account.
Use the refresh button (top right) to re-check the latest from MCSD.
Notes
- "No pending requests." simply means there's no change to the settlement bank account waiting to be processed.
MCSD · Balance
/clients/view?menu=mcsd-balance
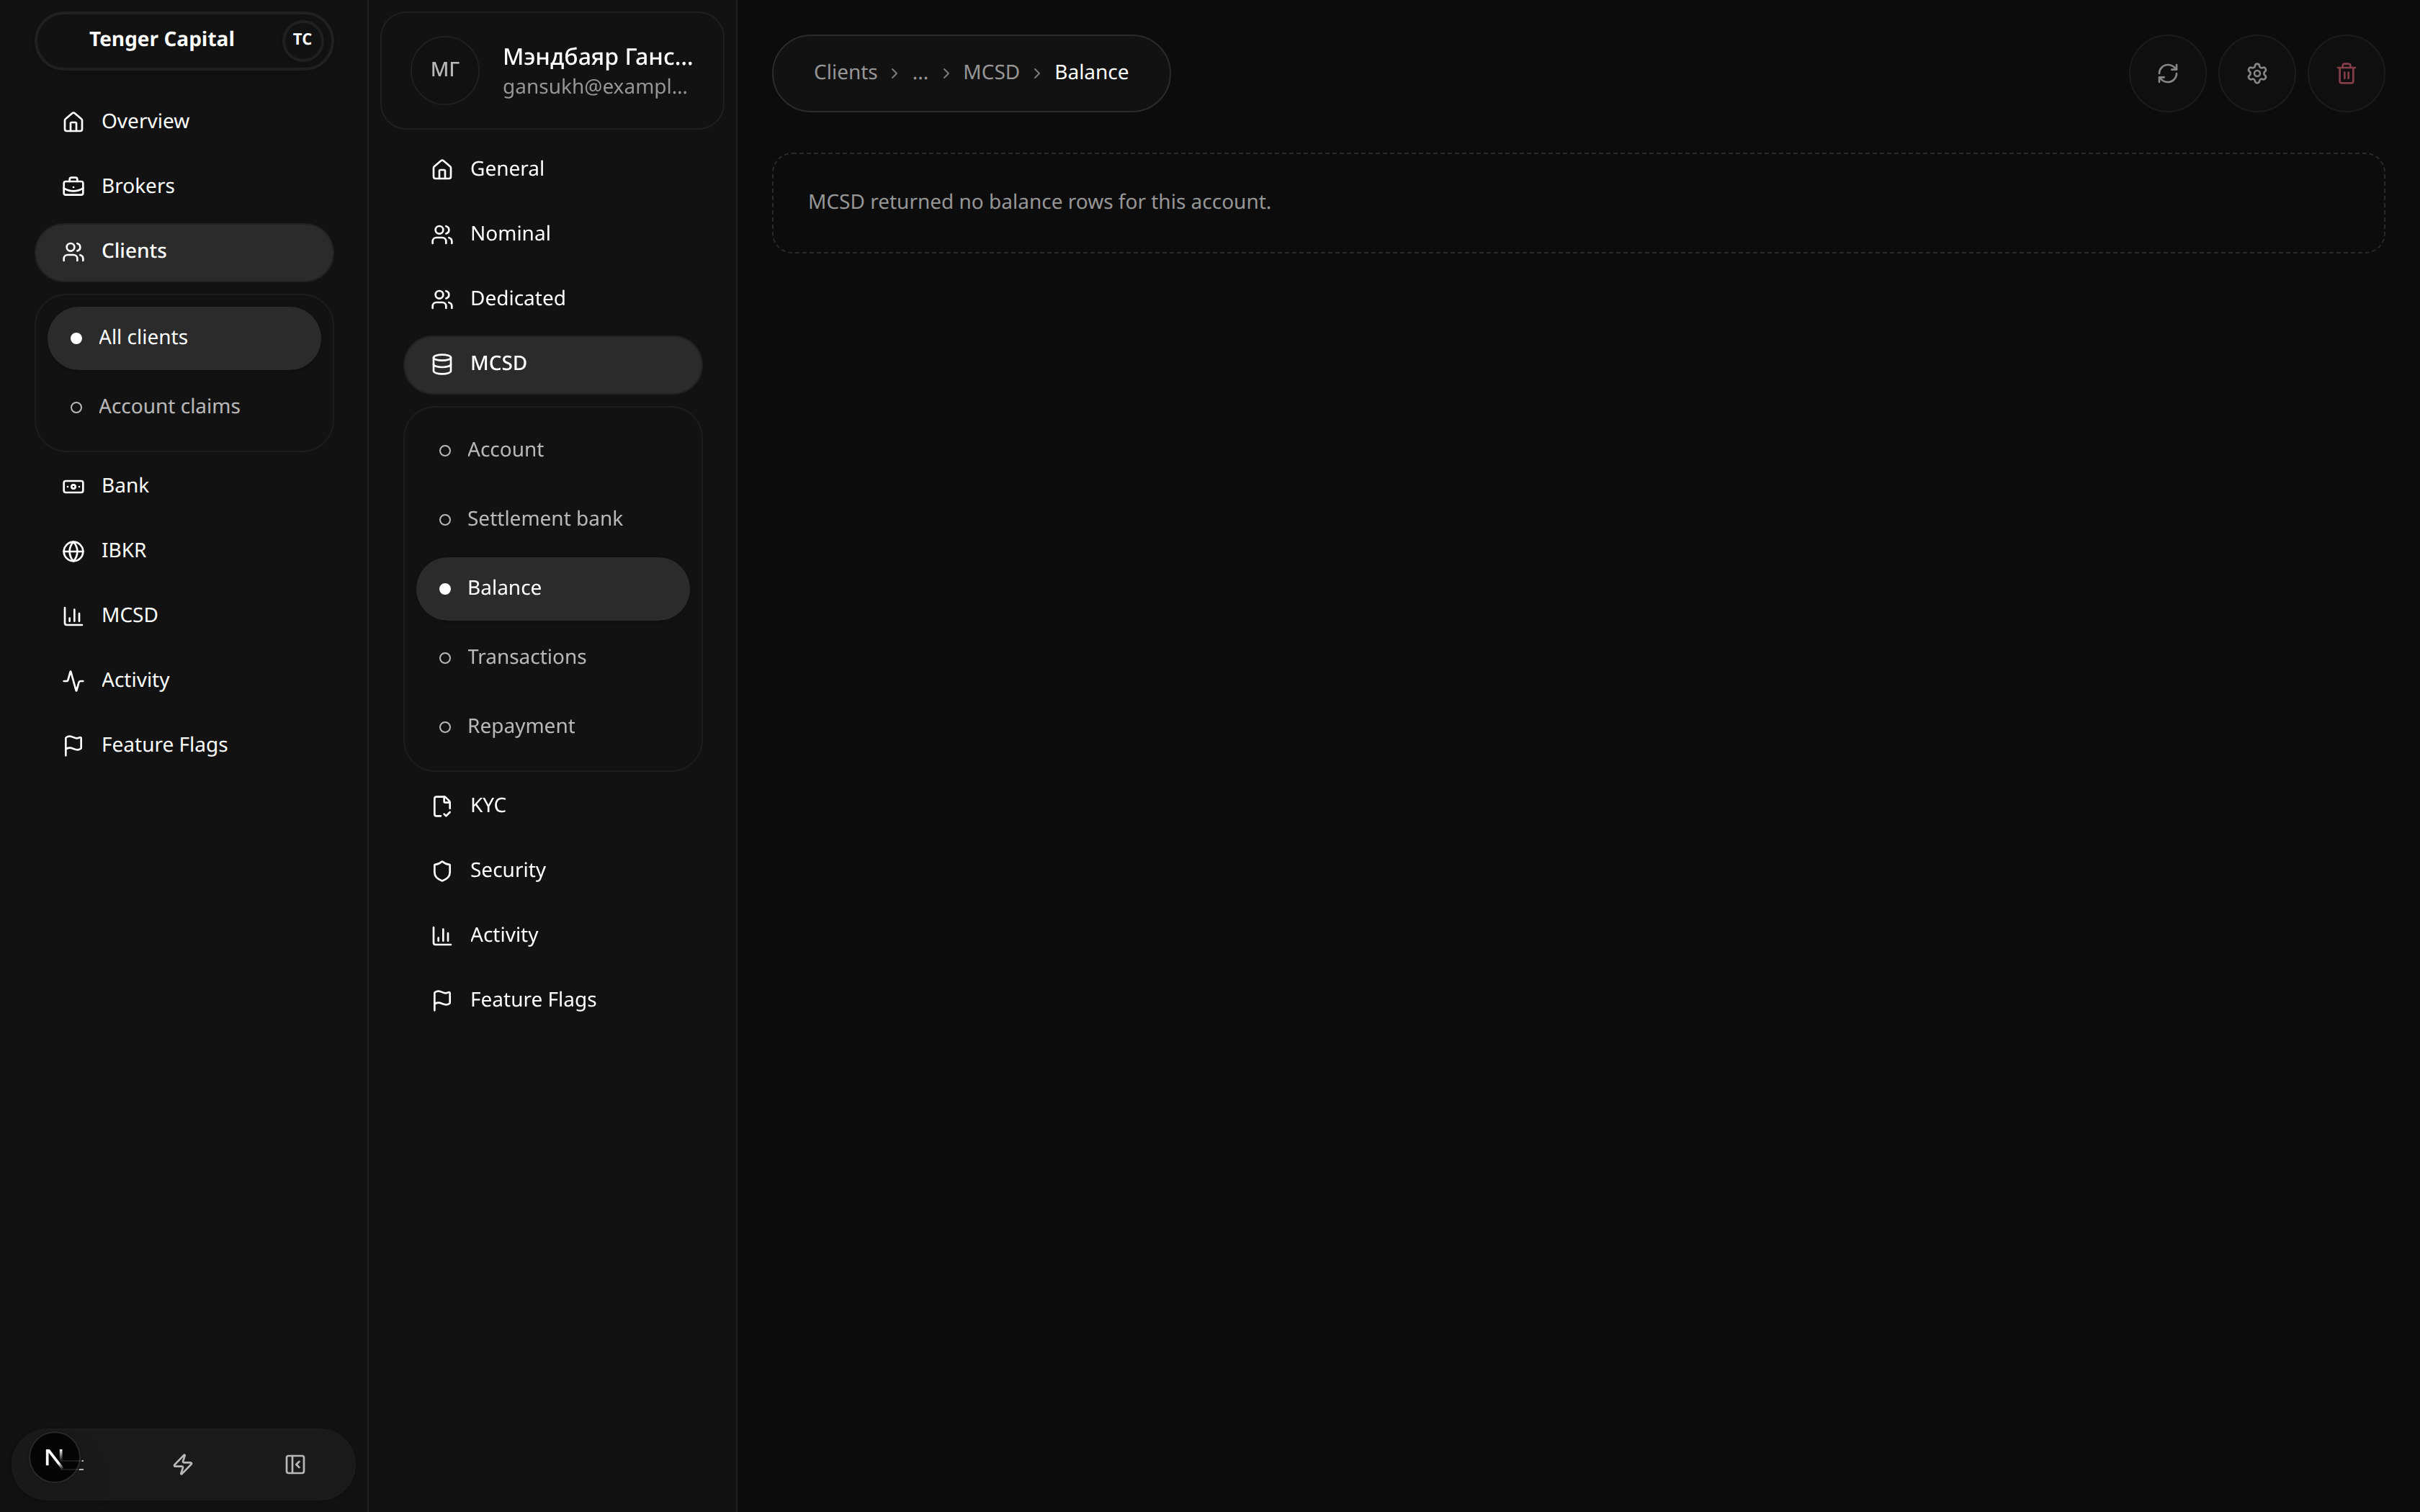
What it does
A section of an individual client's detail page showing the client's holdings and balances at MCSD — the securities and cash recorded for them at the depository. Open it from a client's left menu under MCSD → Balance.
How to use
When MCSD returns balances for the account, they're listed here. There's nothing to configure — it's a read-only view of what the depository reports.
Notes
- The figures come live from MCSD. When the depository returns nothing for the account the page reads "MCSD returned no balance rows for this account." — that's expected for accounts with no current holdings, not an error.
MCSD · Transactions
/clients/view?menu=mcsd-transactions
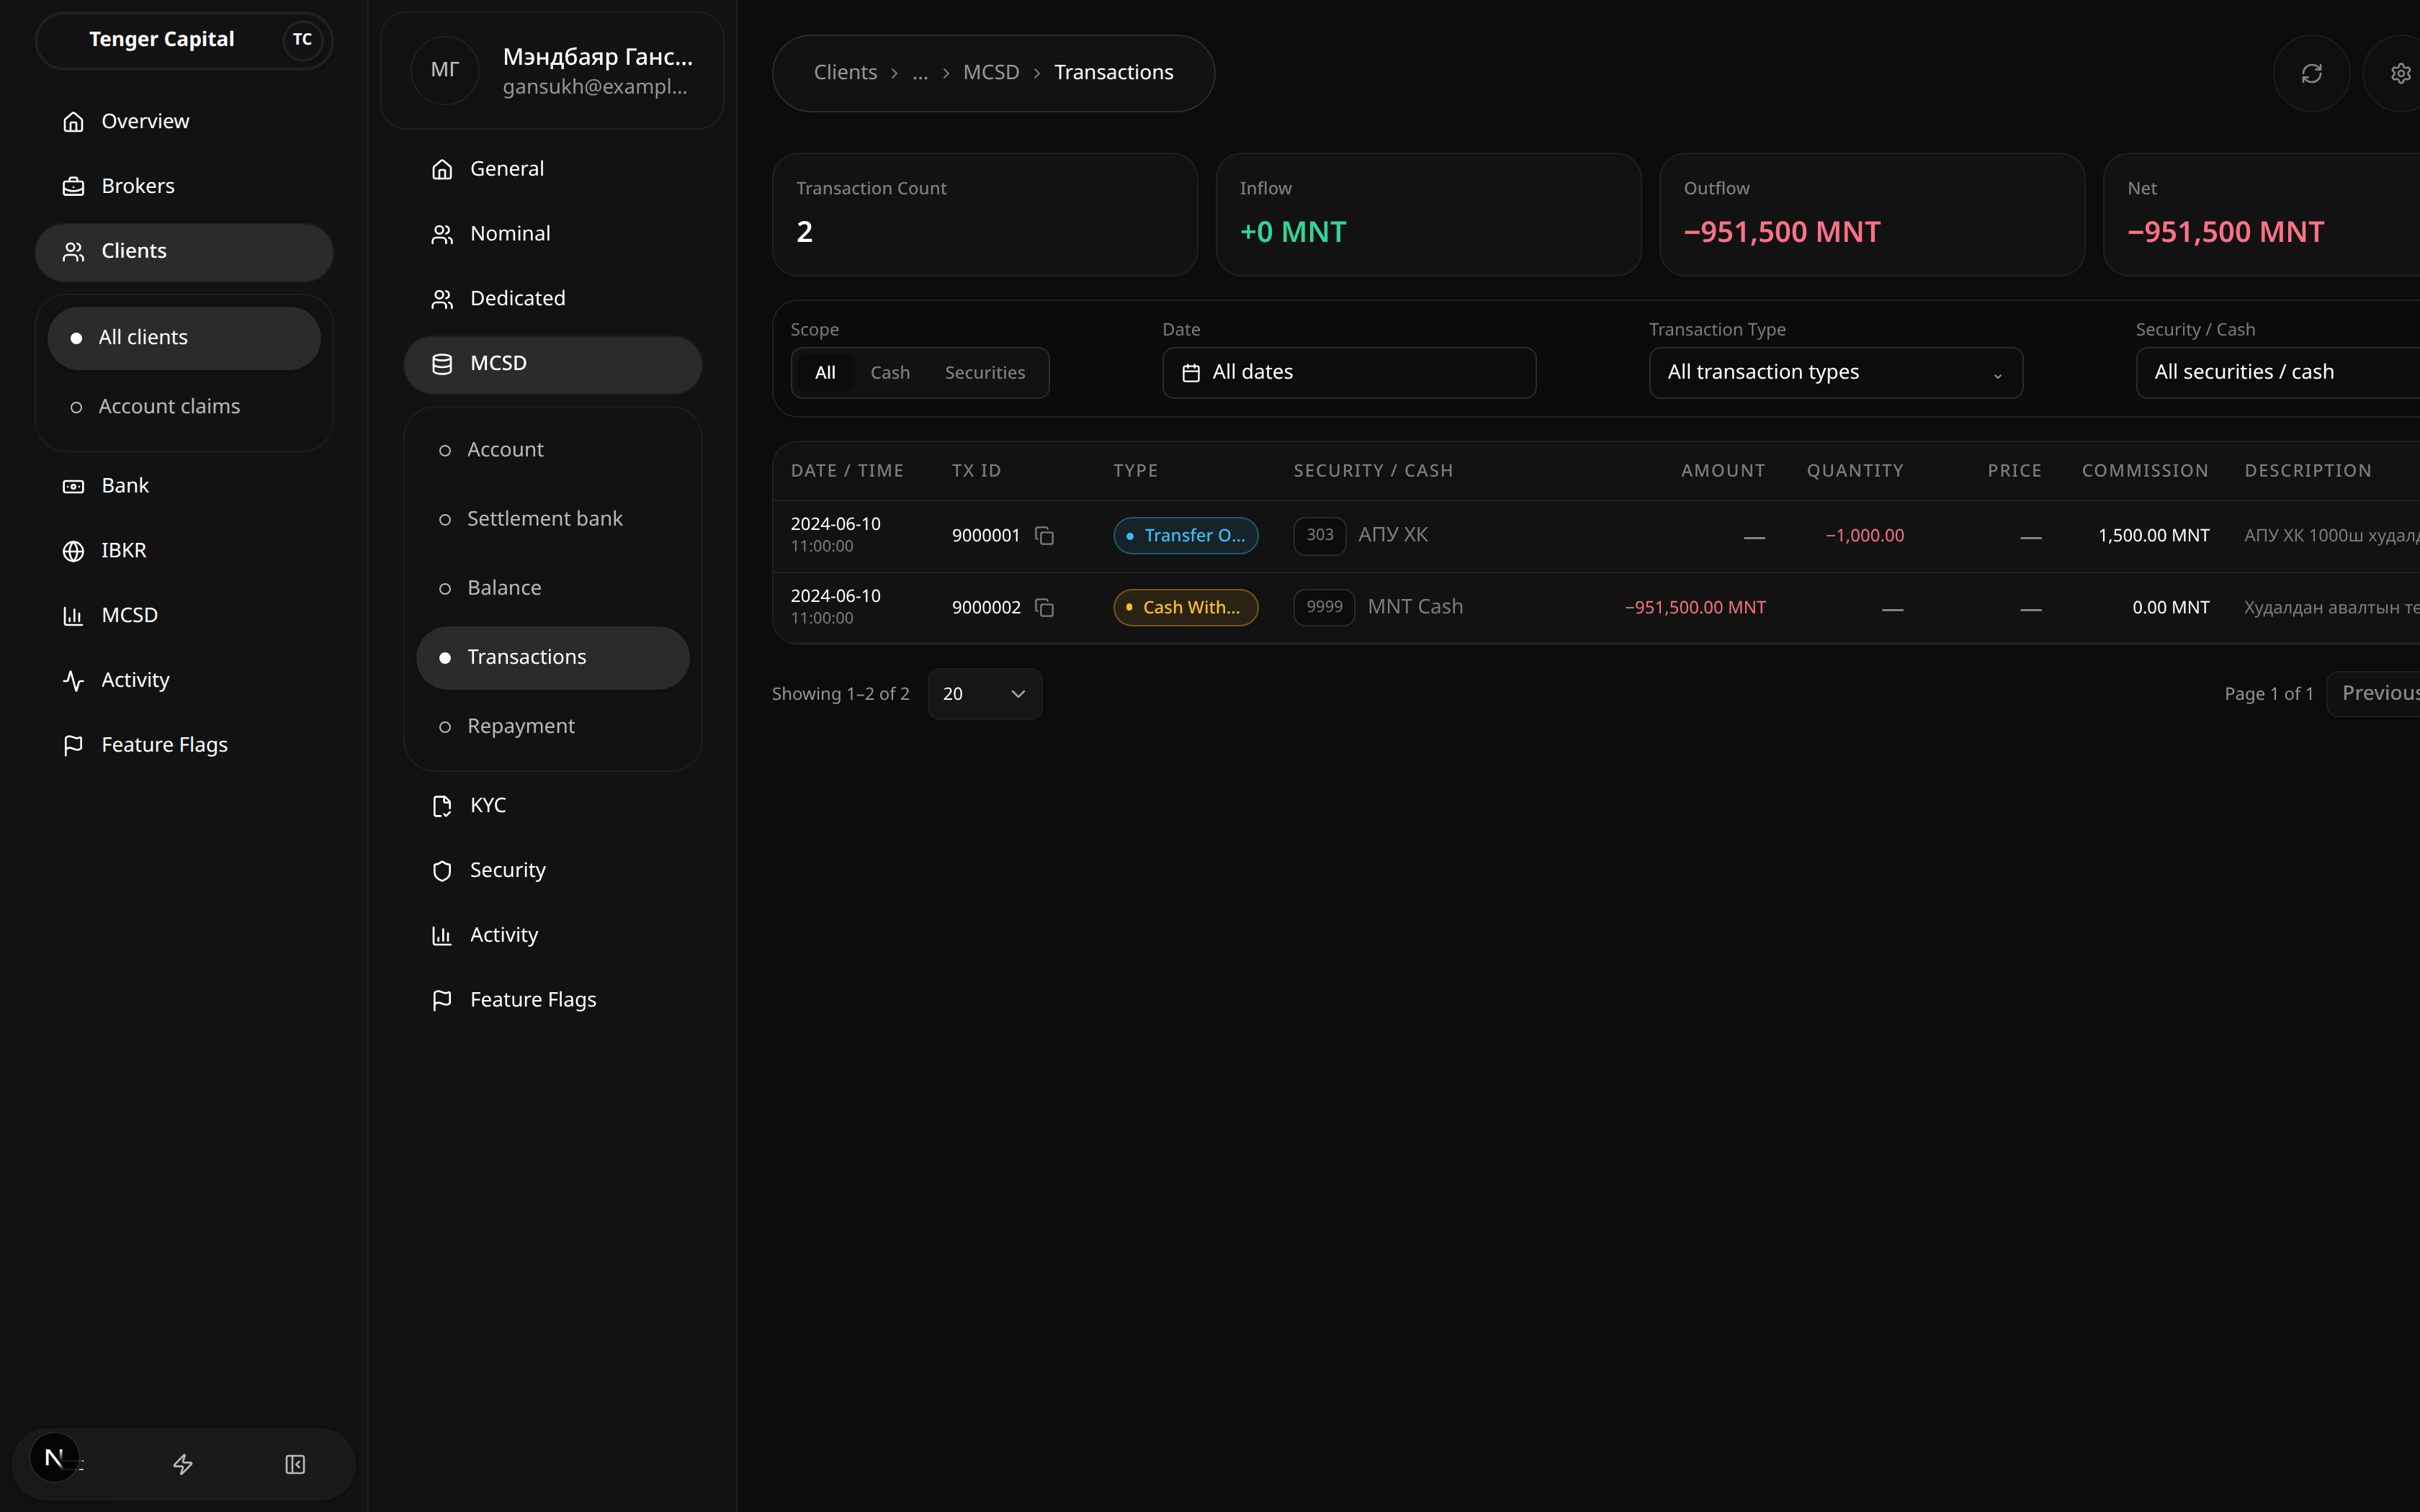
What it does
A section of an individual client's detail page listing the client's MCSD transactions — the securities and cash movements recorded for them at the depository. Open it from a client's left menu under MCSD → Transactions.
How to use
The cards at the top summarise the filtered set: Transaction Count, Inflow, Outflow and Net. Below them:
- Filter by Scope (All / Cash / Securities), Date, Transaction Type, and Security / Cash.
- Read the table: Date / Time, TX ID, Type, Security / Cash, Amount, Quantity, Price, Commission, Description.
- Page through with the controls at the bottom.
Notes
- The summary cards reflect the current filters, so they change as you narrow the list.
- A dash (—) means that column doesn't apply to that transaction (for example quantity on a pure cash movement).
MCSD · Repayment
/clients/view?menu=mcsd-repayment
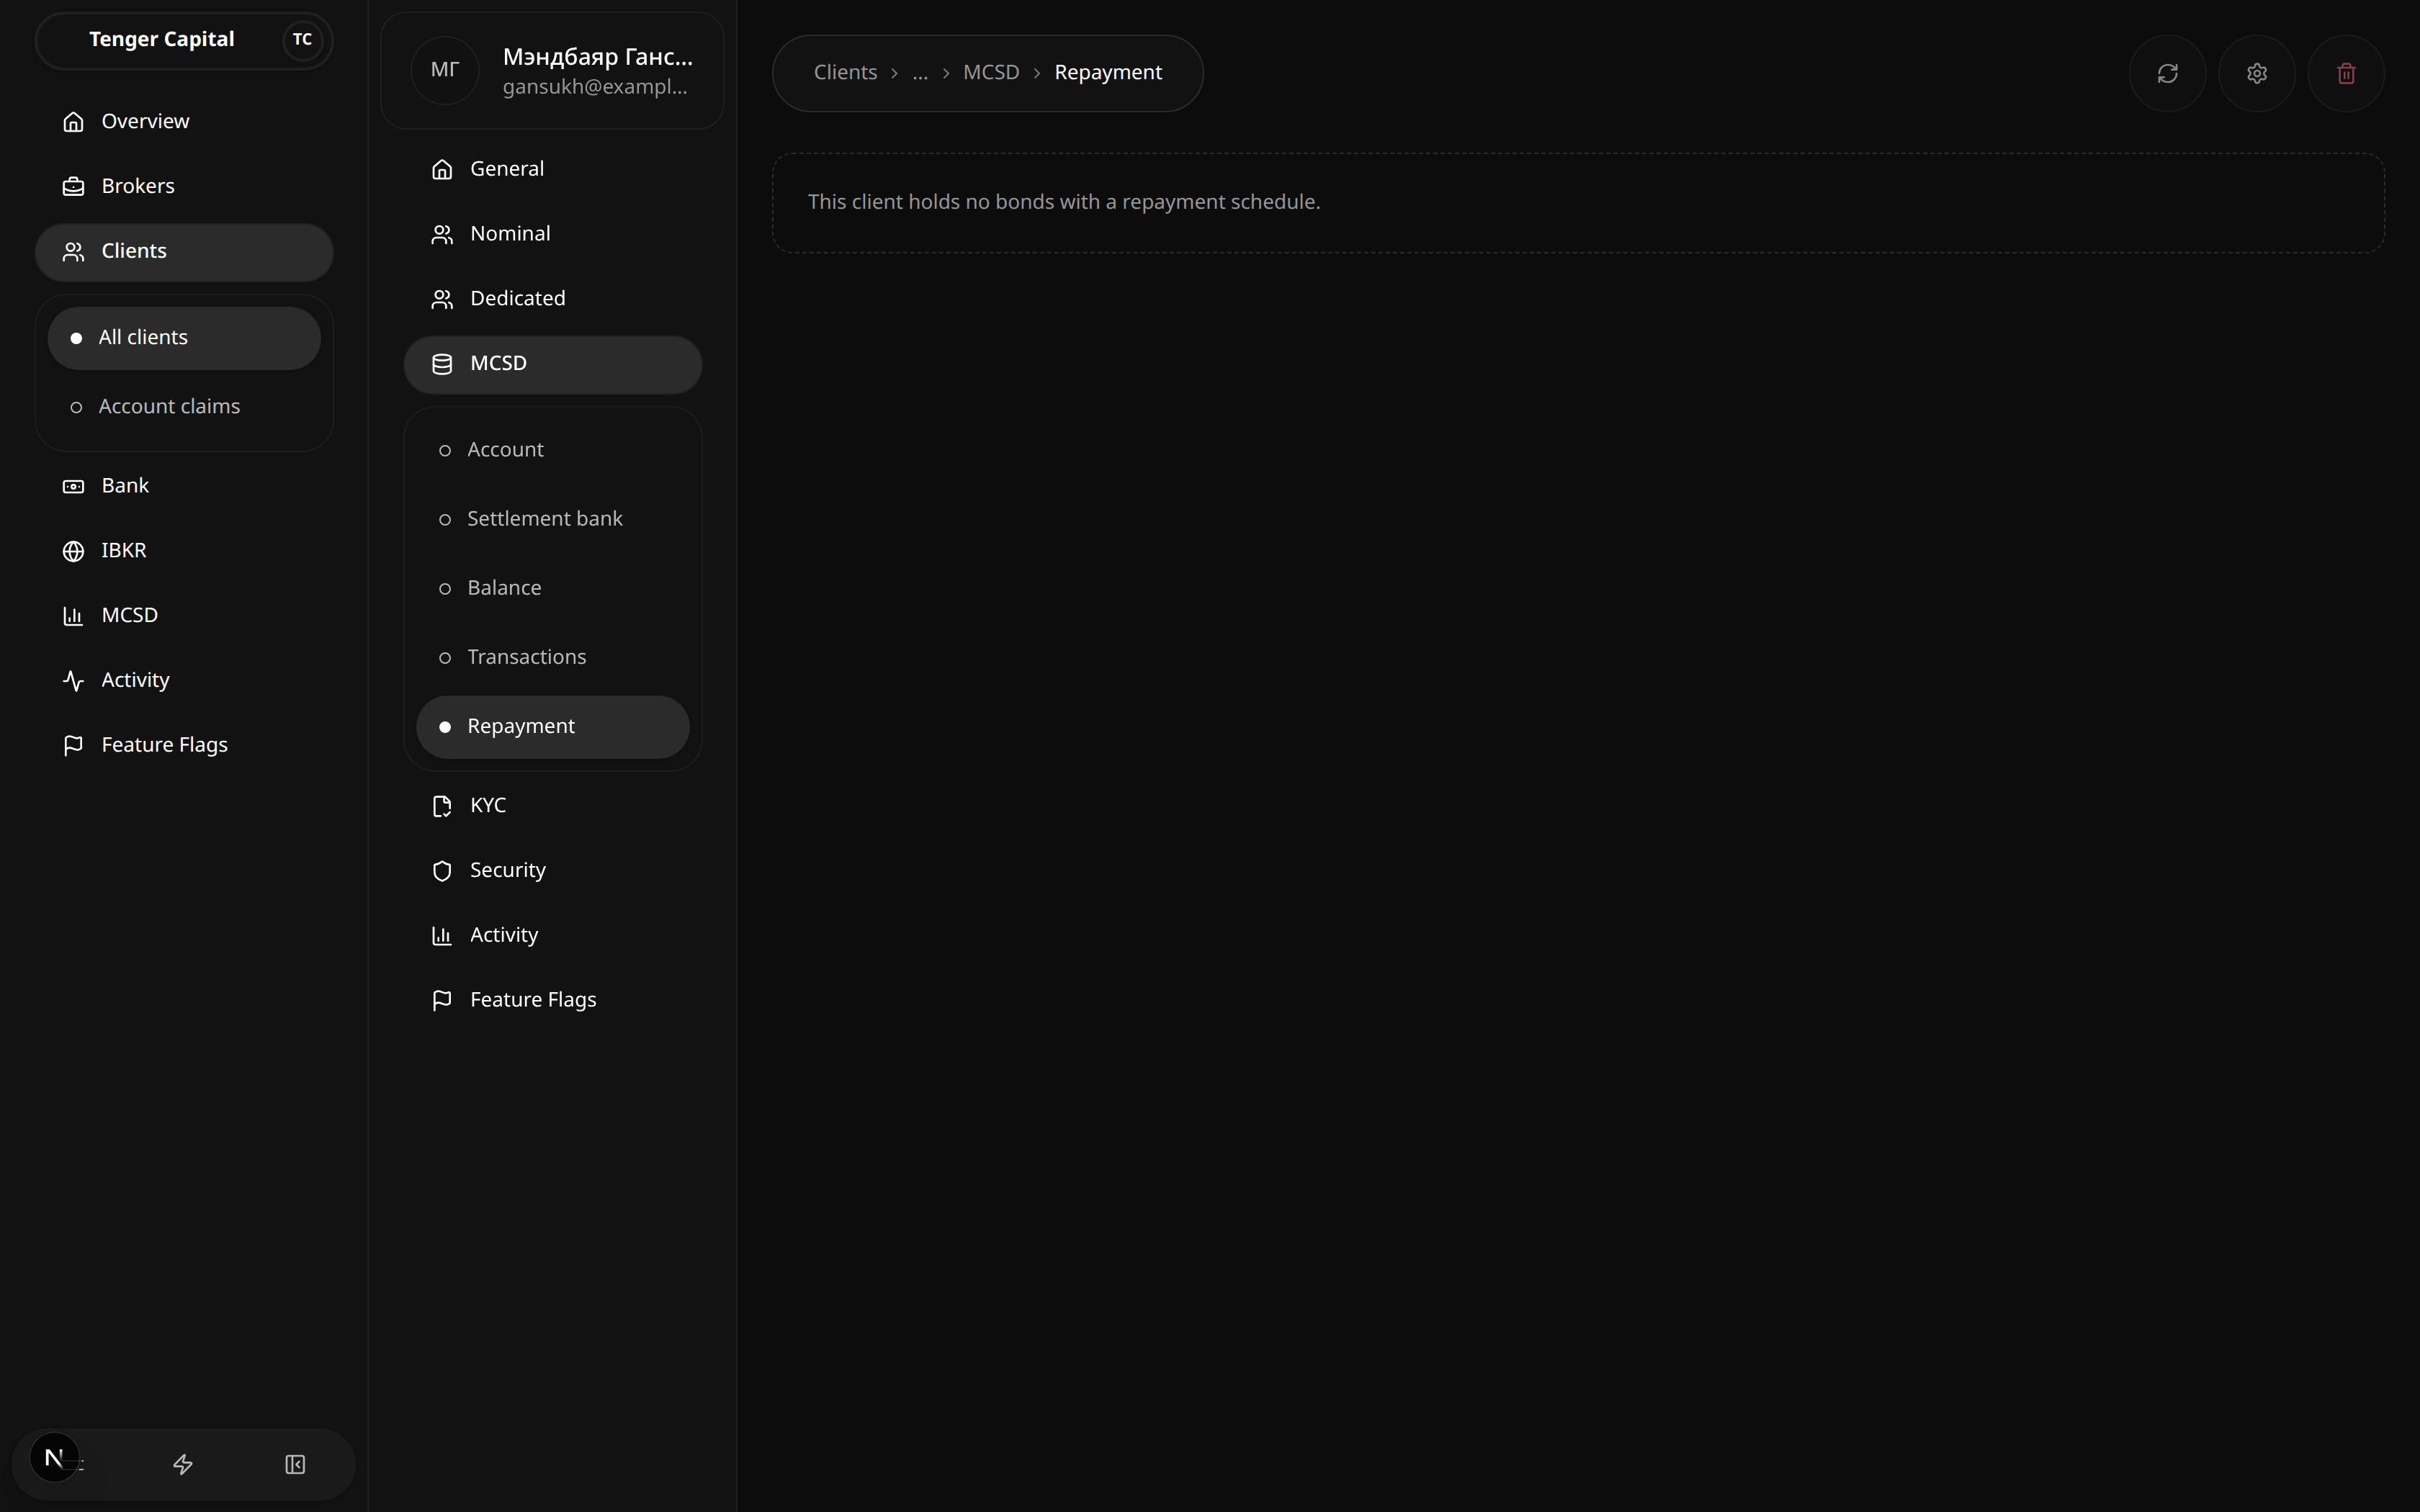
What it does
A section of an individual client's detail page showing the repayment schedule for any bonds the client holds at MCSD — the coupon and principal payments due to them. Open it from a client's left menu under MCSD → Repayment.
How to use
If the client holds bonds, their repayment schedule is listed here. It's a read-only view — nothing to set up.
Notes
- Only clients holding bonds have a schedule. For everyone else the page reads "This client holds no bonds with a repayment schedule." — that's expected, not an error.
KYC · Domestic
/clients/view?menu=kyc&tab=Domestic KYC

What it does
A tab within a client's KYC section for reviewing and deciding the client's domestic (local) identity verification.
How to use
- The right-hand panel shows the overall workflow status (for example Approved) and the stages: Form → Documents → Investment Profile → Review → Decision.
- Read the submitted form below (form type, client details, and so on) — it's read-only here.
- Admin manual override lets you mark domestic KYC as verified when identity has been confirmed outside the platform; add an optional note and tick Mark domestic KYC as verified.
Notes
- Use the manual override only when verification is confirmed through other means — it bypasses the normal form and document checks.
- Domestic KYC must be approved before the client's IBKR KYC application can be created.
KYC · IBKR
/clients/view?menu=kyc&tab=IBKR KYC
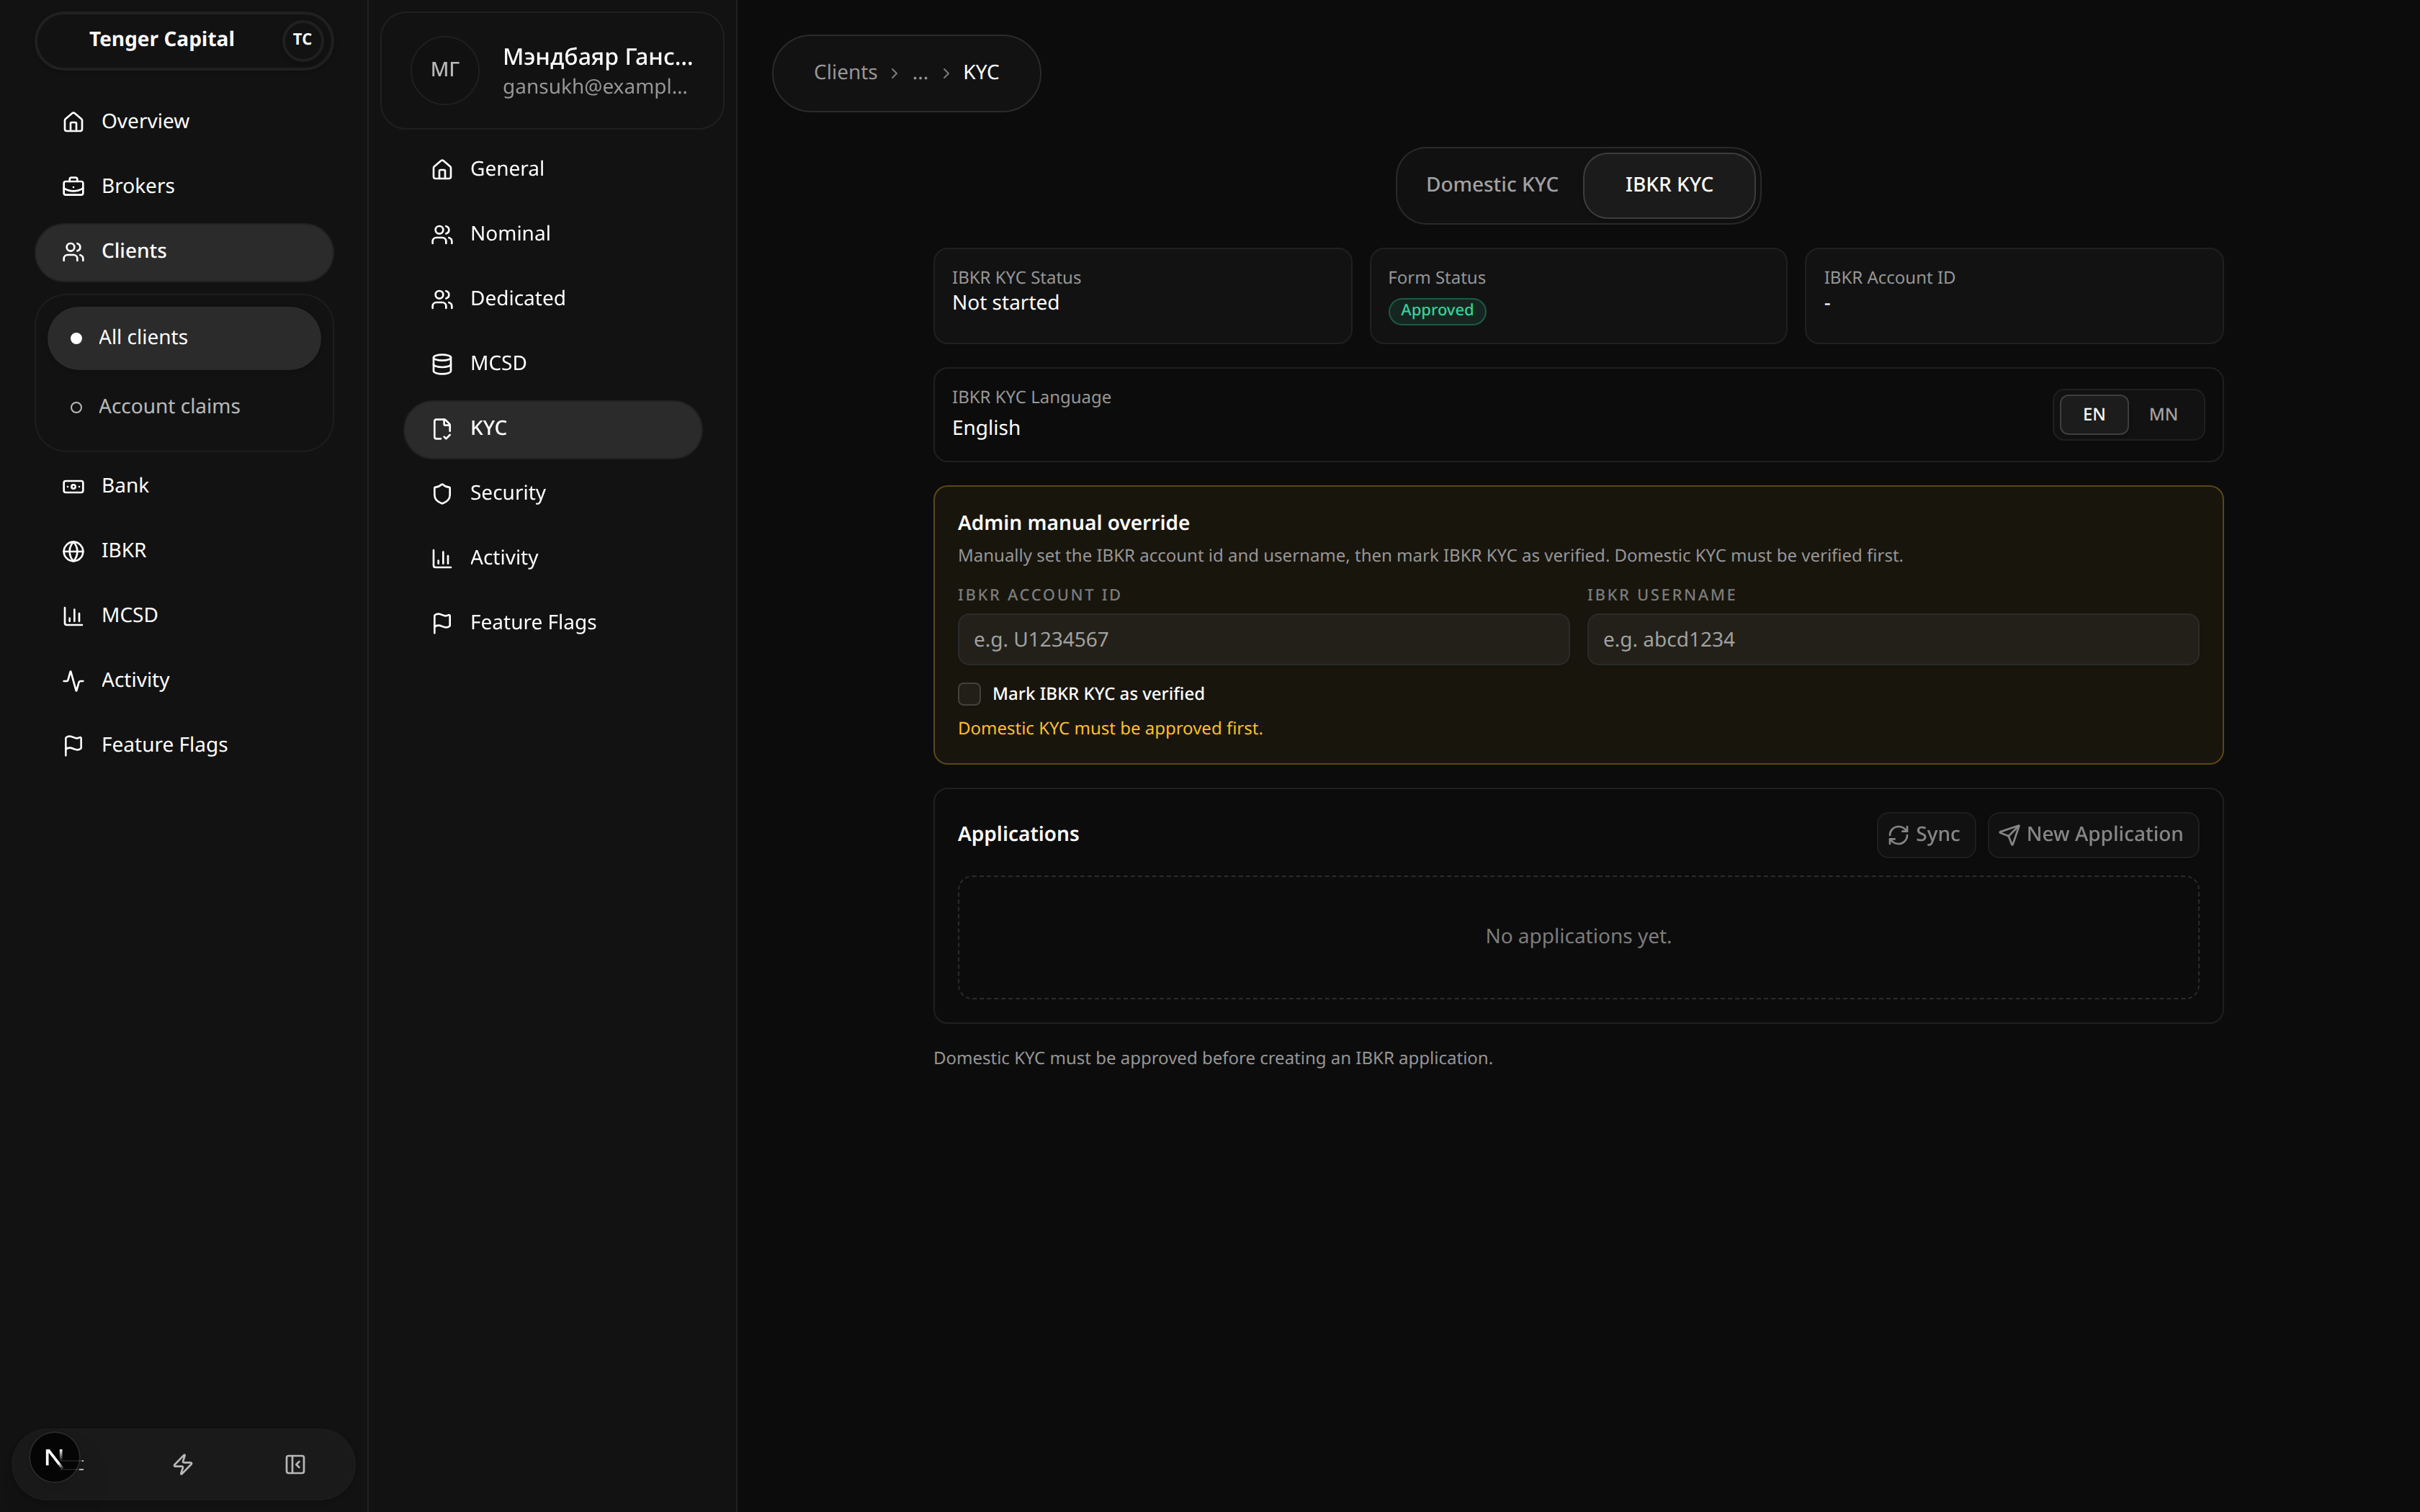
What it does
A tab within a client's KYC section for the client's Interactive Brokers (IBKR) application — the verification needed to open their dedicated IBKR account.
How to use
- The top shows the IBKR KYC status, the form status, the IBKR account ID, and the form language (EN / MN).
- Admin manual override lets you set the IBKR account ID and username and mark IBKR KYC as verified.
- Under Applications, use Sync to refresh from IBKR or New Application to start one.
Notes
- Domestic KYC must be approved first — the page blocks creating an IBKR application until then.
- For corporate clients this tab is hidden; only domestic KYC applies.
Security
/clients/view?menu=security
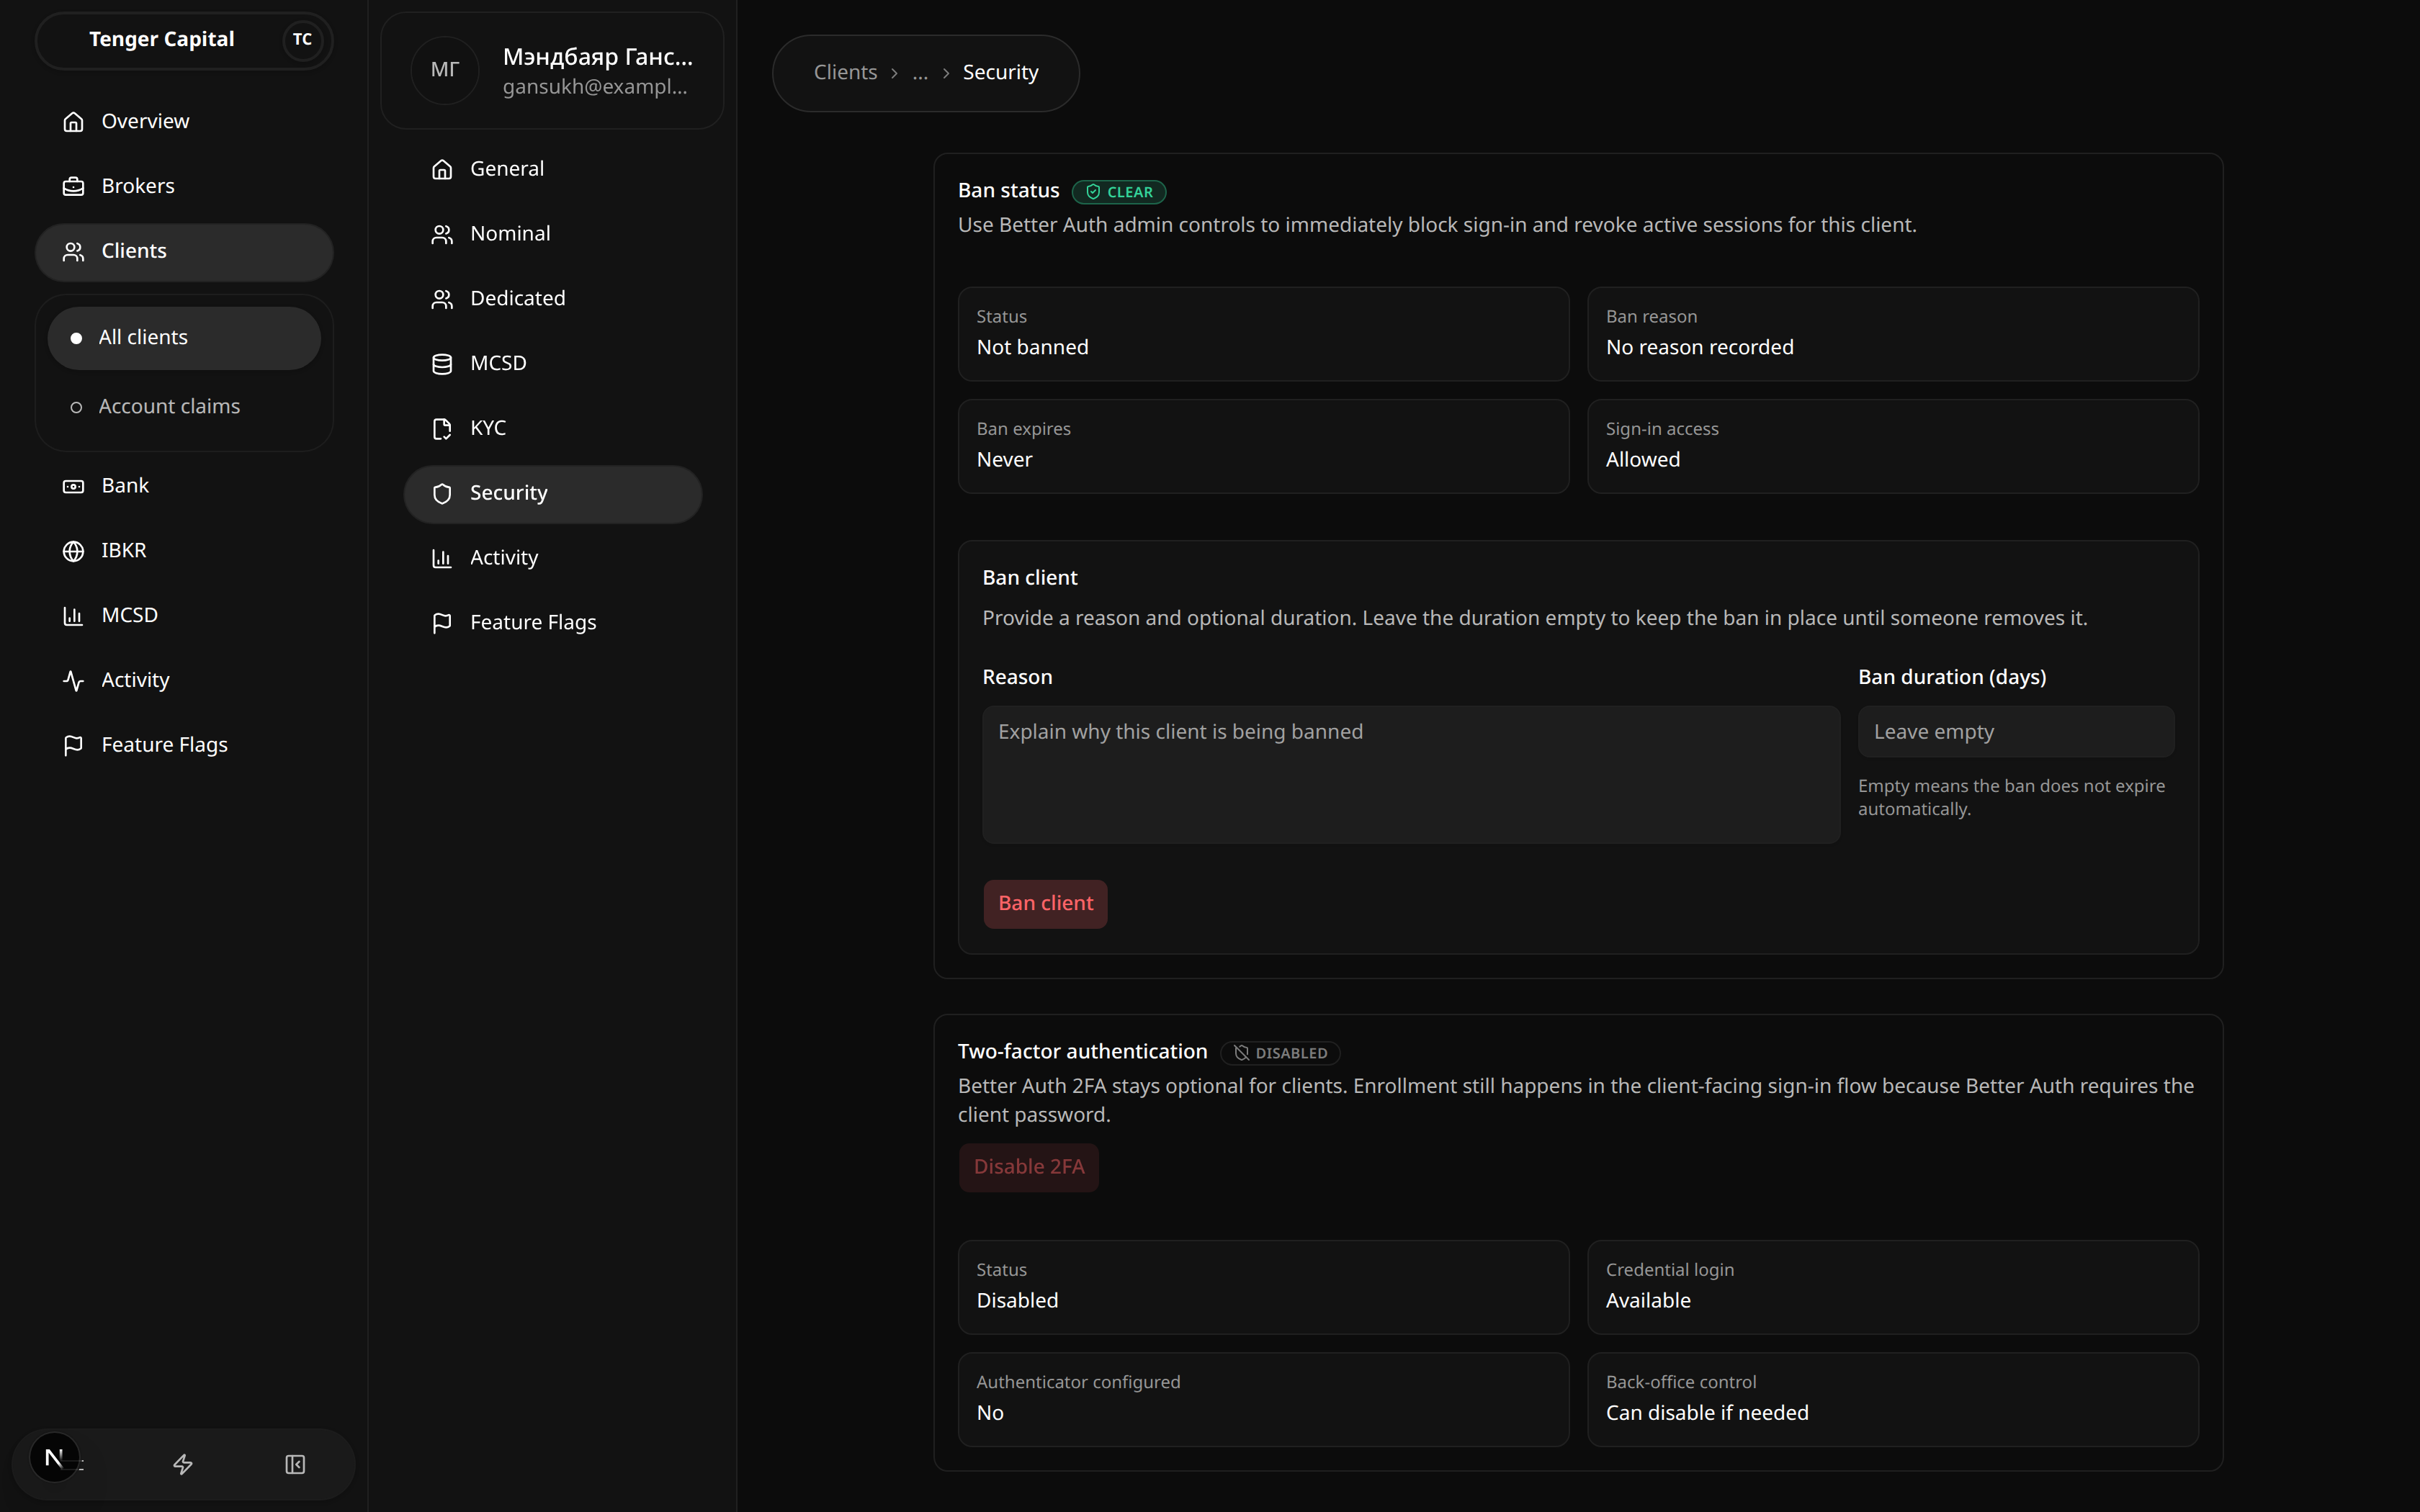
What it does
A section of an individual client's detail page for managing the client's account access and security — blocking sign-in and overseeing two-factor authentication. Open it from a client's left menu under Security.
How to use
- Ban status — immediately block the client from signing in and revoke their active sessions. Enter a reason and an optional duration (days), then Ban client. Leaving the duration empty keeps the ban in place until someone removes it. The status, reason, expiry and sign-in access are shown above, with a Clear action to lift a ban.
- Two-factor authentication — shows whether the client has 2FA enabled and an authenticator configured. Back-office staff can disable it if needed.
Notes
- 2FA stays optional for clients — they enrol it themselves during sign-in; it isn't required.
- Banning takes effect immediately and ends any active sessions, so use it with care.
Activity
/clients/view?menu=activity

What it does
A section of an individual client's detail page showing a timeline of everything that has happened on the client's account — orders, KYC steps, and other events. Open it from a client's left menu under Activity.
How to use
Read the timeline top to bottom (most recent first). Each entry shows what happened (for example an order created or KYC approved), its outcome, when it occurred, and what it relates to. It's a read-only history.
Notes
- This is scoped to the one client you're viewing. The platform-wide audit log lives on the top-level Activity page.
- An empty timeline simply means nothing has been recorded for this client yet.
Feature Flags
/clients/view?menu=feature-flags
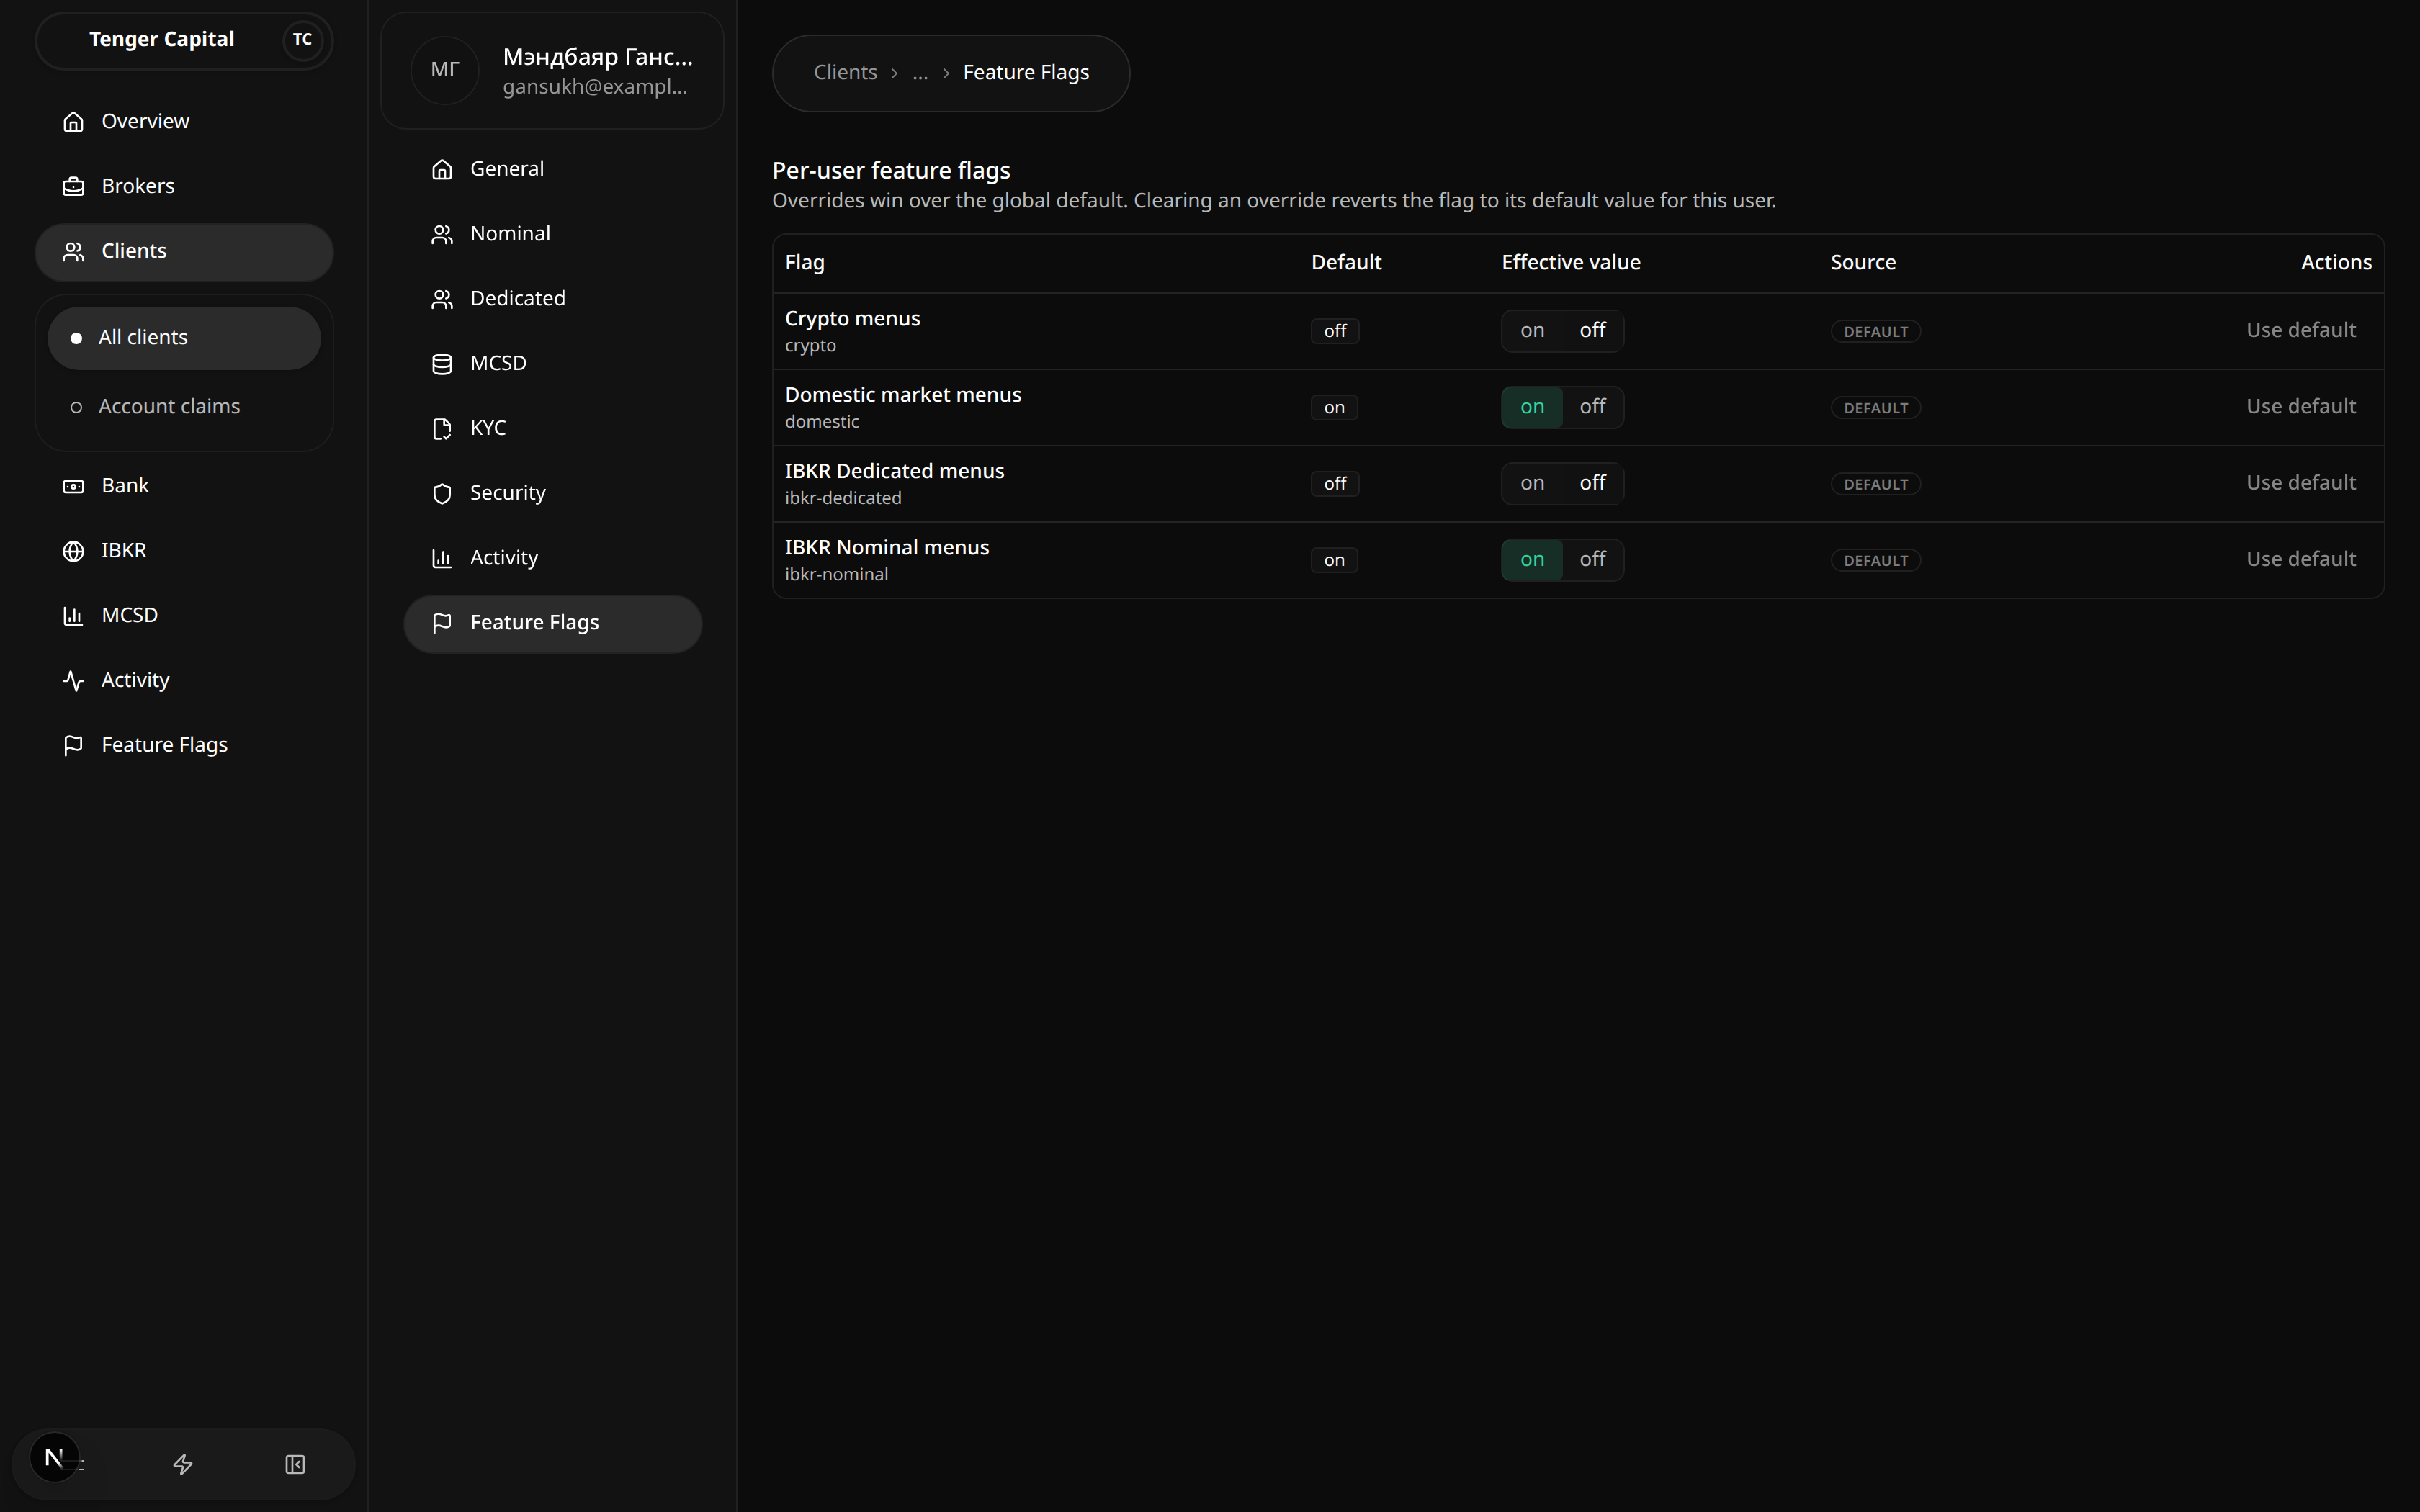
What it does
A section of an individual client's detail page for setting per-client feature overrides — turning specific product features on or off for this one client, regardless of the platform-wide default. Open it from a client's left menu under Feature Flags.
How to use
Read the table of features (for example the crypto, domestic, IBKR dedicated and IBKR nominal menus):
- Default — the platform-wide value for the feature.
- Effective value — what currently applies to this client.
- Source — whether the effective value comes from the default or a per-client override.
- Use the on/off control to set an override for this client, or Use default to remove the override and fall back to the platform value.
Notes
- An override wins over the global default for this client only; clearing it reverts the client to the default.
- This controls what the client sees in their own app — it doesn't change anything for other clients.
Bank Accounts
/bank/accounts
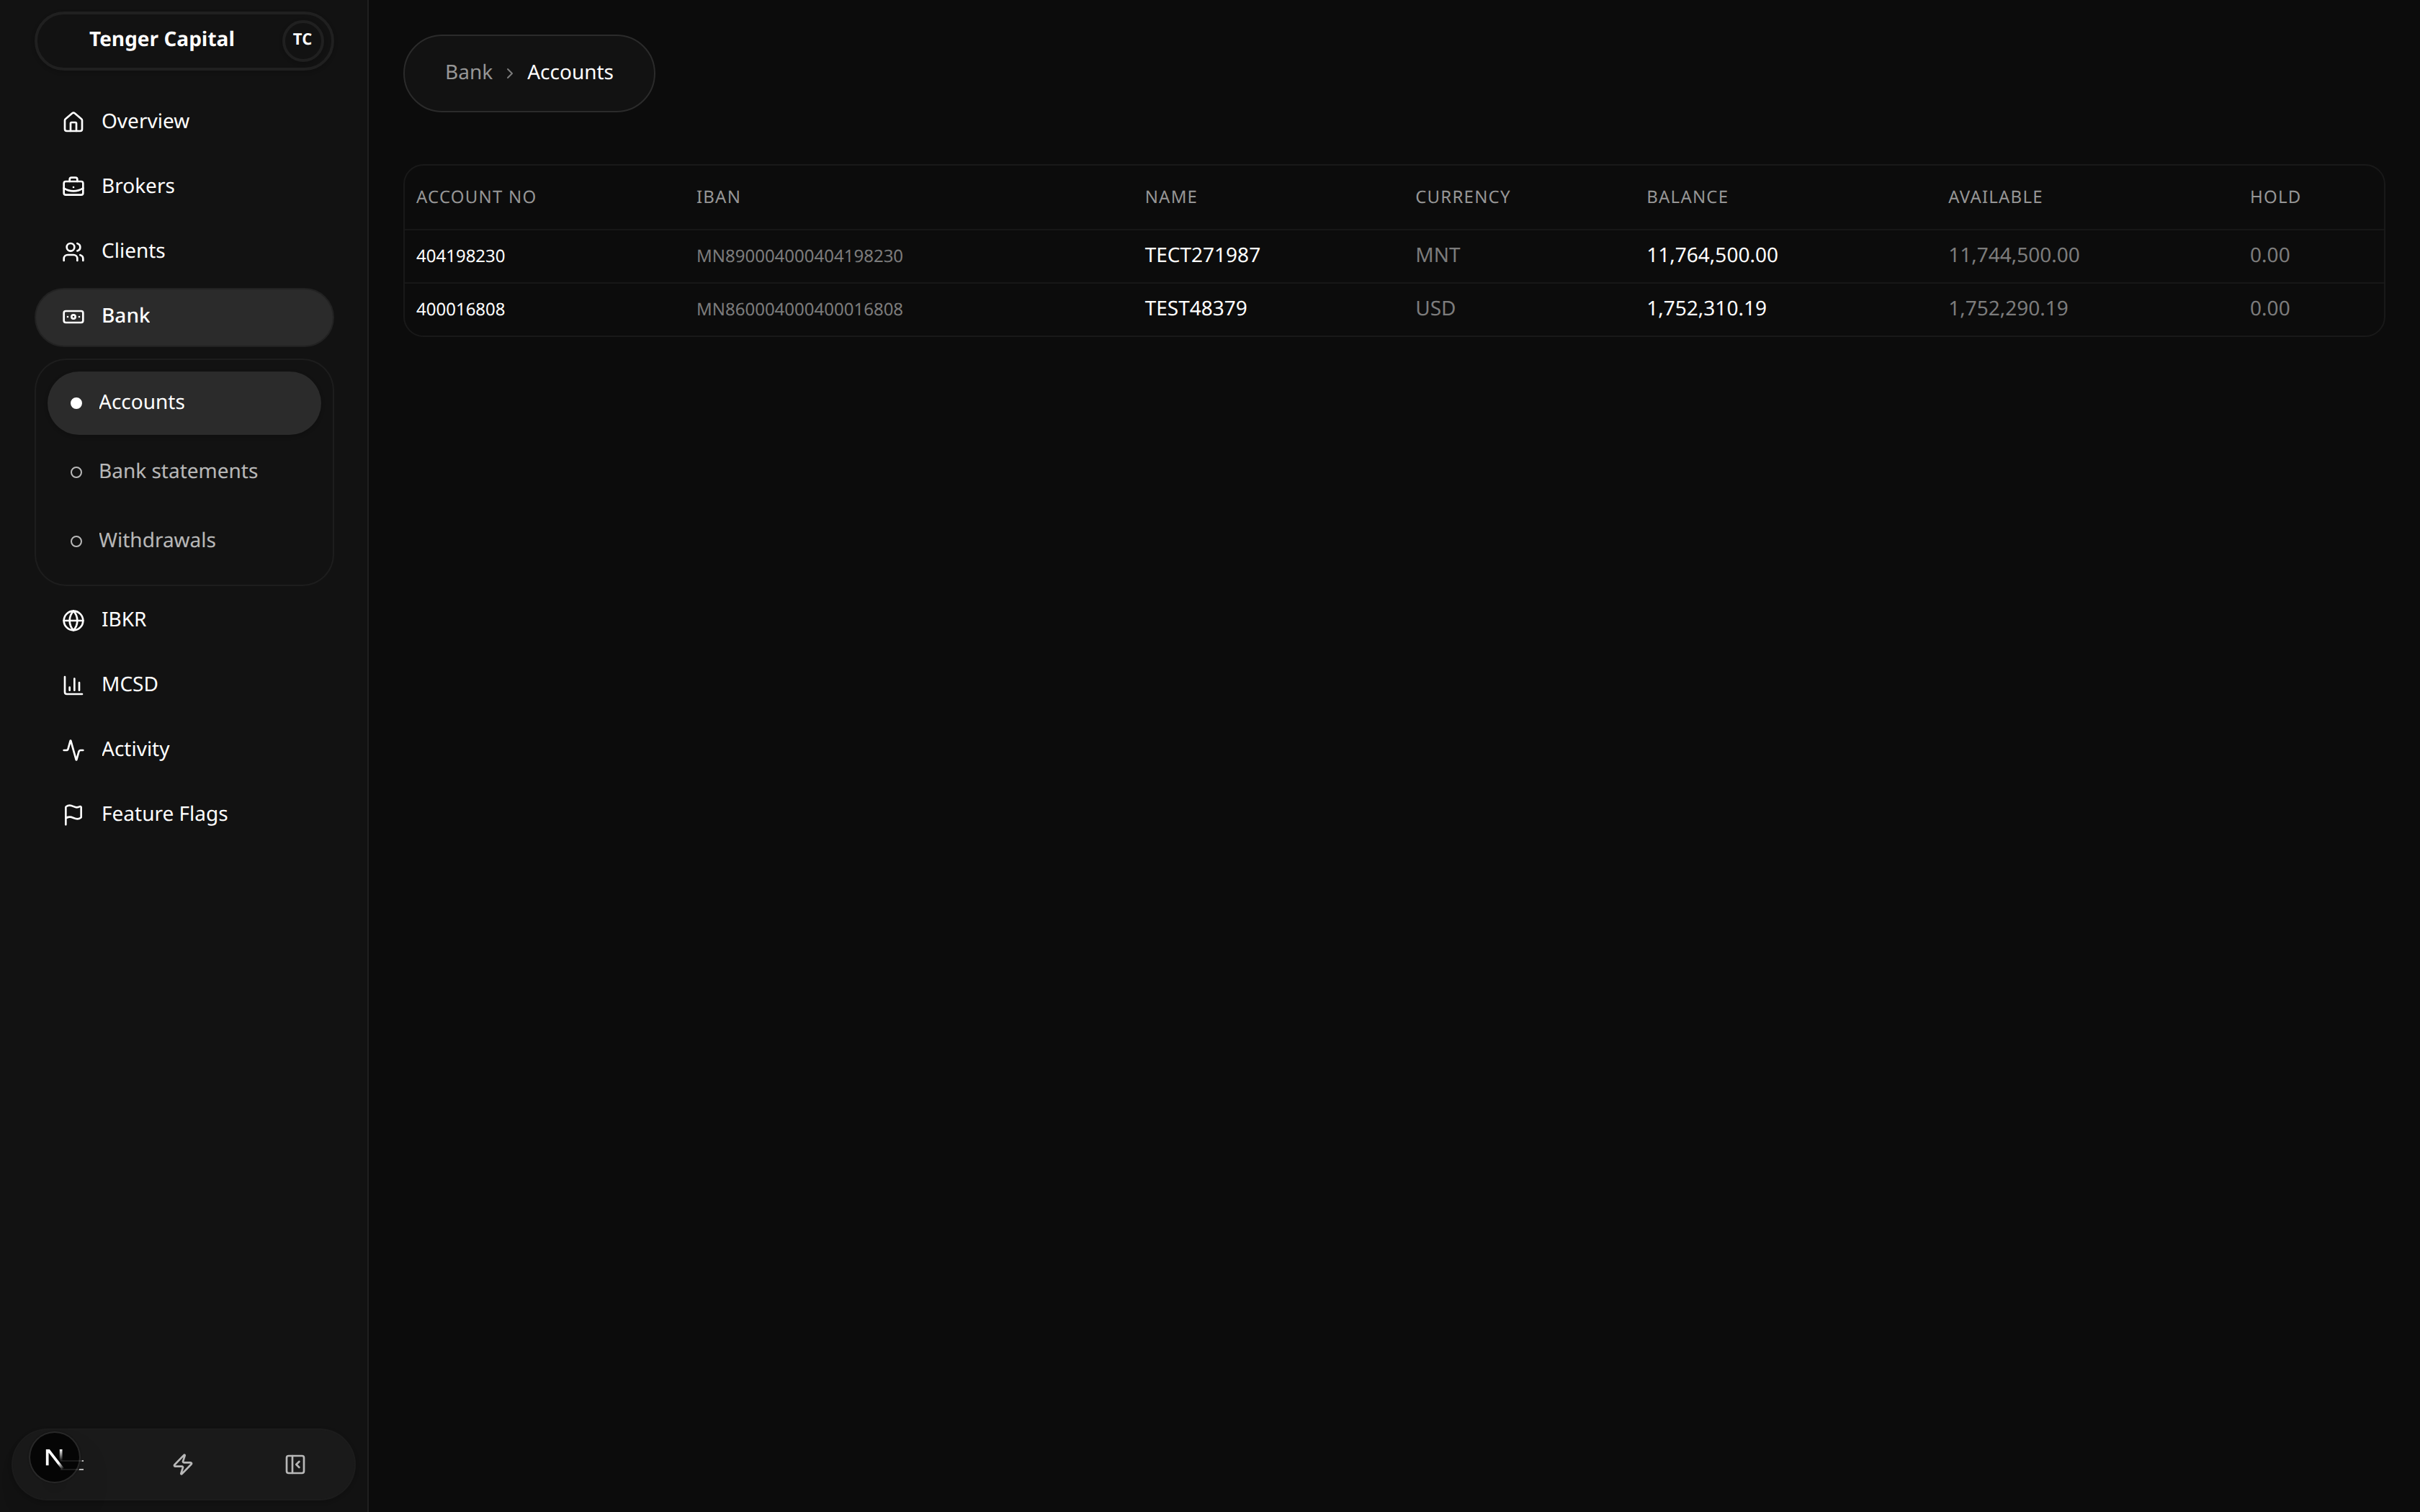
What it does
Shows the firm's pooled accounts at the bank (TDB) — the accounts that hold client deposits and the firm's own funds. Each row is one account, with its balance and how much of that balance is currently on hold. Use it to confirm at a glance what cash the firm holds at the bank and how much is free to move.
How to use
Open Bank → Accounts from the sidebar and read the table:
- Account No — the bank's account number.
- IBAN — the account's international bank account number.
- Name — the account holder's name as registered with the bank.
- Currency — the currency the account is held in (for example MNT or USD).
- Balance — total funds in the account.
- Available — the part of the balance that is free to use.
- Hold — the part of the balance that is reserved and not available.
This page is for viewing only — there are no buttons or filters. The figures come straight from the bank.
Notes
- This page reads live data from the bank. Figures are fetched from the bank gateway each time the page loads, so they reflect the bank's current view, not a stored copy.
- If the page can't reach the bank it shows an error with a Retry button — click it to try loading again.
- A dash (—) in a cell means the bank did not return a value for that field.
Bank Statements
/bank/statements
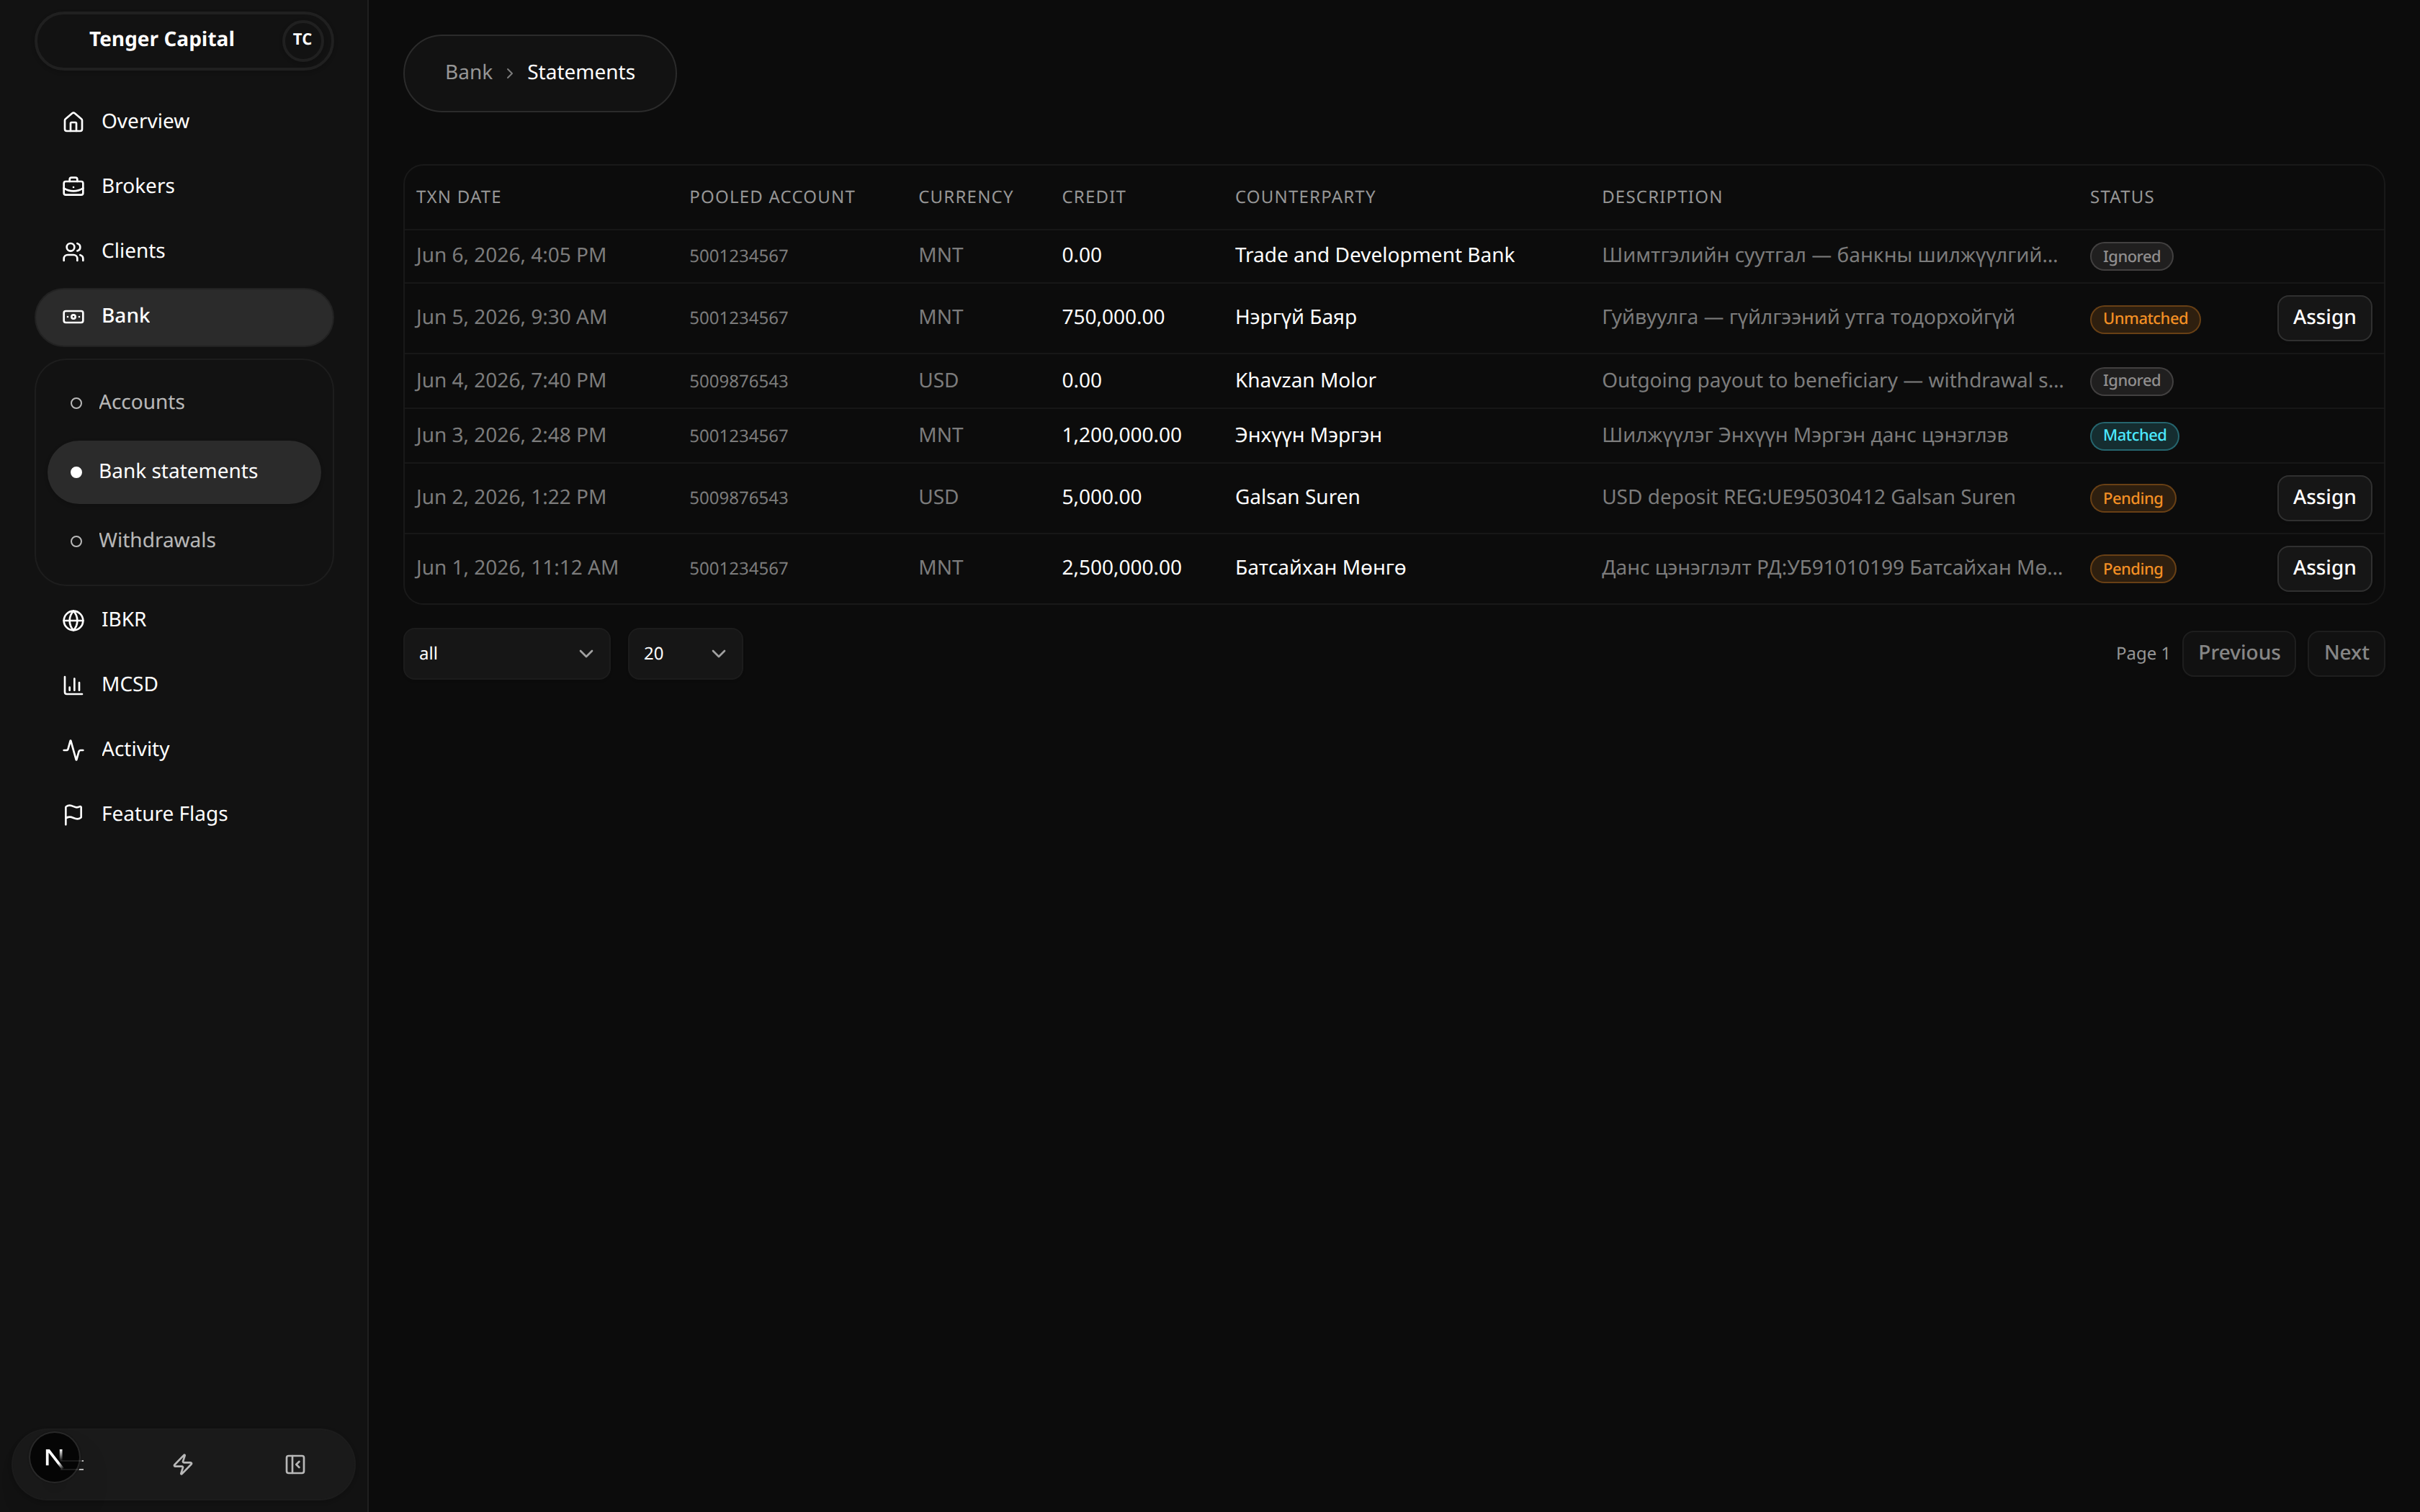
What it does
Lists the transactions that have landed in the firm's pooled bank accounts — the raw movements pulled from the bank statement. Its main job is to help you match incoming deposits to the right client: when a credit arrives but the platform can't tell whose it is, you assign it here so the money is posted to that client's balance.
How to use
Open Bank → Statements from the sidebar and read the table:
- Txn date — when the transaction posted at the bank.
- Pooled account — which firm bank account the movement landed in.
- Currency — the currency of the movement (for example MNT or USD).
- Credit — the amount received. Outgoing/zero-credit rows show 0.00.
- Counterparty — the name (or account number) of whoever sent the money.
- Description — the bank's reference text for the transaction.
- Status — how the deposit has been matched (see below).
Filter the list
- Use the status dropdown (bottom left) to show only pending, matched, unmatched, or ignored rows, or All statuses.
- Use the page-size control and Previous / Next to move through the list.
What the statuses mean
- Pending — a credit that hasn't been matched to a client yet.
- Matched — already linked to a client and posted as a deposit.
- Unmatched — the platform couldn't automatically find an owner; it needs a human to assign it.
- Ignored — set aside as not requiring a client deposit (for example a bank-to-bank movement).
Assign a deposit to a client
Rows that have an incoming credit and aren't already matched show an Assign button on the right.
- Click Assign on the row.
- In the dialog, search for the client by name, email, or registration number and pick the right person from the results.
- Click Assign deposit. The credit is posted to that client as a completed deposit, and the row's status updates to matched.
Notes
- You can only assign rows that actually received money — zero-credit and already-matched rows have no Assign button.
- Assigning posts a real deposit to the client's balance, so double-check you've picked the correct client before confirming.
- Search needs a few characters before it returns results; type the client's name, email, or registration number.
Bank Withdrawals
/bank/withdrawals
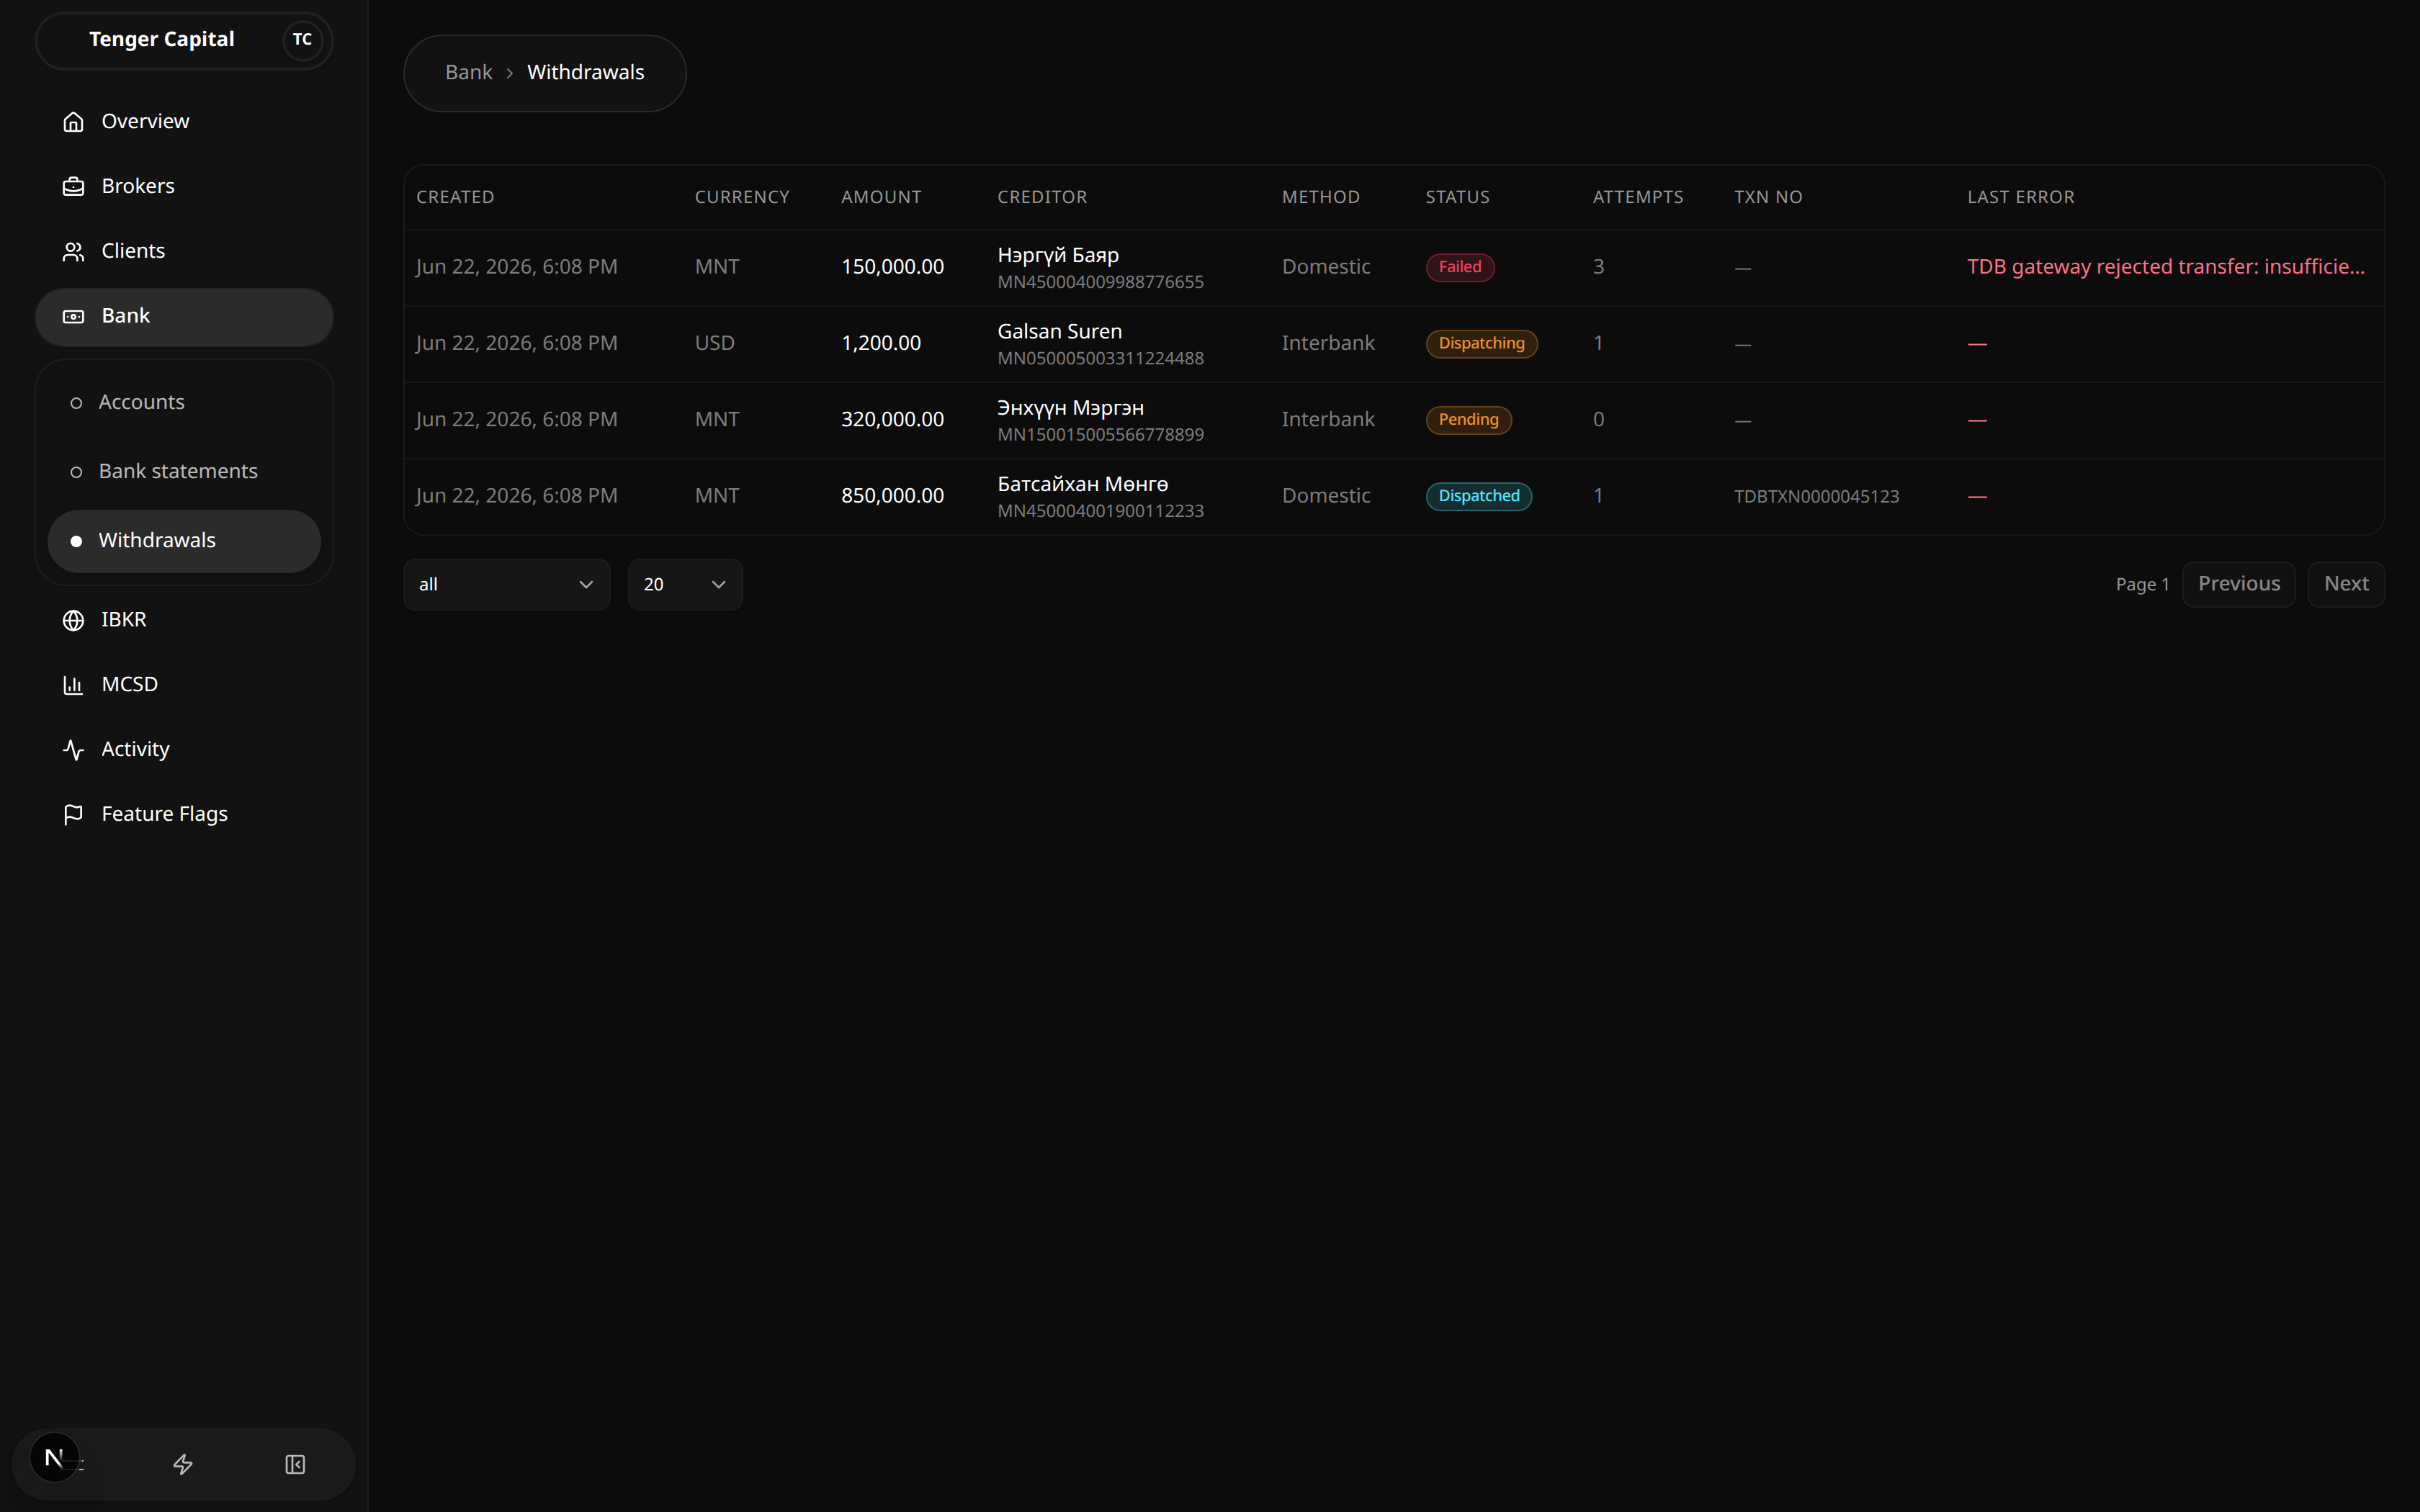
What it does
Tracks the payouts the platform sends to the bank (TDB) — money leaving the firm's pooled accounts to a client's or beneficiary's bank account. Each row is one outgoing transfer, showing where it stands, how many times it's been tried, and any error the bank returned. Use it to confirm that withdrawals are going out cleanly and to spot any that are stuck or failing.
How to use
Open Bank → Withdrawals from the sidebar and read the table:
- Created — when the withdrawal was queued.
- Currency — the currency of the payout (for example MNT or USD).
- Amount — how much is being sent.
- Creditor — the beneficiary's name and account number receiving the money.
- Method — how the transfer is routed: domestic (within the same bank) or interbank (to another bank).
- Status — where the payout stands (see below).
- Attempts — how many times the platform has tried to send it.
- Txn No — the bank's transaction reference, once the payout succeeds.
- Last error — the most recent failure message from the bank, if any.
Filter the list
- Use the status dropdown (bottom left) to show only pending, dispatching, dispatched, or failed rows, or All statuses.
- Use the page-size control and Previous / Next to move through the list.
What the statuses mean
- Pending — queued and waiting to be sent to the bank.
- Dispatching — currently being sent.
- Dispatched — successfully handed to the bank; the Txn No is filled in.
- Failed — the bank rejected it or it couldn't be sent; check Last error and Attempts.
Notes
- This page is for viewing only — withdrawals are created elsewhere in the platform and appear here as they are processed.
- A rising Attempts count with a failed status means the payout kept being retried and still didn't go through; read Last error for the bank's reason.
- A dash (—) means there is no value yet — for example Txn No stays blank until a payout is dispatched, and Last error stays blank while things are going well.
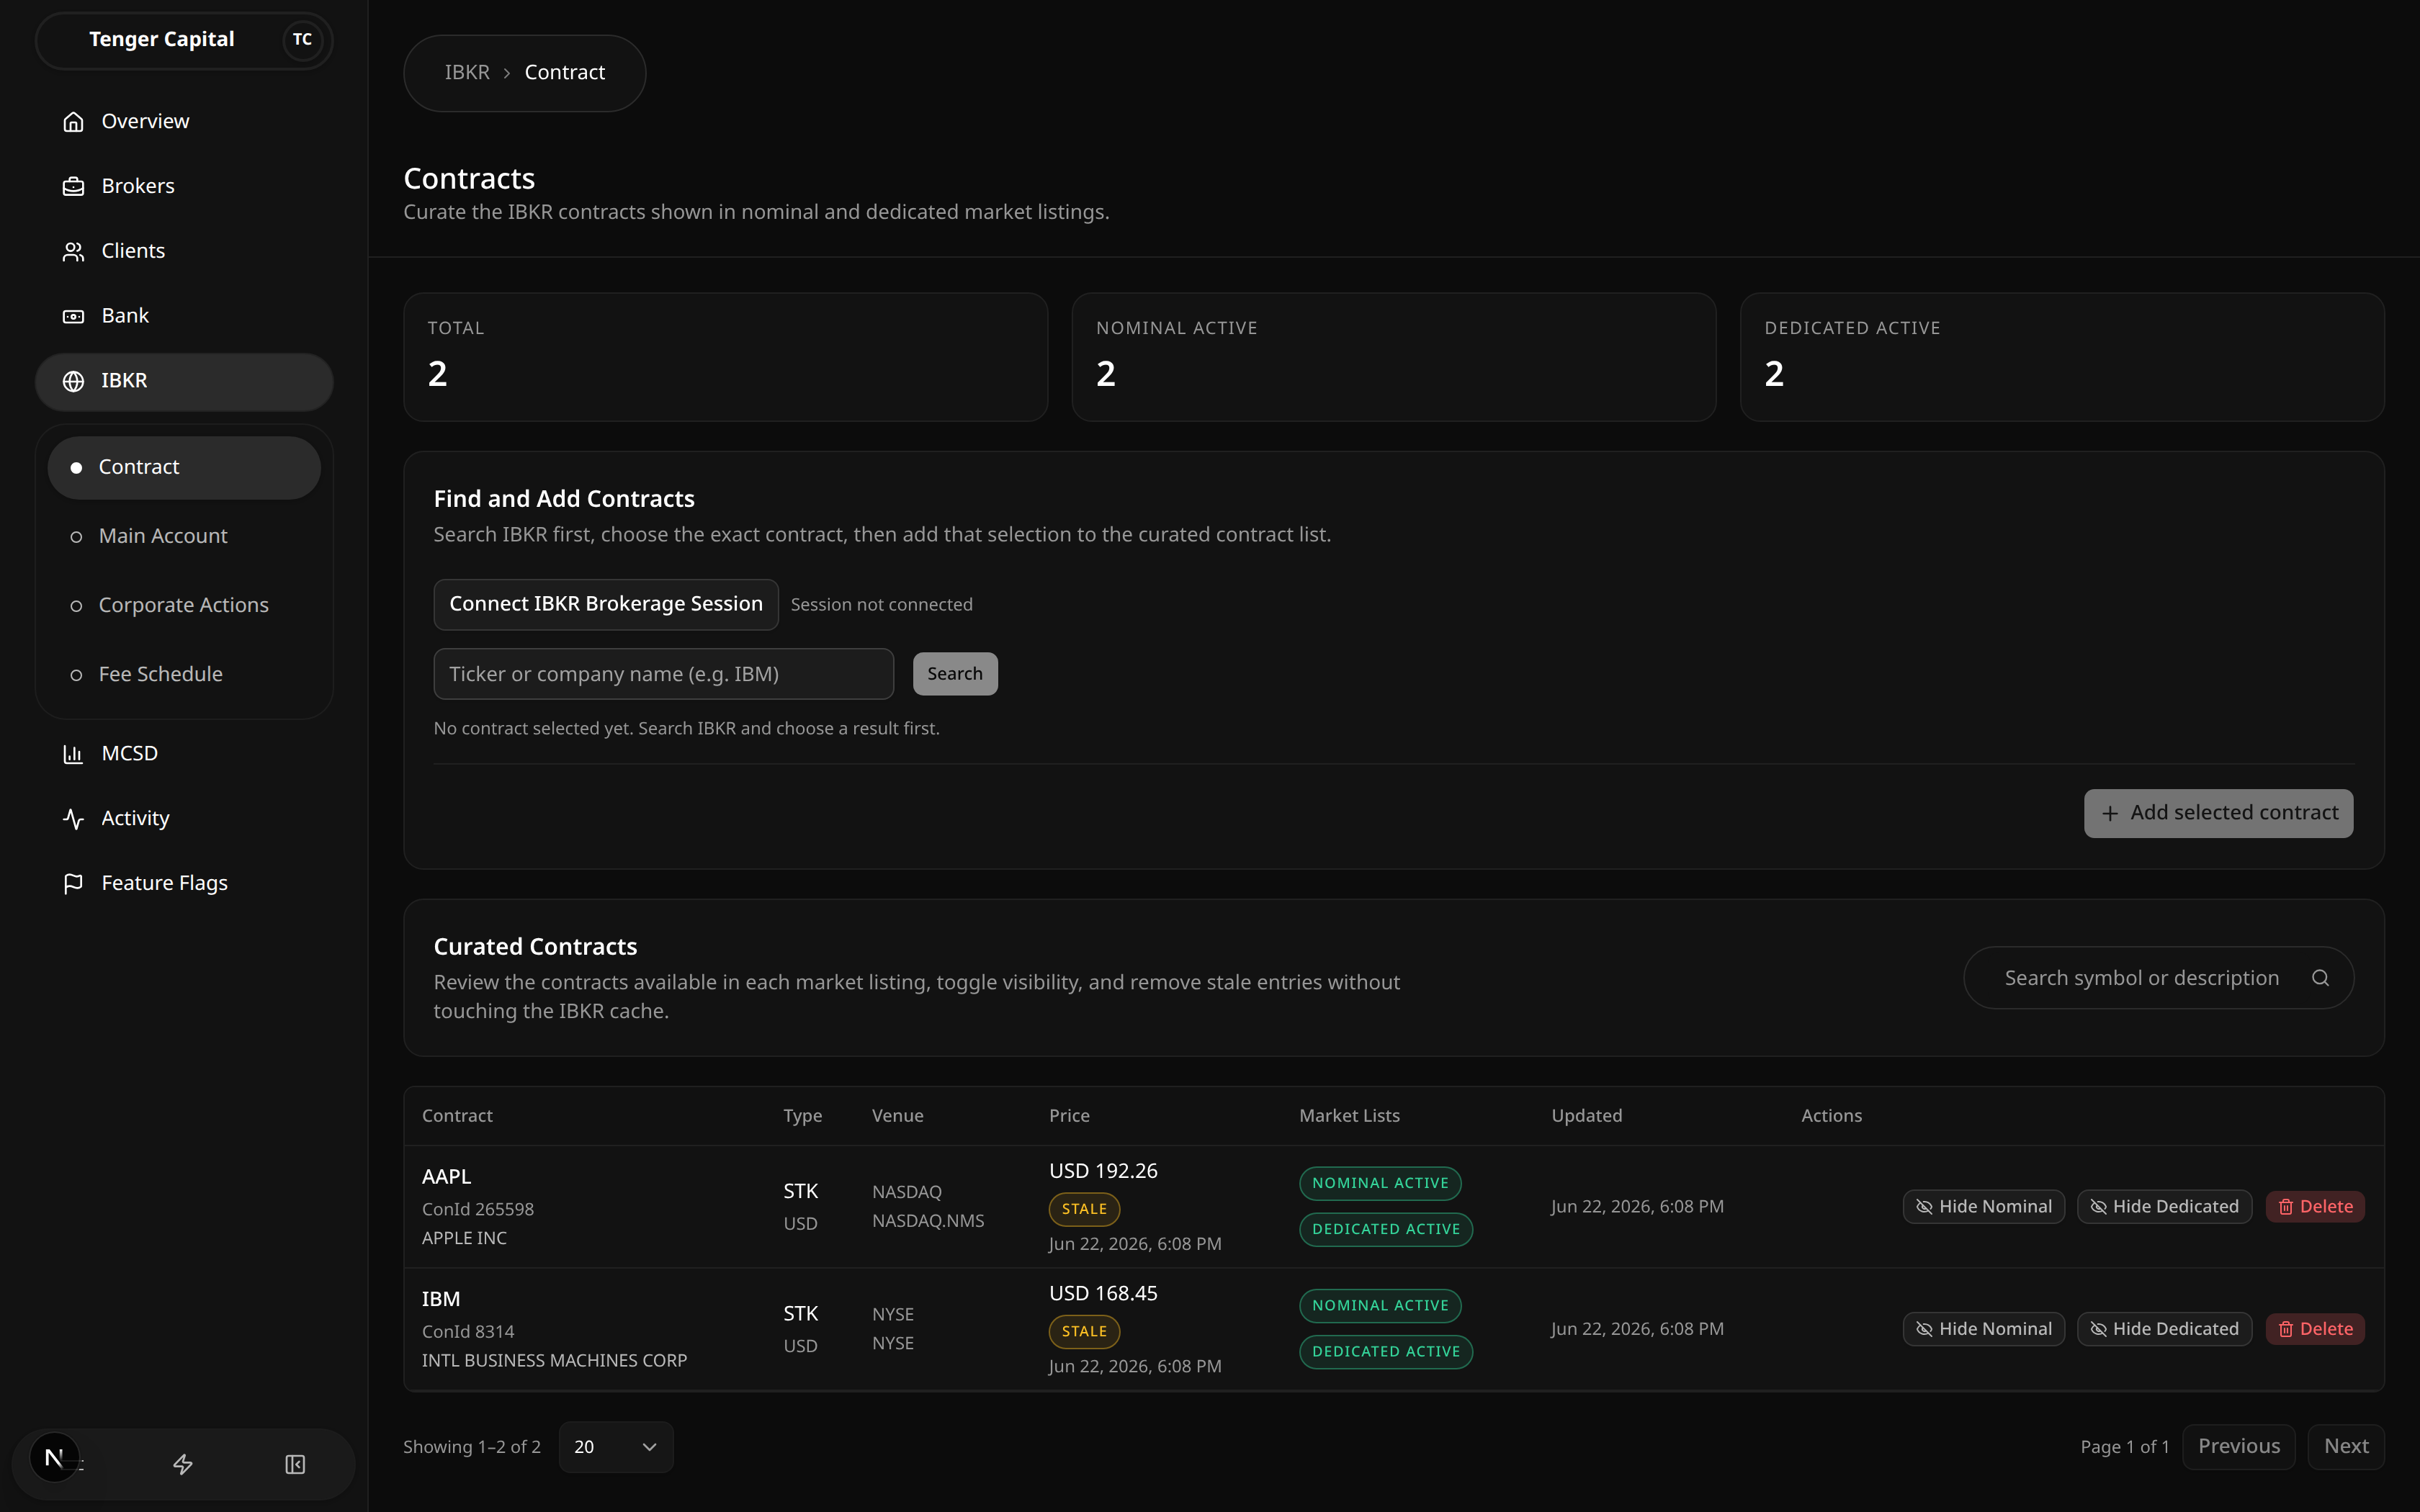
Contracts
/ibkr/contracts

What it does
Curates the IBKR contracts (stocks) that clients can see and trade in the nominal and dedicated market listings. Each curated contract is saved to the platform with its contract ID, symbol, security type, currency and venue, and you control whether it appears in each listing. Contracts that aren't curated here simply don't show up for clients.
The three cards at the top summarise the list: Total curated contracts, Nominal Active (visible in the nominal listing) and Dedicated Active (visible in the dedicated listing).
How to use
Find and add contracts
Adding a contract is a two-step "search, then save" flow:
- Click Connect IBKR Brokerage Session. The label next to it changes to Session ready once connected — you must connect before searching.
- Type a ticker or company name (for example
IBM) into the search box and click Search, or press Enter. - A result list opens. Use the filter box to narrow it down, then click the contract you want. The selected contract is shown back to you with its contract ID and description; click Change selection if you picked the wrong one.
- Click Add selected contract to save it to the curated list. If the contract is already curated, saving refreshes its cached details.
Manage curated contracts
The Curated Contracts table lists everything you've added. Use the search box to find a contract by symbol or description. Each row shows the contract, type and currency, venue, latest price with a quote freshness pill (Fresh / Stale / No Quote), the market-list status, and when it was last updated.
Per row you can:
- Show / Hide Nominal — toggle whether the contract appears in the nominal market listing.
- Show / Hide Dedicated — toggle whether it appears in the dedicated listing.
- Delete — remove the contract from the curated list. A confirmation dialog appears first; cached IBKR lookup data is kept.
Notes
- Only stock (STK) contracts are supported, so every search is limited to stocks.
- A contract can be visible in the nominal listing, the dedicated listing, both, or neither — the two toggles are independent.
- Prices come from a quote sync that only runs for contracts visible in at least one listing, so a hidden contract may show "No Quote" until you make it visible.
- A Stale quote means the last known price is out of date; treat it with care until it refreshes.
- Deleting a contract only removes it from the curated list — it does not delete the underlying IBKR cache, so you can re-add it later.
Corporate Actions
/ibkr/corporate-actions
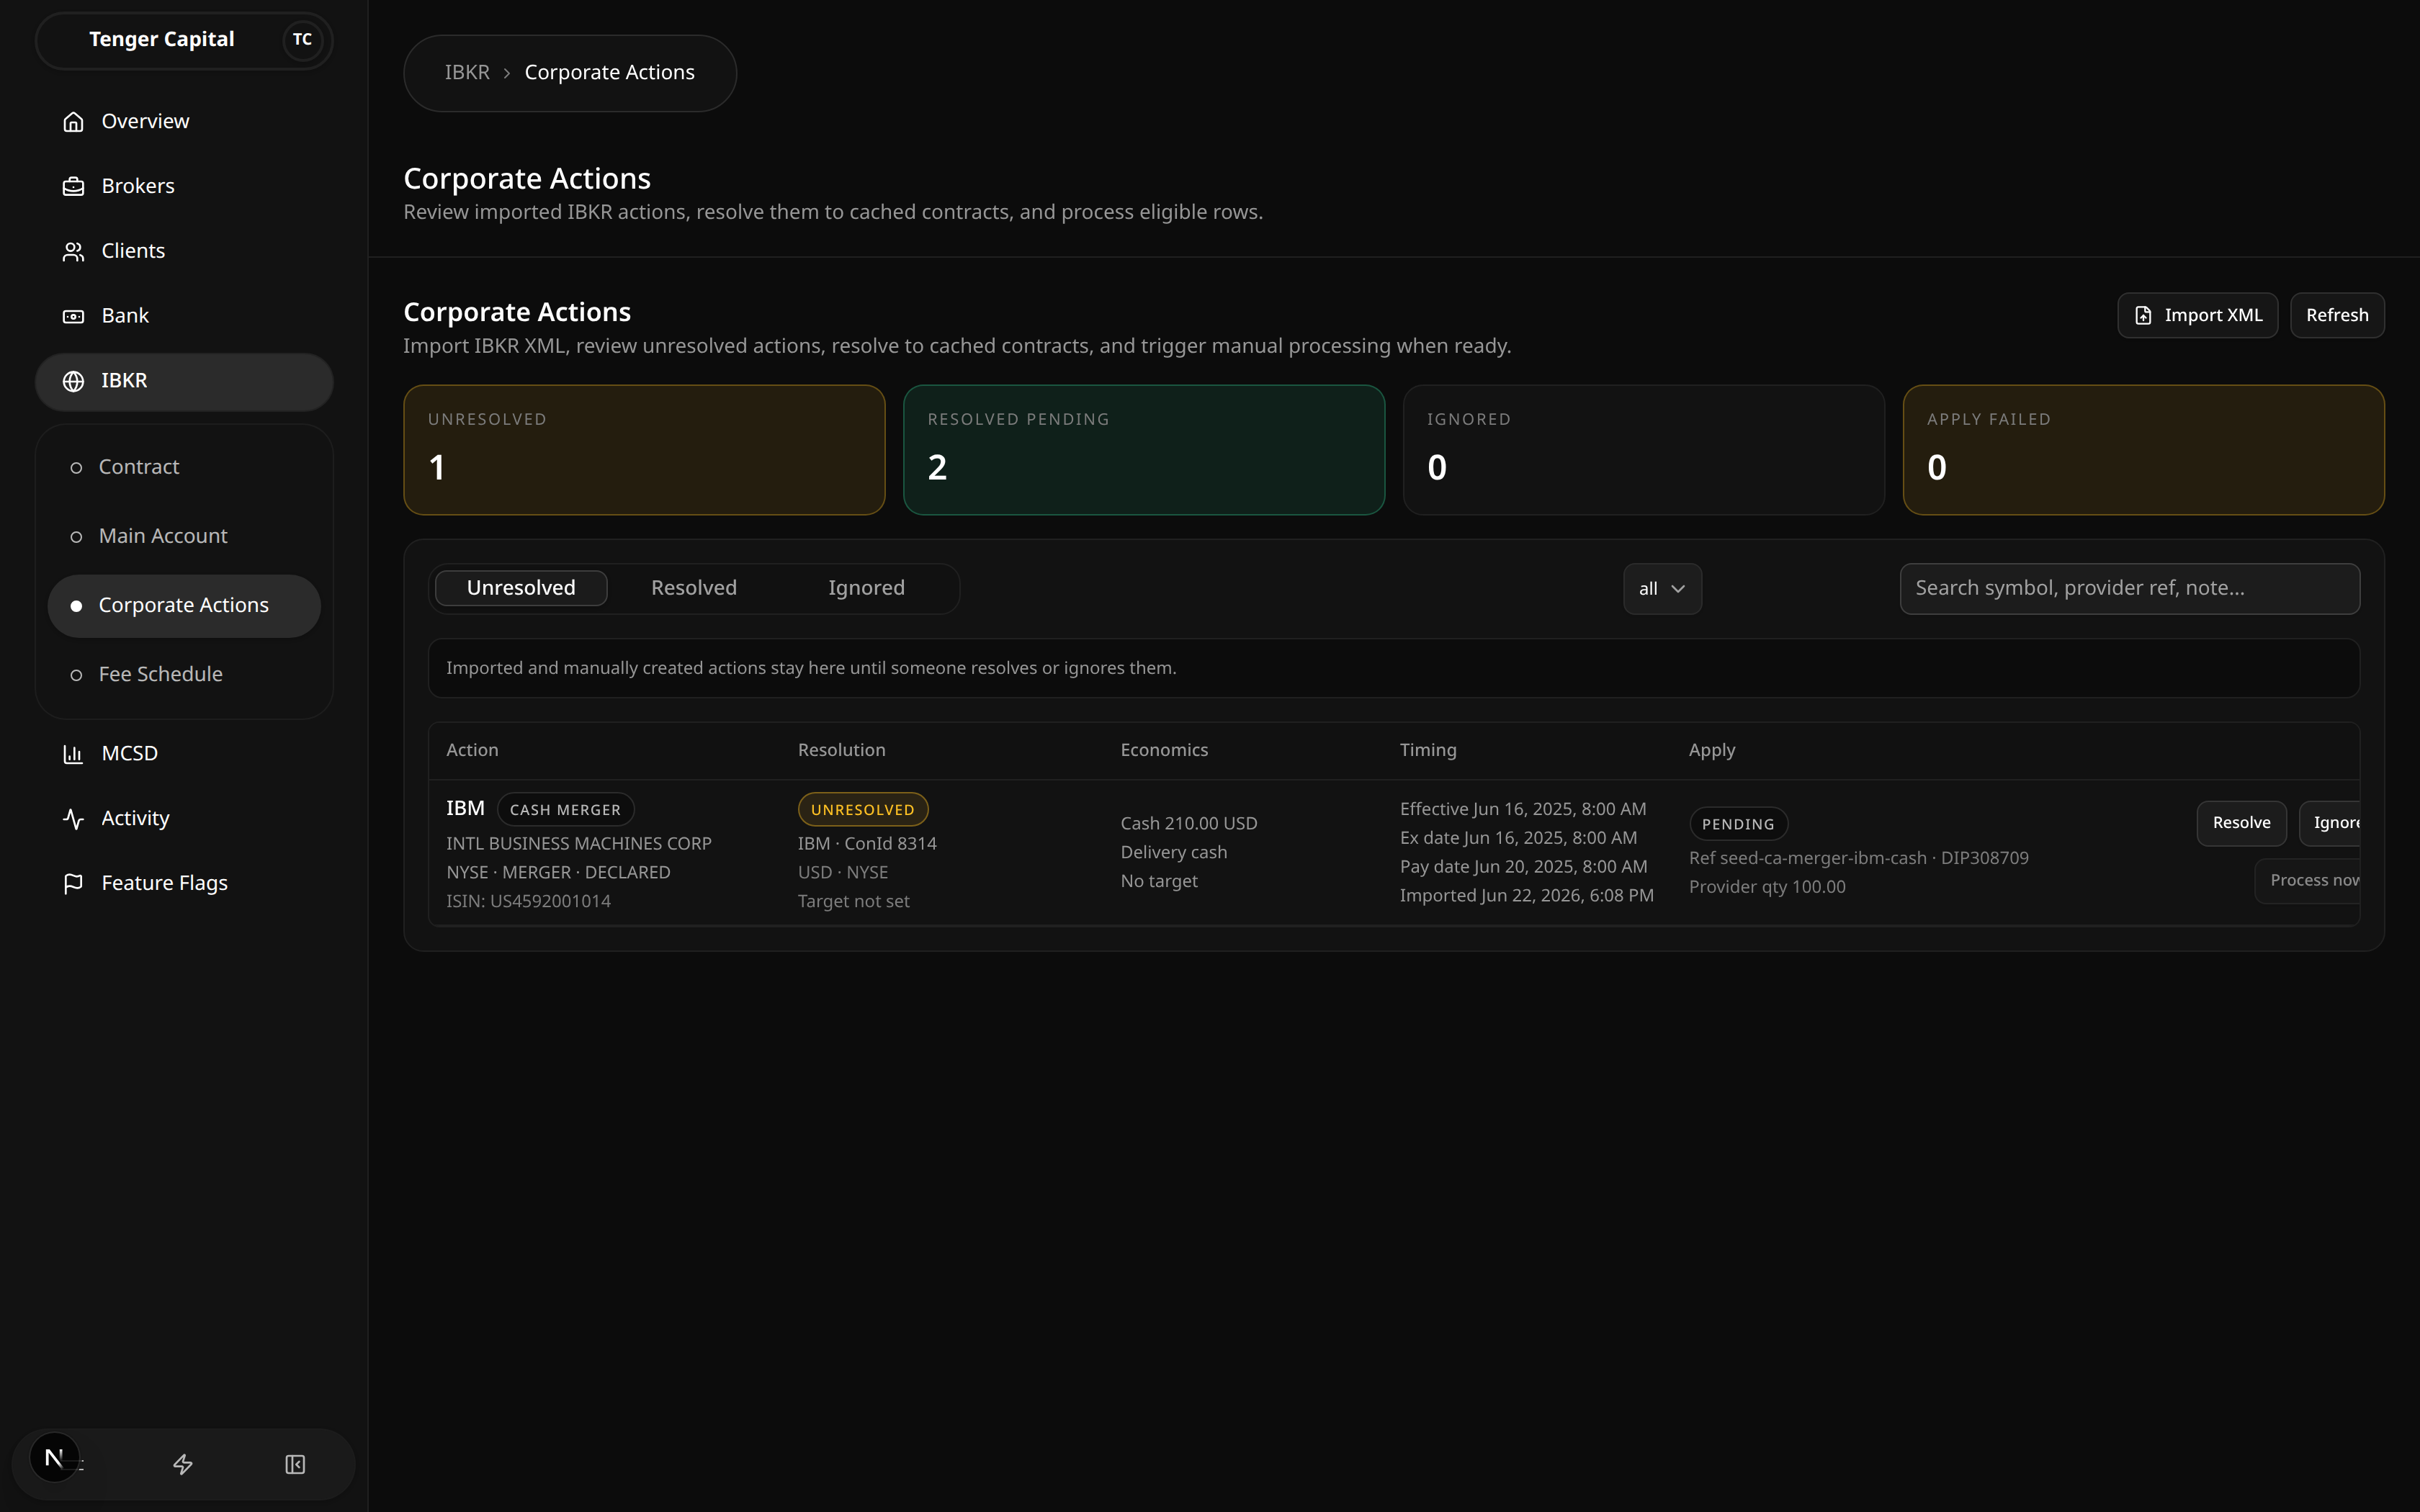
What it does
Manages the corporate actions imported from IBKR — dividends, stock splits and mergers. From here you review each imported action, resolve it to one of the curated contracts so the platform knows exactly which security it affects, and then process the eligible ones (crediting cash for dividends, adjusting share counts for splits, and so on).
Four summary cards across the top track the queue at a glance:
- Unresolved — imported actions still waiting for someone to resolve or ignore them.
- Resolved Pending — resolved actions that are ready to be processed but haven't been applied yet.
- Ignored — actions deliberately set aside.
- Apply Failed — actions whose processing failed and need attention.
How to use
Import XML
- Click Import XML (top right).
- Paste an IBKR corporate-action XML payload into the box, or click Choose
file to load an
.xmlfile. - Click Import. Supported actions are added as Unresolved rows; the result message tells you how many were imported and how many were skipped.
- Use Refresh at any time to reload the list.
Tabs and filters
The list is split into three tabs:
- Unresolved — newly imported (and manually created) actions that still need to be resolved or ignored.
- Resolved — actions that have been pointed at a contract. Only these can be processed; pending applies are ready to run.
- Ignored — actions kept for audit history but excluded from processing.
Within any tab you can narrow the list by action type (all, dividend, stock split, merger) and search by symbol, provider reference, or note. Each row shows the action and its provider details, the resolution status and matched contract, the economics (per-share amounts, ratios, etc.), key dates (effective, ex, pay), and the apply status.
Resolve
- On an unresolved row, click Resolve.
- The dialog shows the provider's action details and a list of candidate contracts with match hints (and, where available, whether the provider position quantity matches).
- Choose the Source contract the action applies to. Stock splits and asset mergers also ask for a Target contract (the resulting security) — for a split you can pick No target, Same as source, or a Different target contract.
- Optionally add a resolution note, then click Resolve. The row moves to the Resolved tab.
Ignore
Click Ignore on a row to remove it from the processing workflow while keeping it for audit history. You can add an optional reason. Actions that are already applied or processing can't be ignored.
Process
- For stock splits and mergers, click Process now on a resolved, pending row, then Run now in the confirmation dialog. Only resolved, still-pending actions are eligible.
- Dividends use a review step — see the Dividend page.
Sub-pages
The sidebar offers two filtered views that behave exactly like this page but start pre-filtered:
- Dividend — dividends, with the Preview / Review & apply flow.
- Stock Split — stock splits.
Notes
- An action must be resolved before it can be processed — unresolved and ignored rows are never applied.
- Resolving a stock split to a different target contract is stored, but applying currently only supports splits where the target is the same contract as the source.
- Ignored rows stay visible for the audit trail; they are simply not eligible for processing.
- If an apply fails, the action shows under Apply Failed and can be re-previewed or re-processed once the cause is fixed.
Corporate Actions - Dividend
/ibkr/corporate-actions/dividend
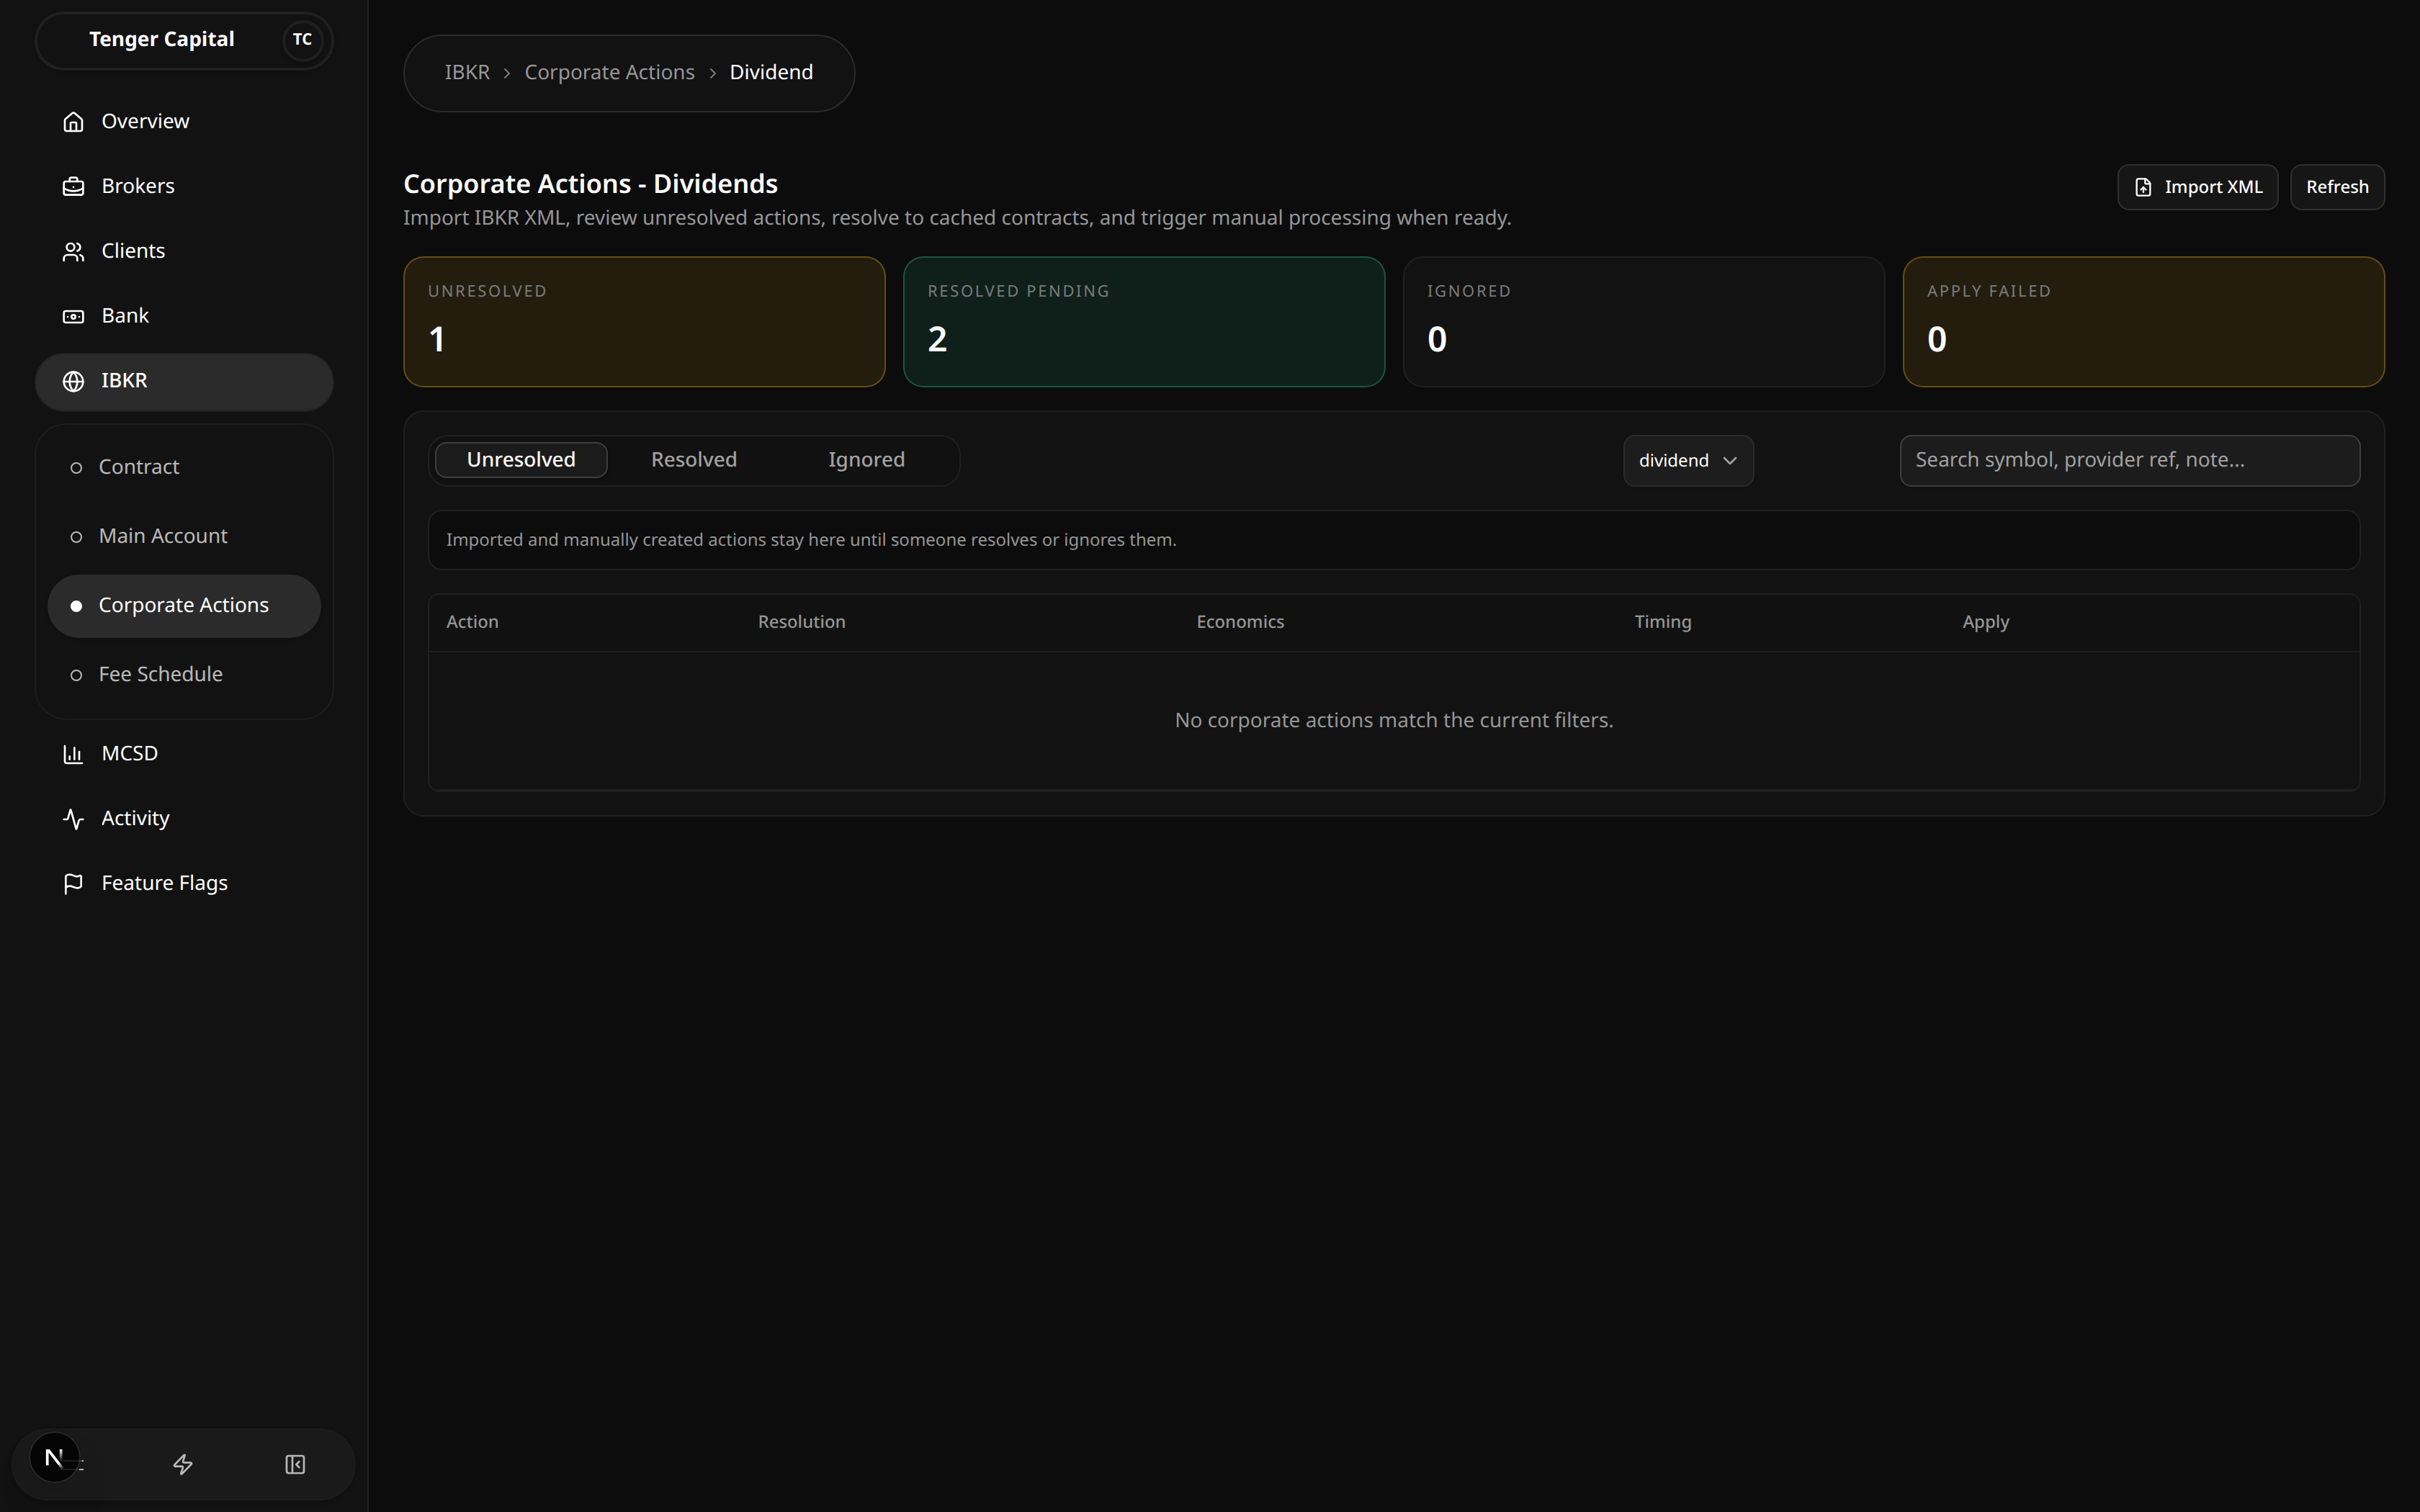
What it does
A filtered view of Corporate Actions that shows only dividends. It works the same way as the main page — the same summary cards, tabs and Import XML — but the action-type filter is locked to dividends so you can focus on cash distributions. This is also where you preview and apply the per-account cash credits for a dividend.
How to use
Review and resolve
Dividends arrive as Unresolved rows. Resolve each one to a curated contract the same way as on the main page (click Resolve, choose the source contract, add an optional note). For each dividend you can see the Gross, Net and Withholding per share alongside the ex, record and pay dates.
Preview the distribution
- On a resolved dividend, click Preview. The platform stages the distribution — working out which client accounts held the security and how much cash each is due — and tells you how many accounts are eligible and the total amount.
- The Review Dividend Distribution dialog opens automatically.
Review and apply
In the review dialog you verify the proposed per-account credits before anything posts:
- The header shows the dividend, its net-per-share rate and the key dates.
- Summary cards show Included accounts, Skipped accounts and the running Total.
- The table lists each client with their eligible shares and the proposed cash
amount. You can:
- Edit the amount for any account.
- Uncheck Include to exclude an account entirely.
- Accounts with no position are shown as Skipped (no position).
- Re-generate from holders re-stages the distribution from current holdings if positions have changed.
- When the numbers look right, click Approve & apply to credit the included accounts. Nothing posts to the ledger until you approve.
Notes
- Nothing is credited during preview — only Approve & apply posts cash to accounts.
- A distribution can only be applied while it is in the previewed state; if its status has moved on, re-preview it first.
- Amount edits stick to the exact value you type; untouched rows keep their full-precision staged amount.
- Excluded and skipped accounts receive nothing and are reported separately in the result message.
Corporate Actions - Stock Split
/ibkr/corporate-actions/stock-split

What it does
A filtered view of Corporate Actions that shows only stock splits. It behaves exactly like the main page — same summary cards, tabs and Import XML — but the action-type filter is locked to stock splits so you can work through them on their own.
How to use
Review and resolve
Stock splits arrive as Unresolved rows. For each one the economics column shows the split Ratio, the quantity Scale, and the Fractional policy (how leftover fractional shares are handled, e.g. round down).
Click Resolve to point the split at a curated contract:
- Choose the Source contract the split applies to.
- Choose the Target contract — the security clients end up holding:
- No target contract
- Same as source contract (most common)
- Different target contract, then pick the replacement contract.
- Add an optional resolution note and click Resolve. The row moves to the Resolved tab.
Process
On a resolved, pending split click Process now, then Run now in the confirmation dialog. The platform adjusts the affected accounts' share counts according to the ratio and fractional policy.
Notes
- Only resolved, still-pending splits can be processed — unresolved and ignored rows are never applied.
- Choosing a Different target contract is recorded, but applying currently only supports splits where the target is the same contract as the source. Use Same as source contract for splits you intend to process.
- The fractional policy determines what happens to leftover part-shares; review it before processing.
Fee Schedule
/ibkr/fee-schedule
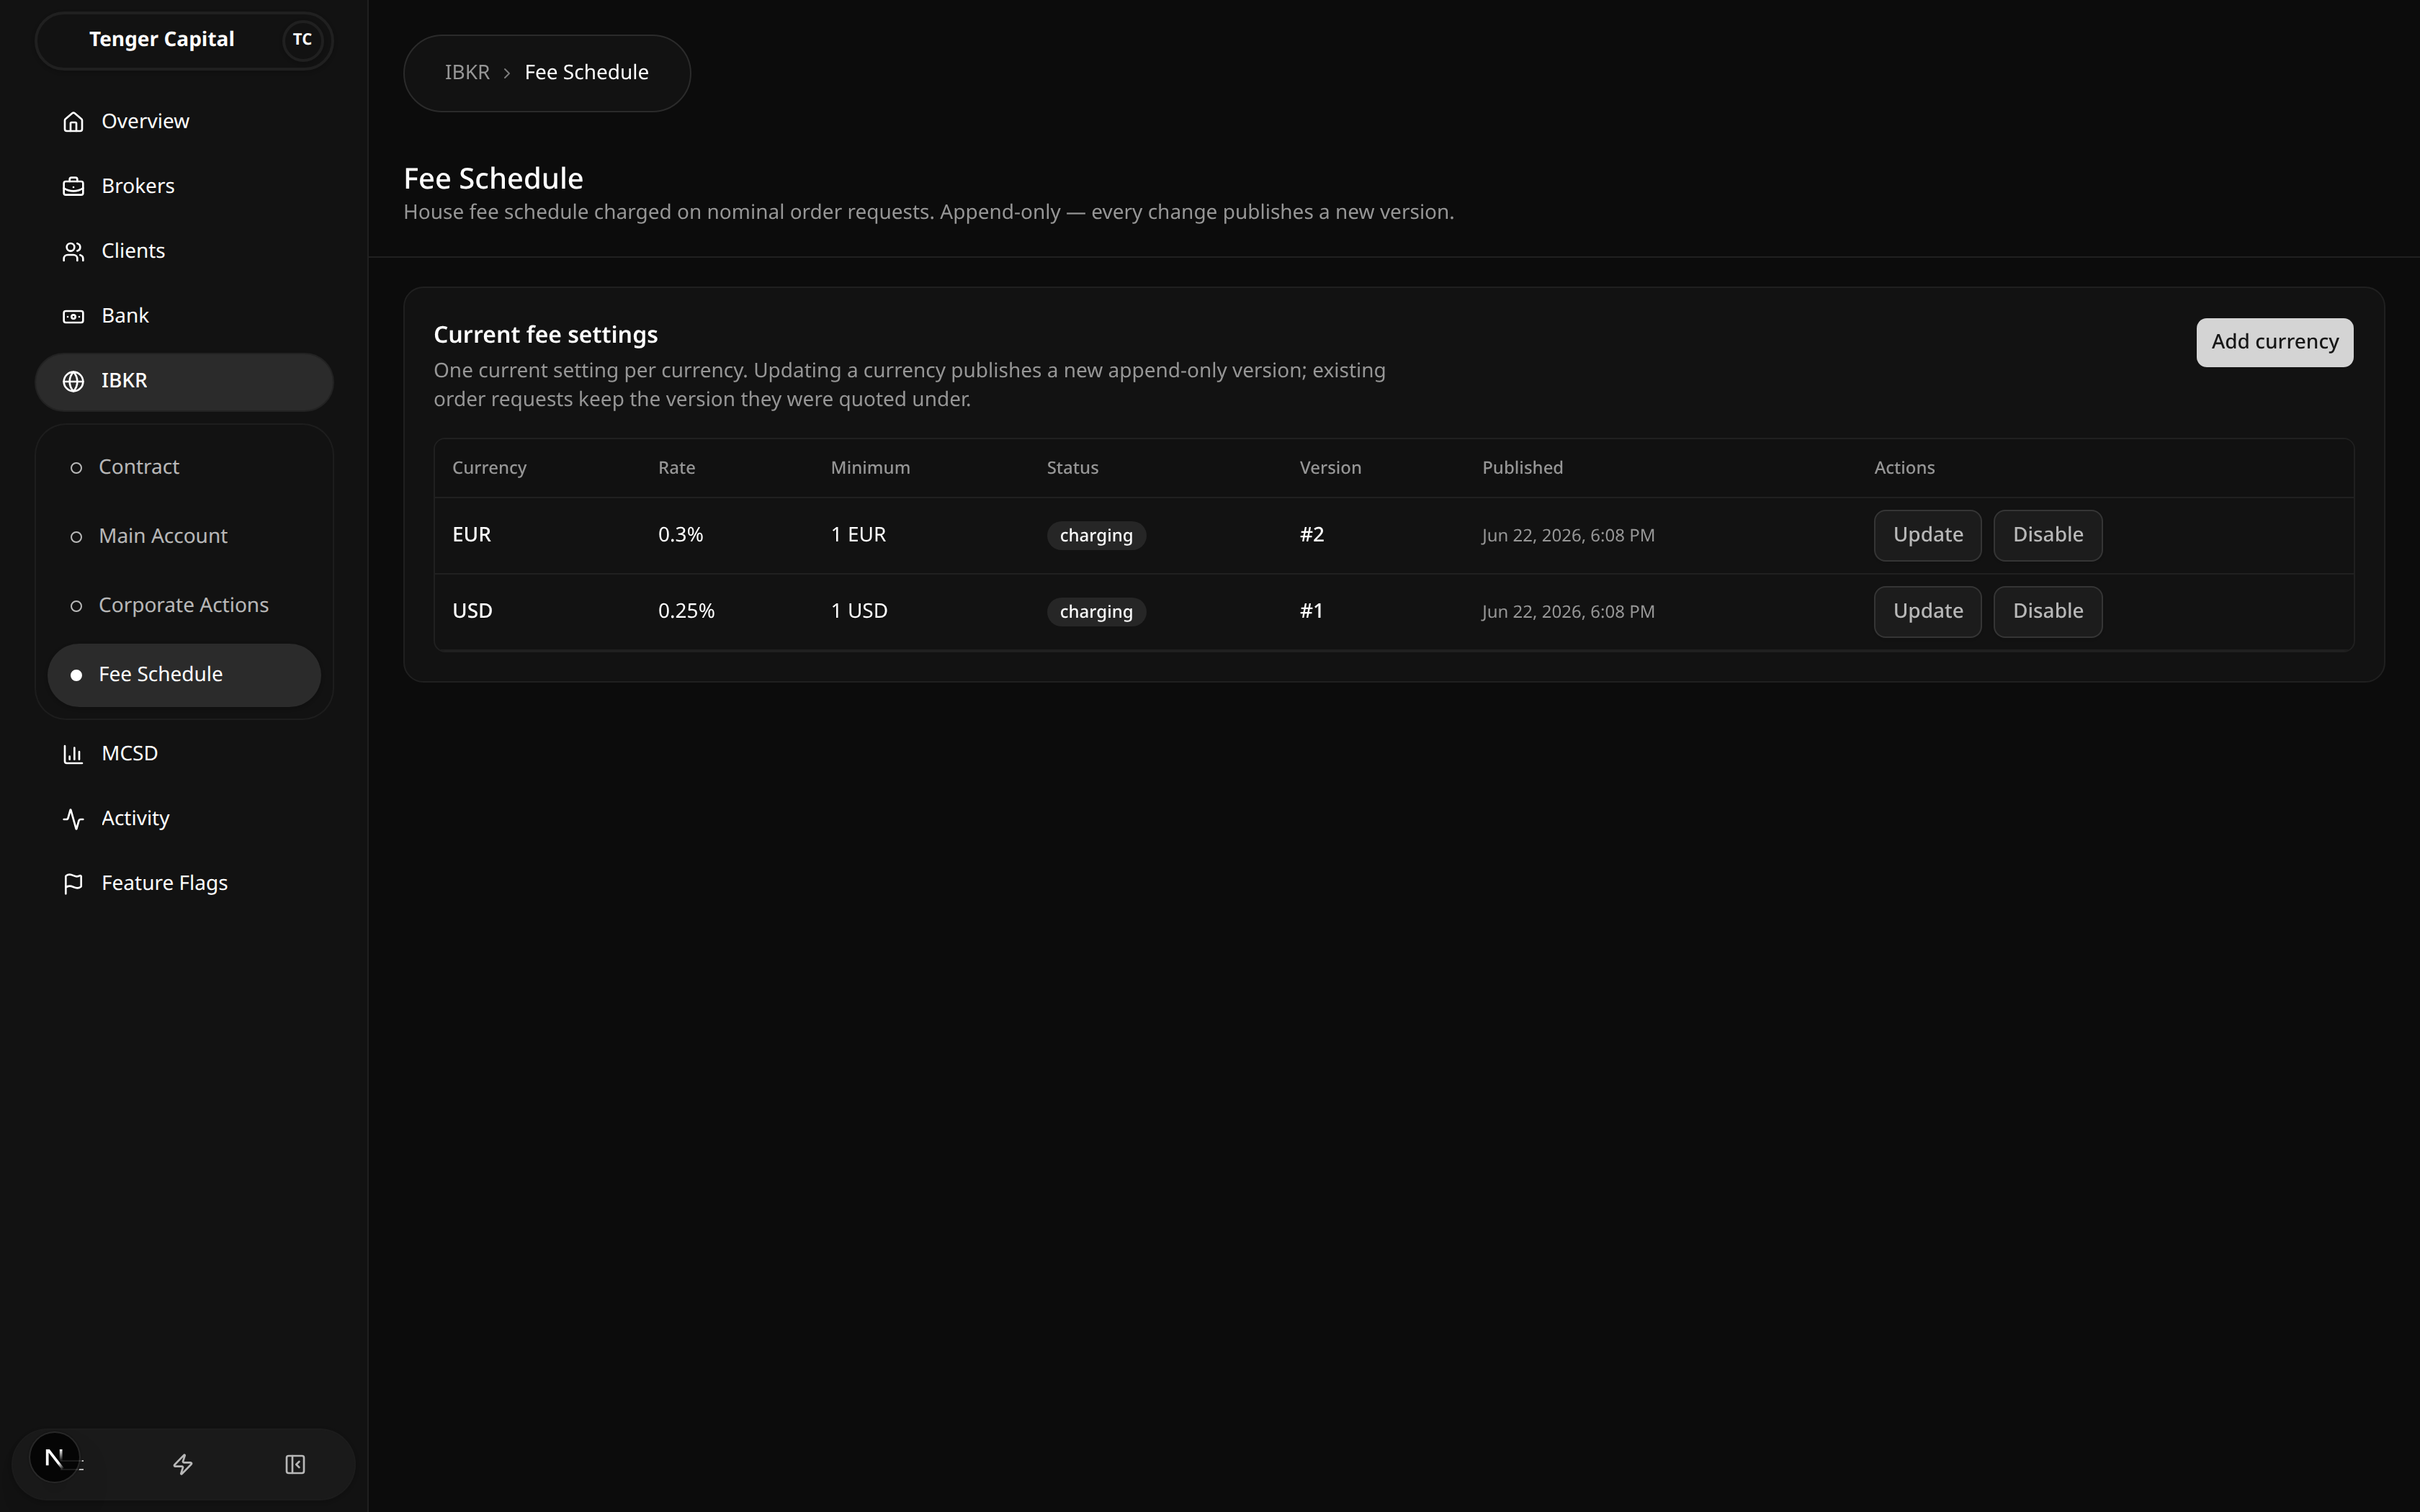
What it does
Sets the house fee charged on nominal order requests, configured per currency. Each currency has one current setting made up of a percentage rate and a minimum charge. The schedule is append-only: every change publishes a new version rather than overwriting the old one, so order requests already quoted keep the fee they were quoted under.
How to use
Review the current settings
Open IBKR → Fee Schedule and read the table. There is one row per currency:
- Currency — the currency the fee applies to (for example USD or EUR).
- Rate — the percentage charged on the order.
- Minimum — the smallest fee charged, in that currency.
- Status — charging when fees are on, or fees off when disabled.
- Version — the version number of the current setting.
- Published — when this version took effect.
Add a currency
- Click Add currency (top right).
- Enter the currency, the percentage rate and the minimum amount.
- Save. This publishes the first version for that currency and it starts charging immediately.
Update a currency
- Click Update on the currency's row.
- Change the rate and/or minimum and save. The currency itself is locked — you are publishing a new version of the same currency, not changing which currency it is.
- The new version becomes the current setting; the previous version is retained in history.
Turn fees off for a currency
- Click Disable on an active currency's row. The button arms and changes to Confirm off.
- Click Confirm off to publish a "fees off" version. The row's status changes to fees off.
If you don't confirm within a few seconds the button disarms, so you have to click twice on purpose to switch fees off.
Notes
- The schedule is append-only — you never edit or delete a version; every change creates a new one, and the full history is preserved.
- Order requests already quoted keep the fee version they were quoted under, so a change only affects future requests.
- Turning fees off is itself a published version, recorded for audit; you can re-enable a currency later by updating it again.
Main Account Cash
/ibkr/main-account/cash
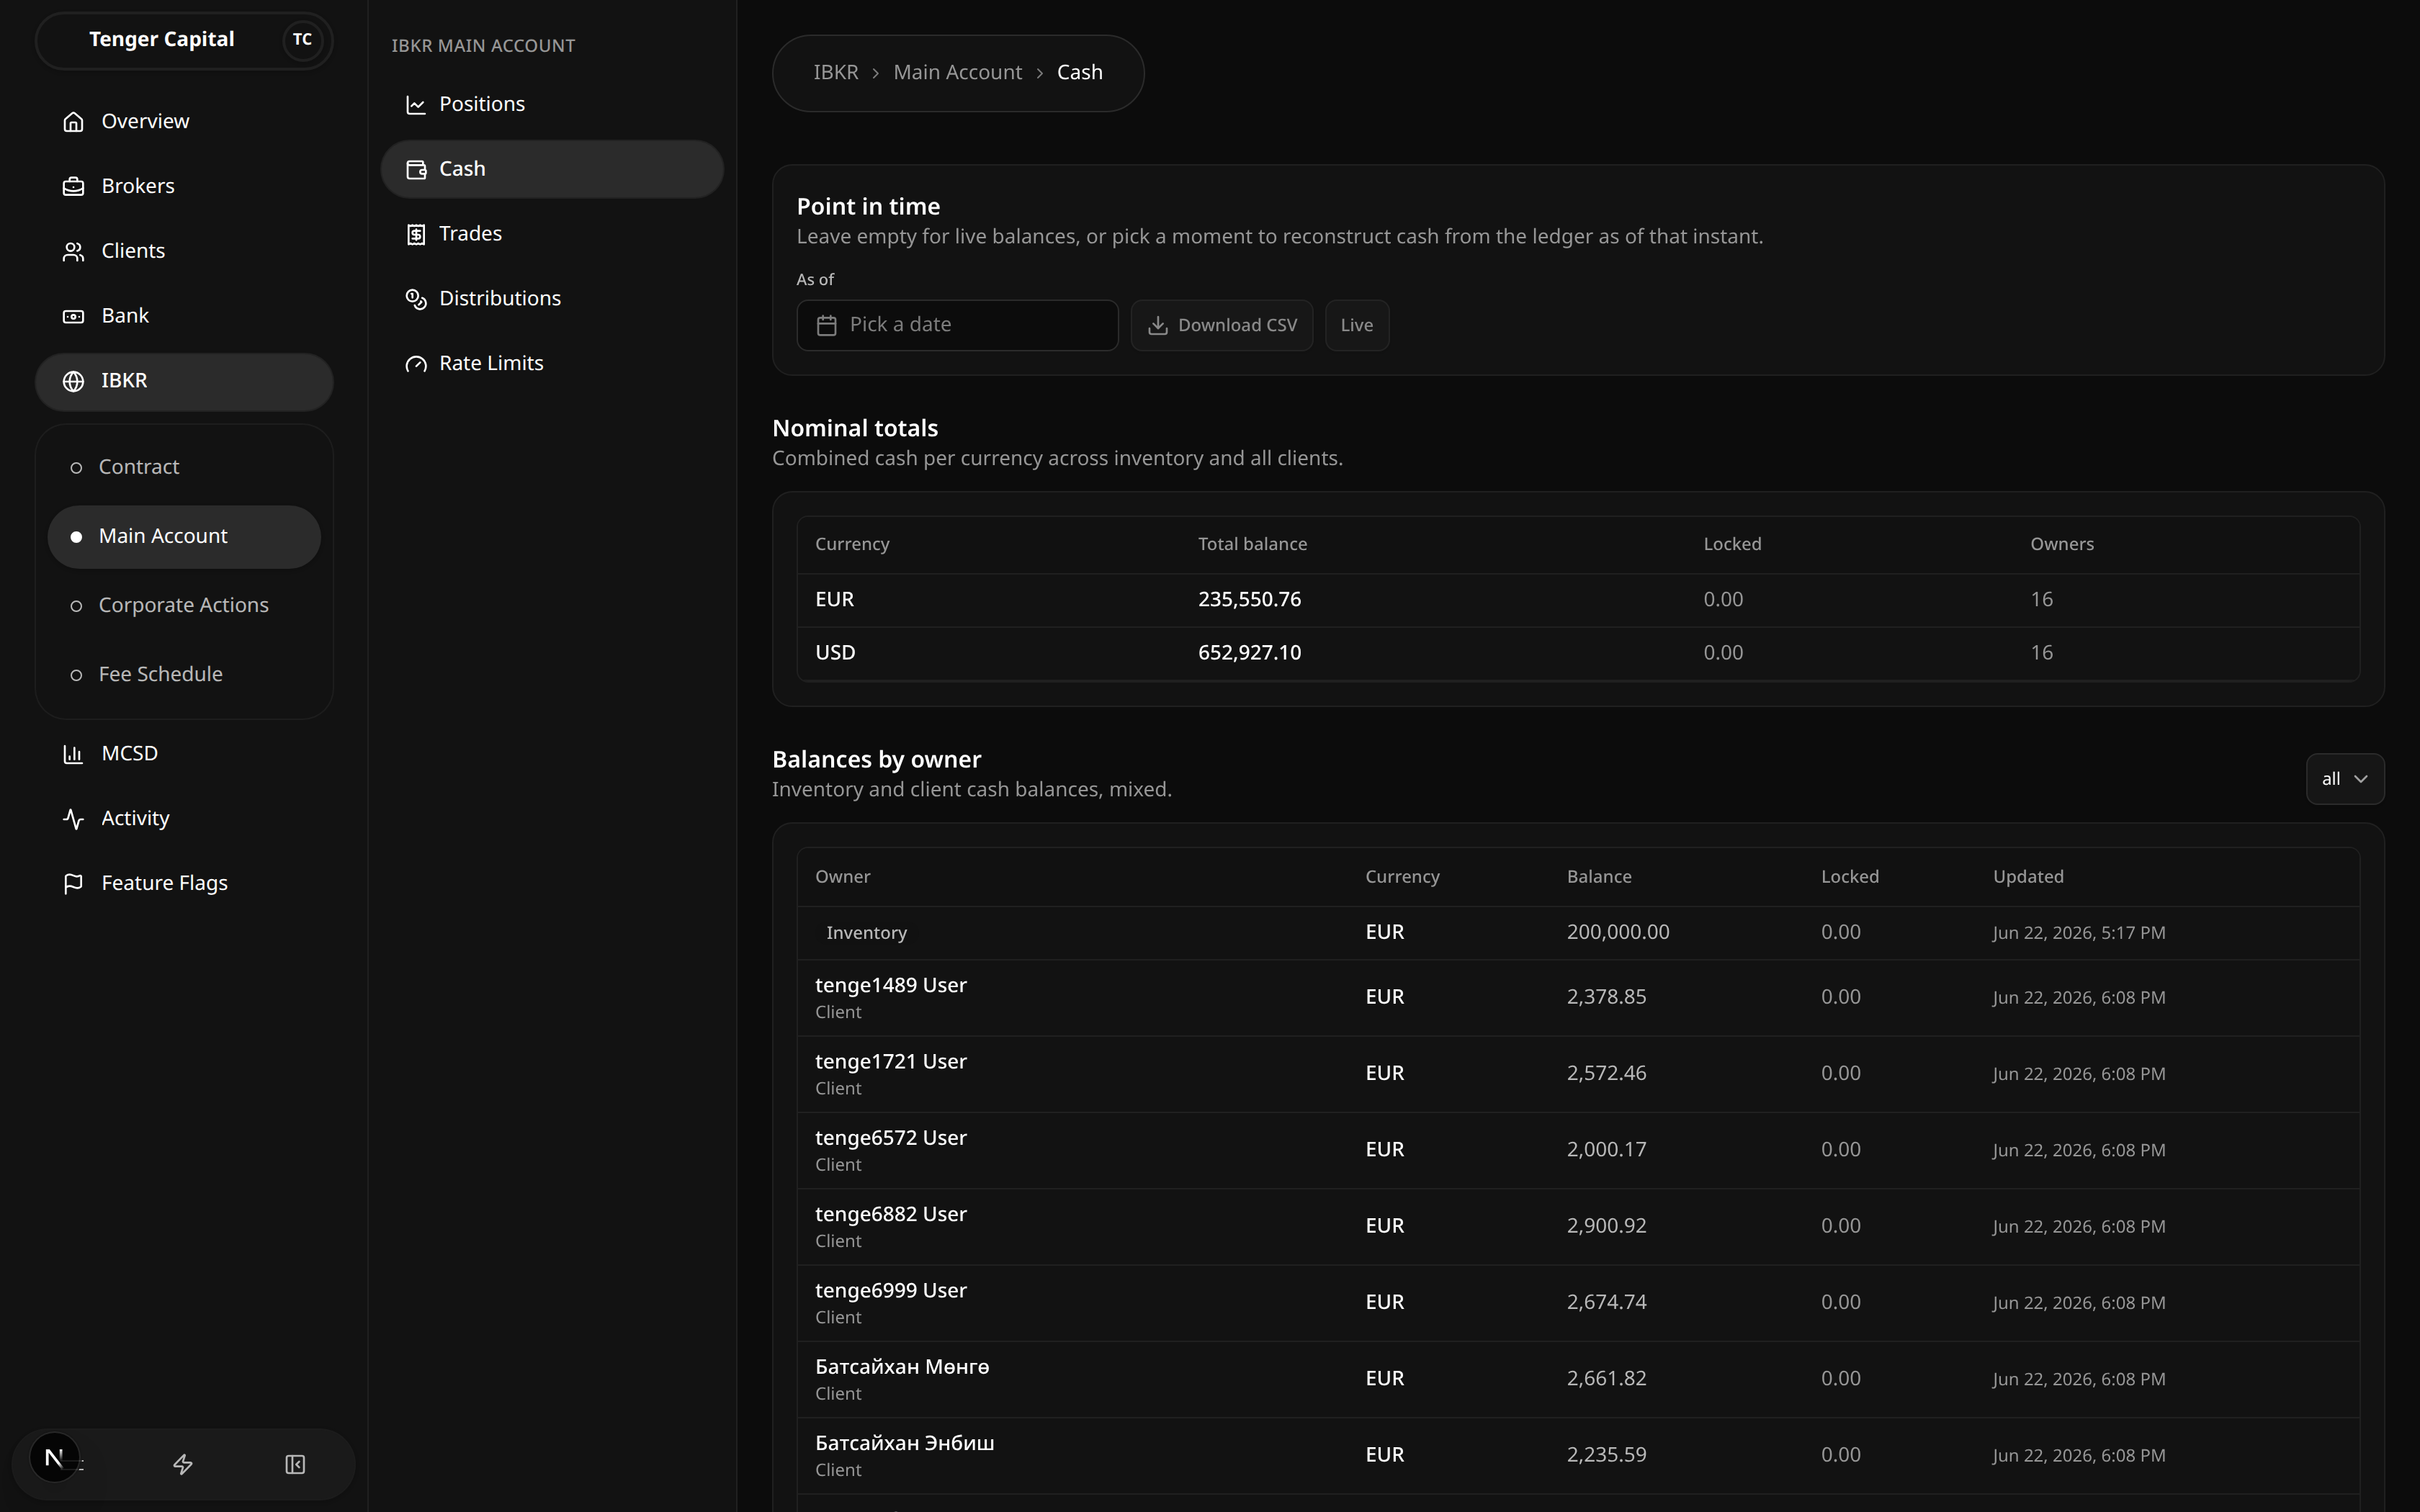
What it does
Shows the cash held in the IBKR main account, combining the firm's own inventory cash and every client's cash in one place. You can see the combined total per currency as well as the breakdown by owner, and you can reconstruct what cash balances looked like at an earlier point in time.
How to use
Point in time
The Point in time panel at the top controls whether you are looking at live balances or a past snapshot.
- Leave As of empty to see current, live balances.
- Pick a date to reconstruct balances as they stood at the close of that day. A blue banner confirms which date you are viewing.
- Use Download CSV (enabled only when a date is picked) to export the reconstructed balances for that date.
- Click Live to clear the date and return to current balances.
Nominal totals
The Nominal totals table shows combined cash per currency across inventory and all clients:
- Currency — the currency of the balance (for example USD or EUR).
- Total balance — combined cash held in that currency across all owners.
- Locked — the portion reserved (for example for pending settlement) and not freely available.
- Owners — how many owners (inventory plus clients) hold cash in that currency.
Balances by owner
The Balances by owner table breaks the same cash down per owner:
- Owner — either Inventory (the firm's own cash) or a named client.
- Currency — the currency of the balance.
- Balance / Locked — the owner's balance and the reserved portion.
- Updated — when the balance last changed.
Use the owner filter (top right of this section) to show All owners, Inventory only, or Clients only.
Notes
- This page is for viewing and exporting only — balances change as a result of trades, distributions, and other activity elsewhere in the platform.
- To find how much is actually available in a currency, subtract Locked from the balance.
- A currency with no cash simply won't appear in the tables.
- The historical (as-of) view is rebuilt from the ledger, so it always reflects what was recorded as of the chosen date.
Main Account Distributions
/ibkr/main-account/distributions
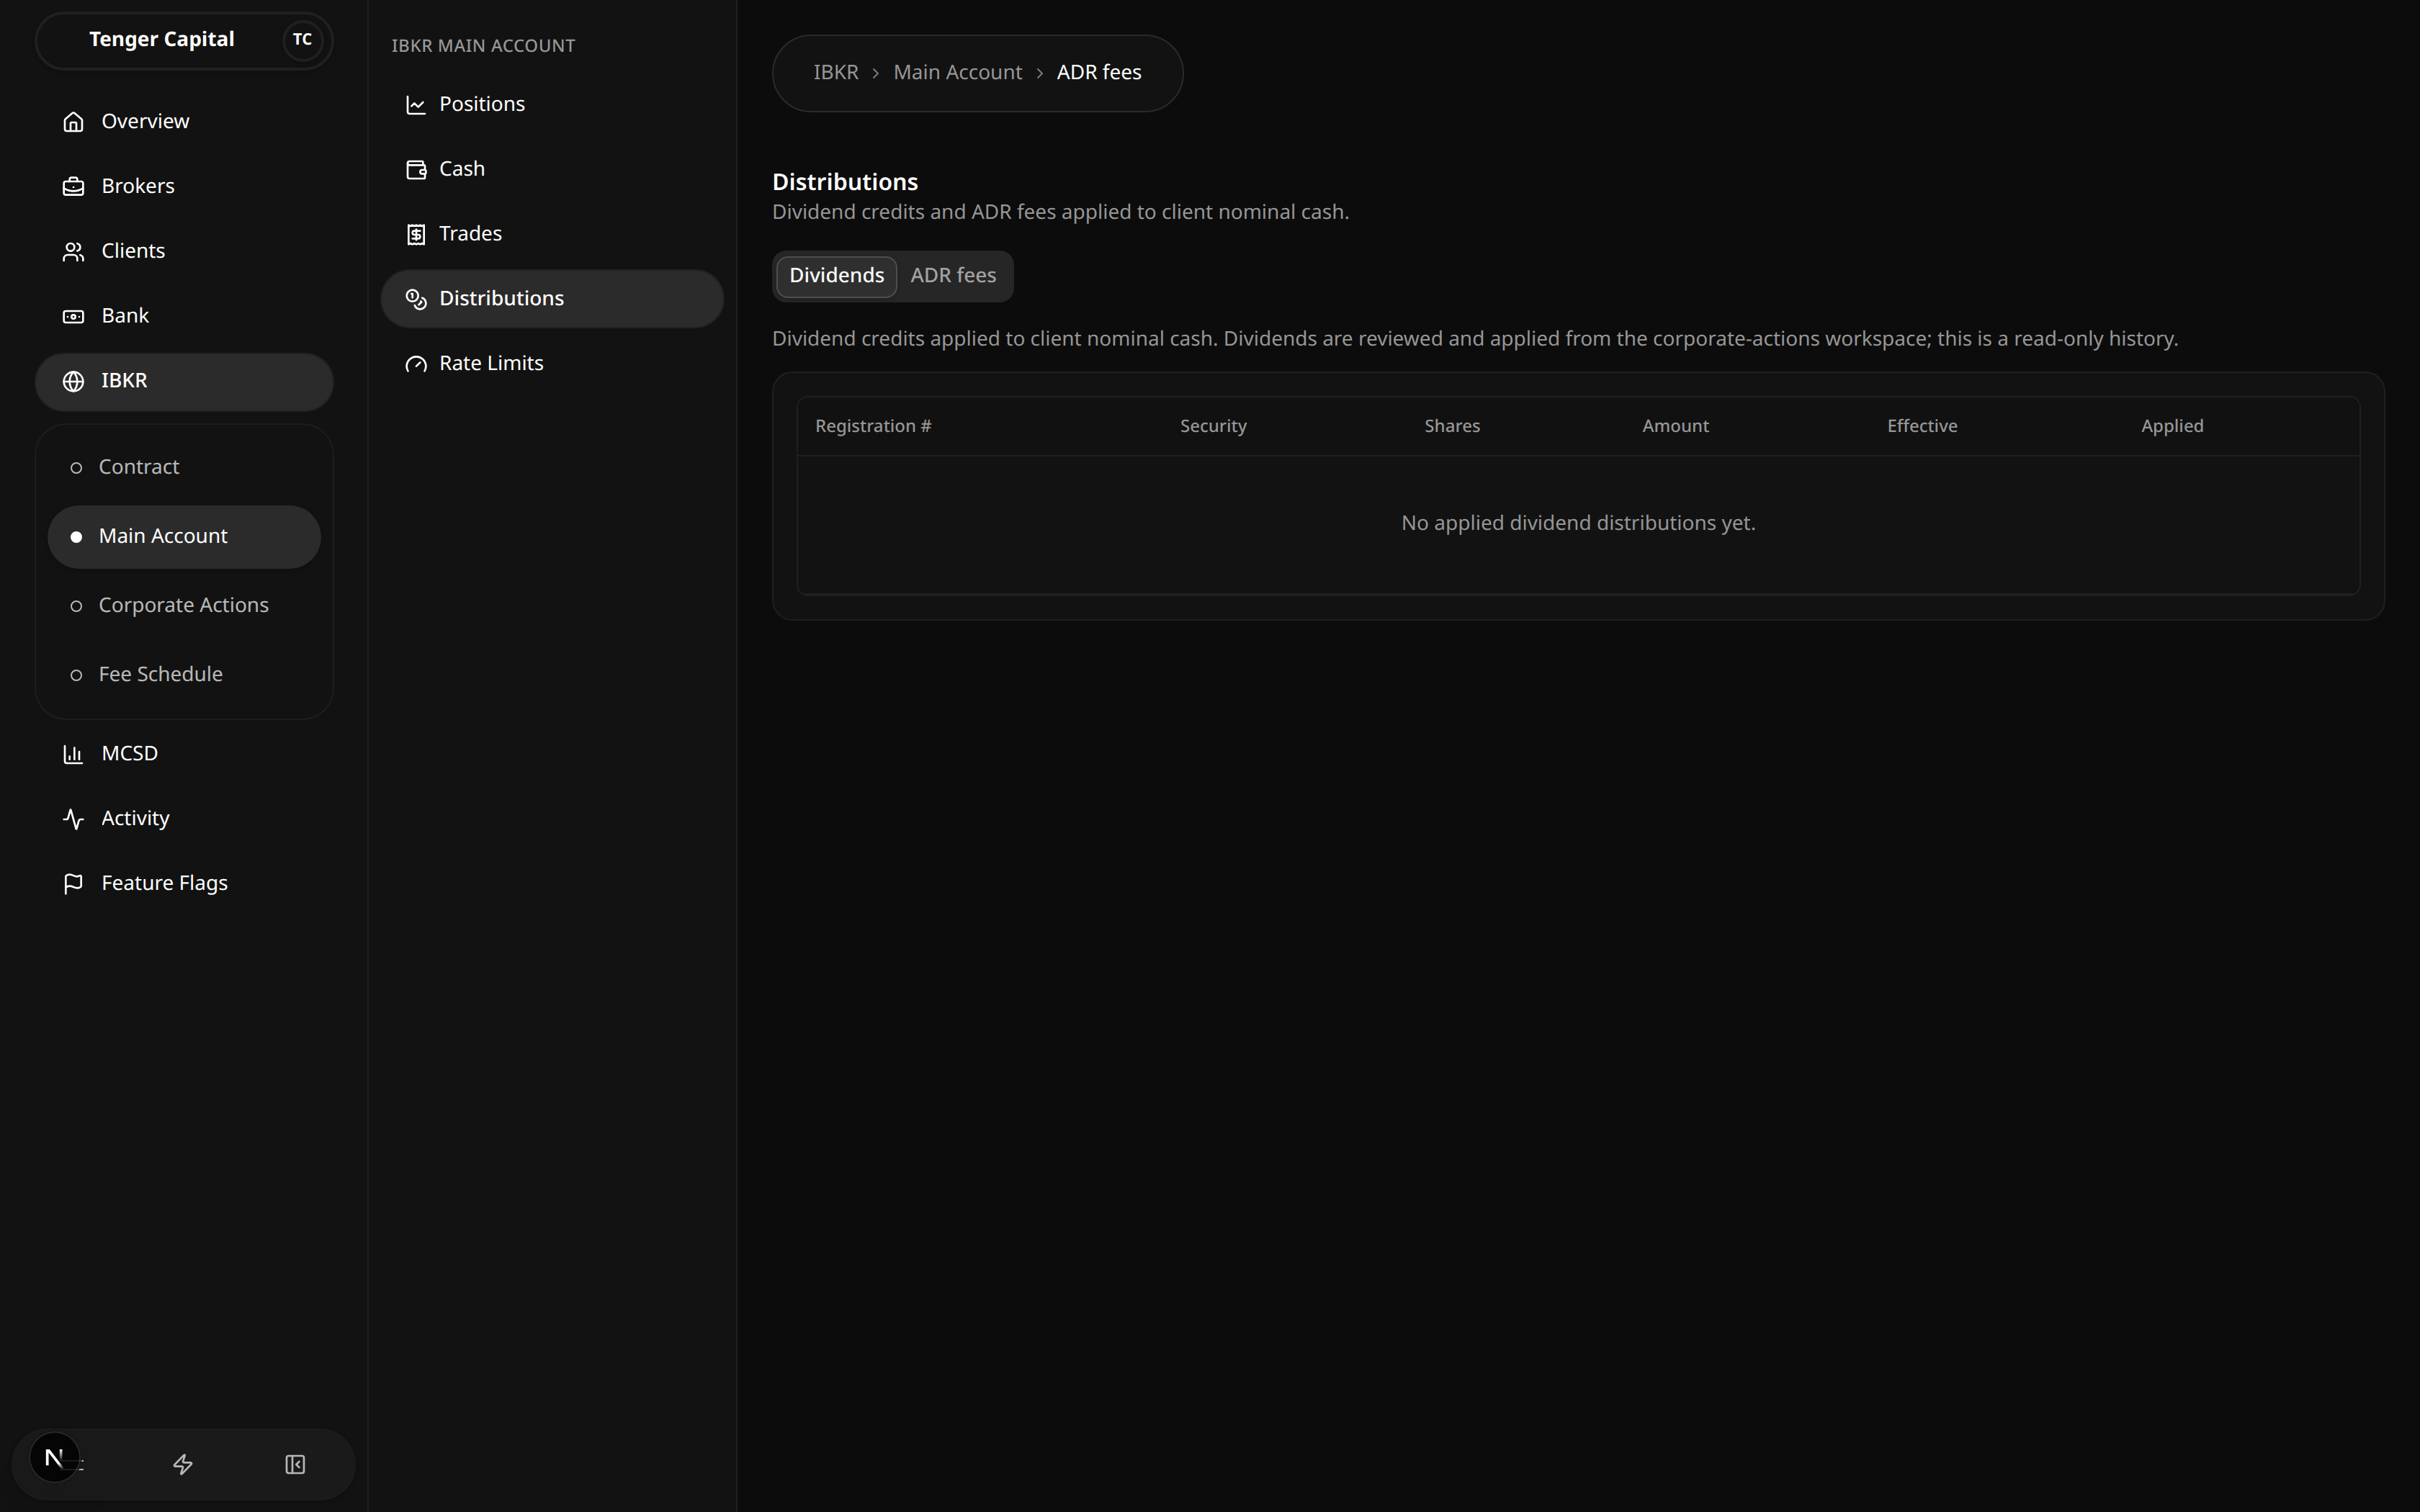
What it does
Tracks the cash distributions applied to clients in the IBKR main account — dividend credits and ADR fees. It is split into two sub-tabs: Dividends is a read-only history of dividend credits, while ADR fees lets you review the ADR fee history and upload new ADR fee charges from a CSV.
How to use
Dividends sub-tab
A read-only history of dividend credits applied to client cash. Dividends are reviewed and applied from the Corporate Actions workspace, so there is nothing to upload here — this tab just shows what has already been applied. Columns:
- Registration # — the client's registration number, with their name (or account) underneath.
- Security — the ticker and contract identifier the dividend relates to.
- Shares — the number of eligible shares.
- Amount — the cash credited, with currency.
- Effective — the date the distribution takes effect.
- Applied — when the credit was actually applied.
ADR fees sub-tab
Shows the history of ADR (American Depositary Receipt) custody fees charged to clients, and lets you apply new ones from a CSV. Columns include the client's Registration #, the Origin, the Security, the Amount (a charge, normally shown in red), the Effective date, an optional Note, and when it was Applied.
To apply new ADR fees:
- Click Upload ADR fee CSV.
- In the dialog, either Choose file to load a CSV or paste rows directly into the text box. Use Template to download a correctly formatted starter file. Each row covers one client and includes the registration number, contract identifier, amount, currency, effective date, and an optional note.
- Every row in the file is applied as an ADR fee — there is no type column in the file.
- Click Apply ADR fees to submit, or Cancel to back out.
- On success, a message confirms how many rows were applied, and the history table and client cash balances update.
If any row is invalid, the whole upload is rejected and nothing is applied — the dialog lists each rejected line with the reason so you can fix the file and try again.
Notes
- The two sub-tabs are independent: Dividends is view-only, while ADR fees is where charges are uploaded.
- ADR fee uploads are all-or-nothing: if even one row fails validation, no rows are applied.
- An ADR fee amount can be entered with or without a leading minus — it is treated as a charge either way.
- Applied ADR fees reduce client cash, which you can then see reflected under Main Account Cash.
Main Account Positions
/ibkr/main-account/positions
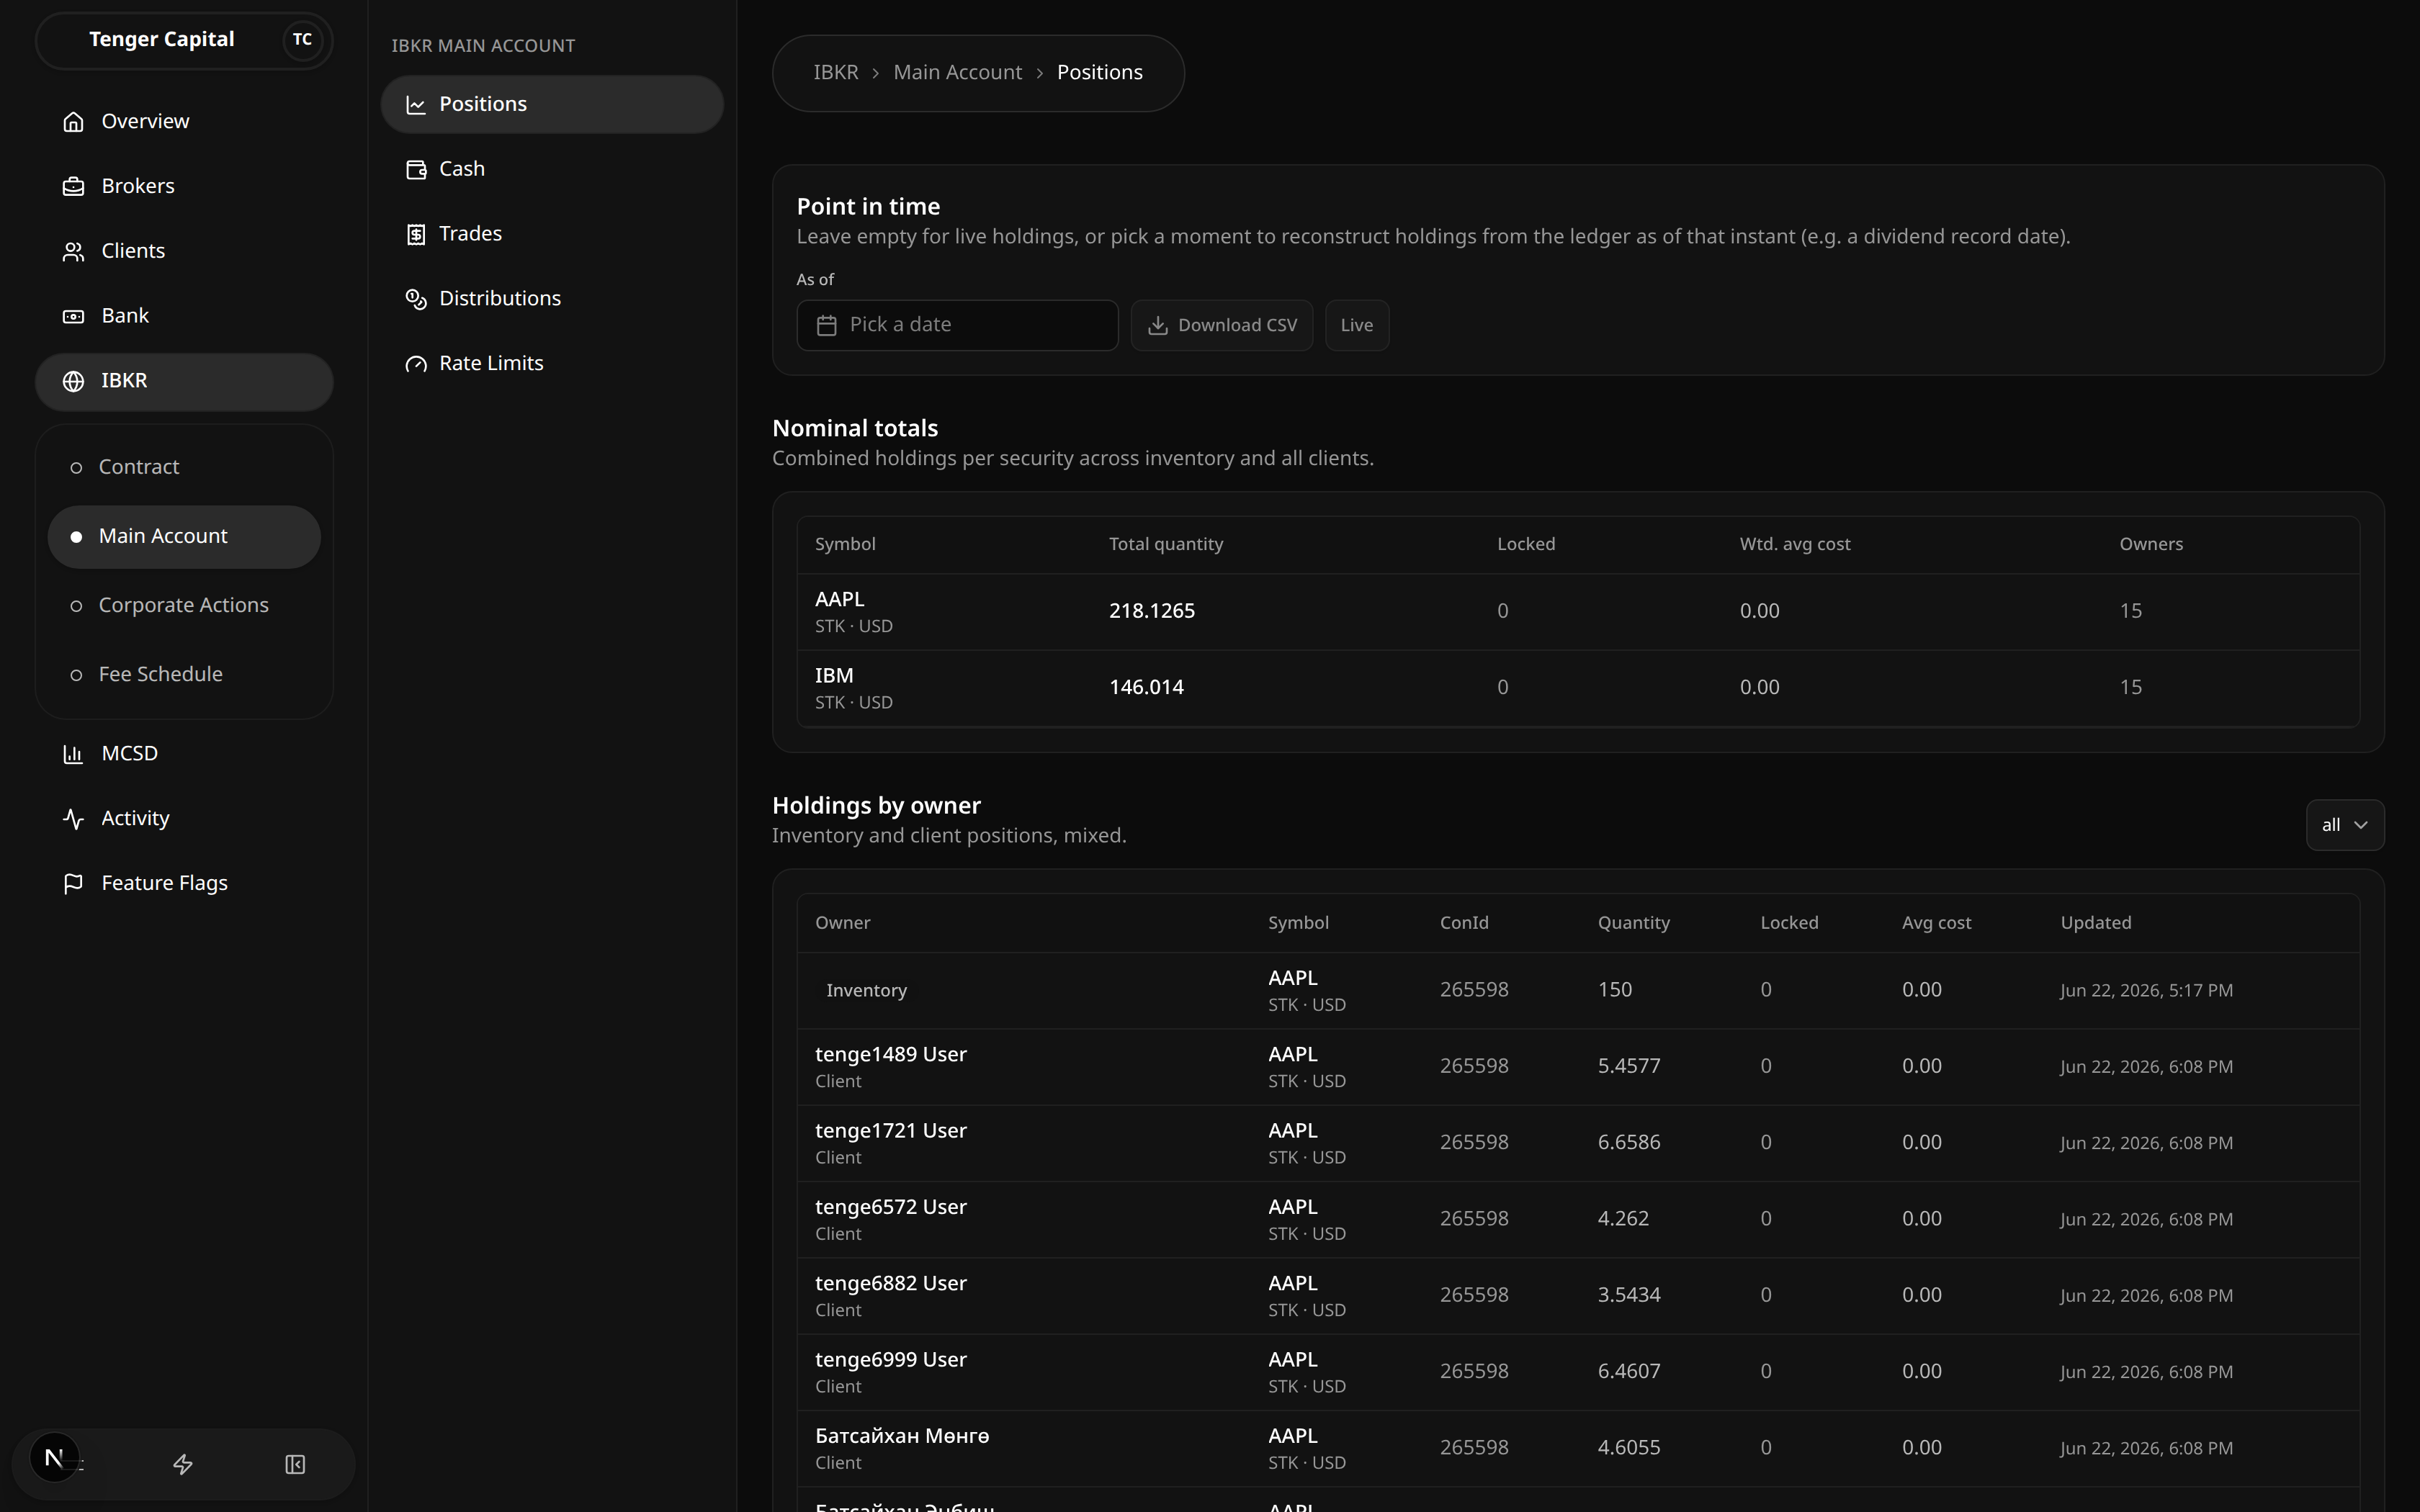
What it does
Shows the securities held in the IBKR main account, combining the firm's own inventory and every client's holdings in one place. You can see the combined total per security as well as the breakdown by owner, and you can reconstruct what holdings looked like at an earlier point in time (for example on a dividend record date).
How to use
Point in time
At the top of the page, the Point in time panel controls whether you are looking at live holdings or a past snapshot.
- Leave As of empty to see current, live holdings.
- Pick a date to reconstruct holdings as they stood at the close of that day. A blue banner confirms which date you are viewing. Average cost is not reconstructed in this historical view.
- Use Download CSV (enabled only when a date is picked) to export the full reconstructed holdings for that date.
- Click Live to clear the date and return to current holdings.
Nominal totals
The Nominal totals table shows combined holdings per security across inventory and all clients:
- Symbol — the ticker, with its security type and currency underneath.
- Total quantity — combined quantity held across all owners.
- Locked — the portion reserved (for example for pending settlement) and not freely available.
- Wtd. avg cost — the weighted average cost across owners.
- Owners — how many owners (inventory plus clients) hold the security.
Holdings by owner
The Holdings by owner table breaks the same holdings down per owner:
- Owner — either Inventory (the firm's own holding) or a named client.
- Symbol — the ticker, with security type and currency.
- ConId — IBKR's contract identifier for the security.
- Quantity / Locked — the owner's quantity and the reserved portion.
- Avg cost — the owner's average cost (live view only).
- Updated — when the holding last changed.
Use the owner filter (top right of this section) to show All owners, Inventory only, or Clients only. Long lists are paginated with Previous / Next.
Notes
- This page is for viewing and exporting only — holdings change as a result of trades, distributions, and other activity elsewhere in the platform.
- To find how much of a position is actually available, subtract Locked from the quantity.
- A security with no holdings simply won't appear in the tables.
- The historical (as-of) view is rebuilt from the ledger, so it always reflects what was recorded as of the chosen date.
Main Account Rate Limits
/ibkr/main-account/rate-limits
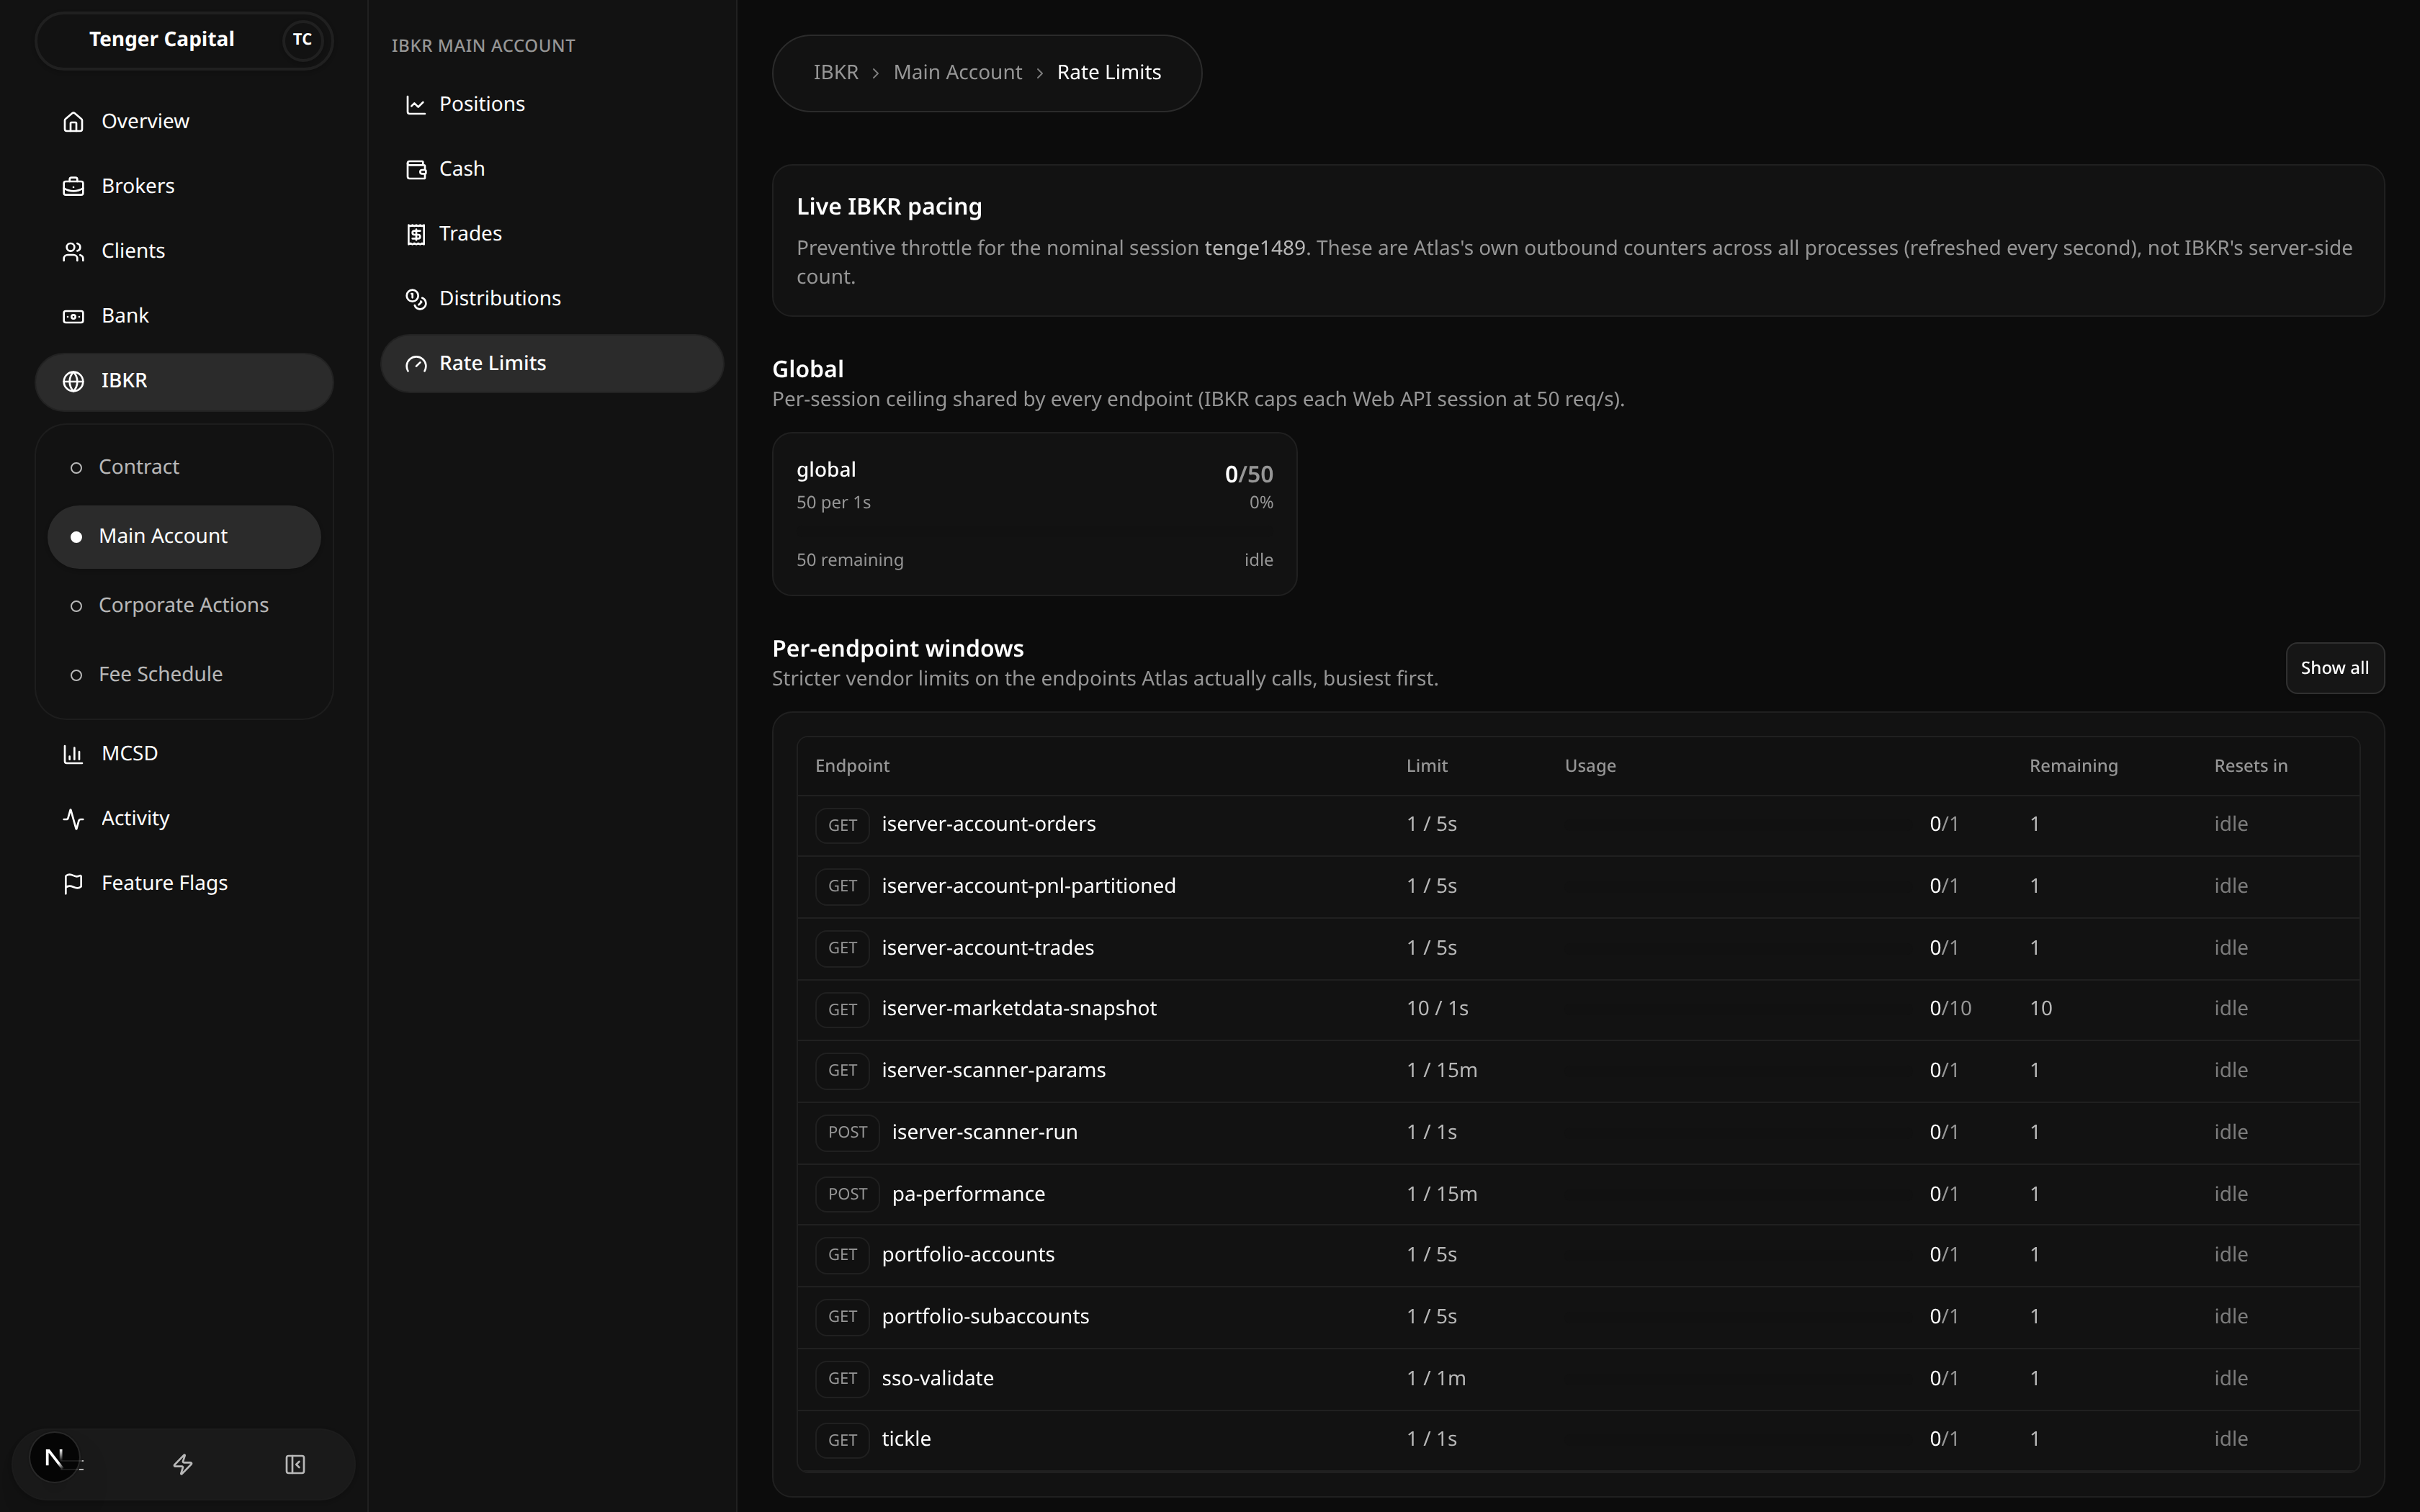
What it does
Shows, in real time, how much of the IBKR main account's API request budget is currently being used. IBKR caps how often the platform may call its API, both overall and per individual endpoint, and this page is the live dashboard for those limits. It refreshes every second so you can watch usage rise and fall as the platform talks to IBKR — useful when diagnosing slow or throttled broker activity.
How to use
Live IBKR pacing
The banner at the top names the session these counters apply to. The numbers are the platform's own outbound request counters across all of its processes, not IBKR's server-side count.
Global
A single gauge showing the per-session ceiling shared by every endpoint. It shows how many requests have been used out of the limit, the percentage, how many remain, and when the window resets (or idle when nothing is in flight). The bar turns green, then amber, then red as usage approaches the ceiling.
Per-endpoint windows
A table of the stricter, per-endpoint limits, busiest first:
- Endpoint — the API endpoint, with its request method. Endpoints not currently in use are tagged unused.
- Limit — how many requests are allowed per time window.
- Usage — a bar plus a used / limit count.
- Remaining — how many requests are still available in the current window.
- Resets in — when the window resets, or idle when nothing is in flight.
By default only the endpoints the platform actually calls are shown. Use Show all to include every vendor-documented endpoint, including ones never called; click again (Used only) to collapse back.
Concurrency
If any endpoints are limited by the number of simultaneous in-flight requests (rather than a time window), they appear here as gauges.
Notes
- This page reflects live API usage. In a quiet or test environment with no recent IBKR traffic, the counters will normally read zero and most rows will be idle — that is expected, not an error.
- The numbers are the platform's own preventive throttle, meant to keep it under IBKR's caps; they are not IBKR's official server-side count.
- There is nothing to configure or submit here — it is a read-only monitor.
Main Account Trades
/ibkr/main-account/trades
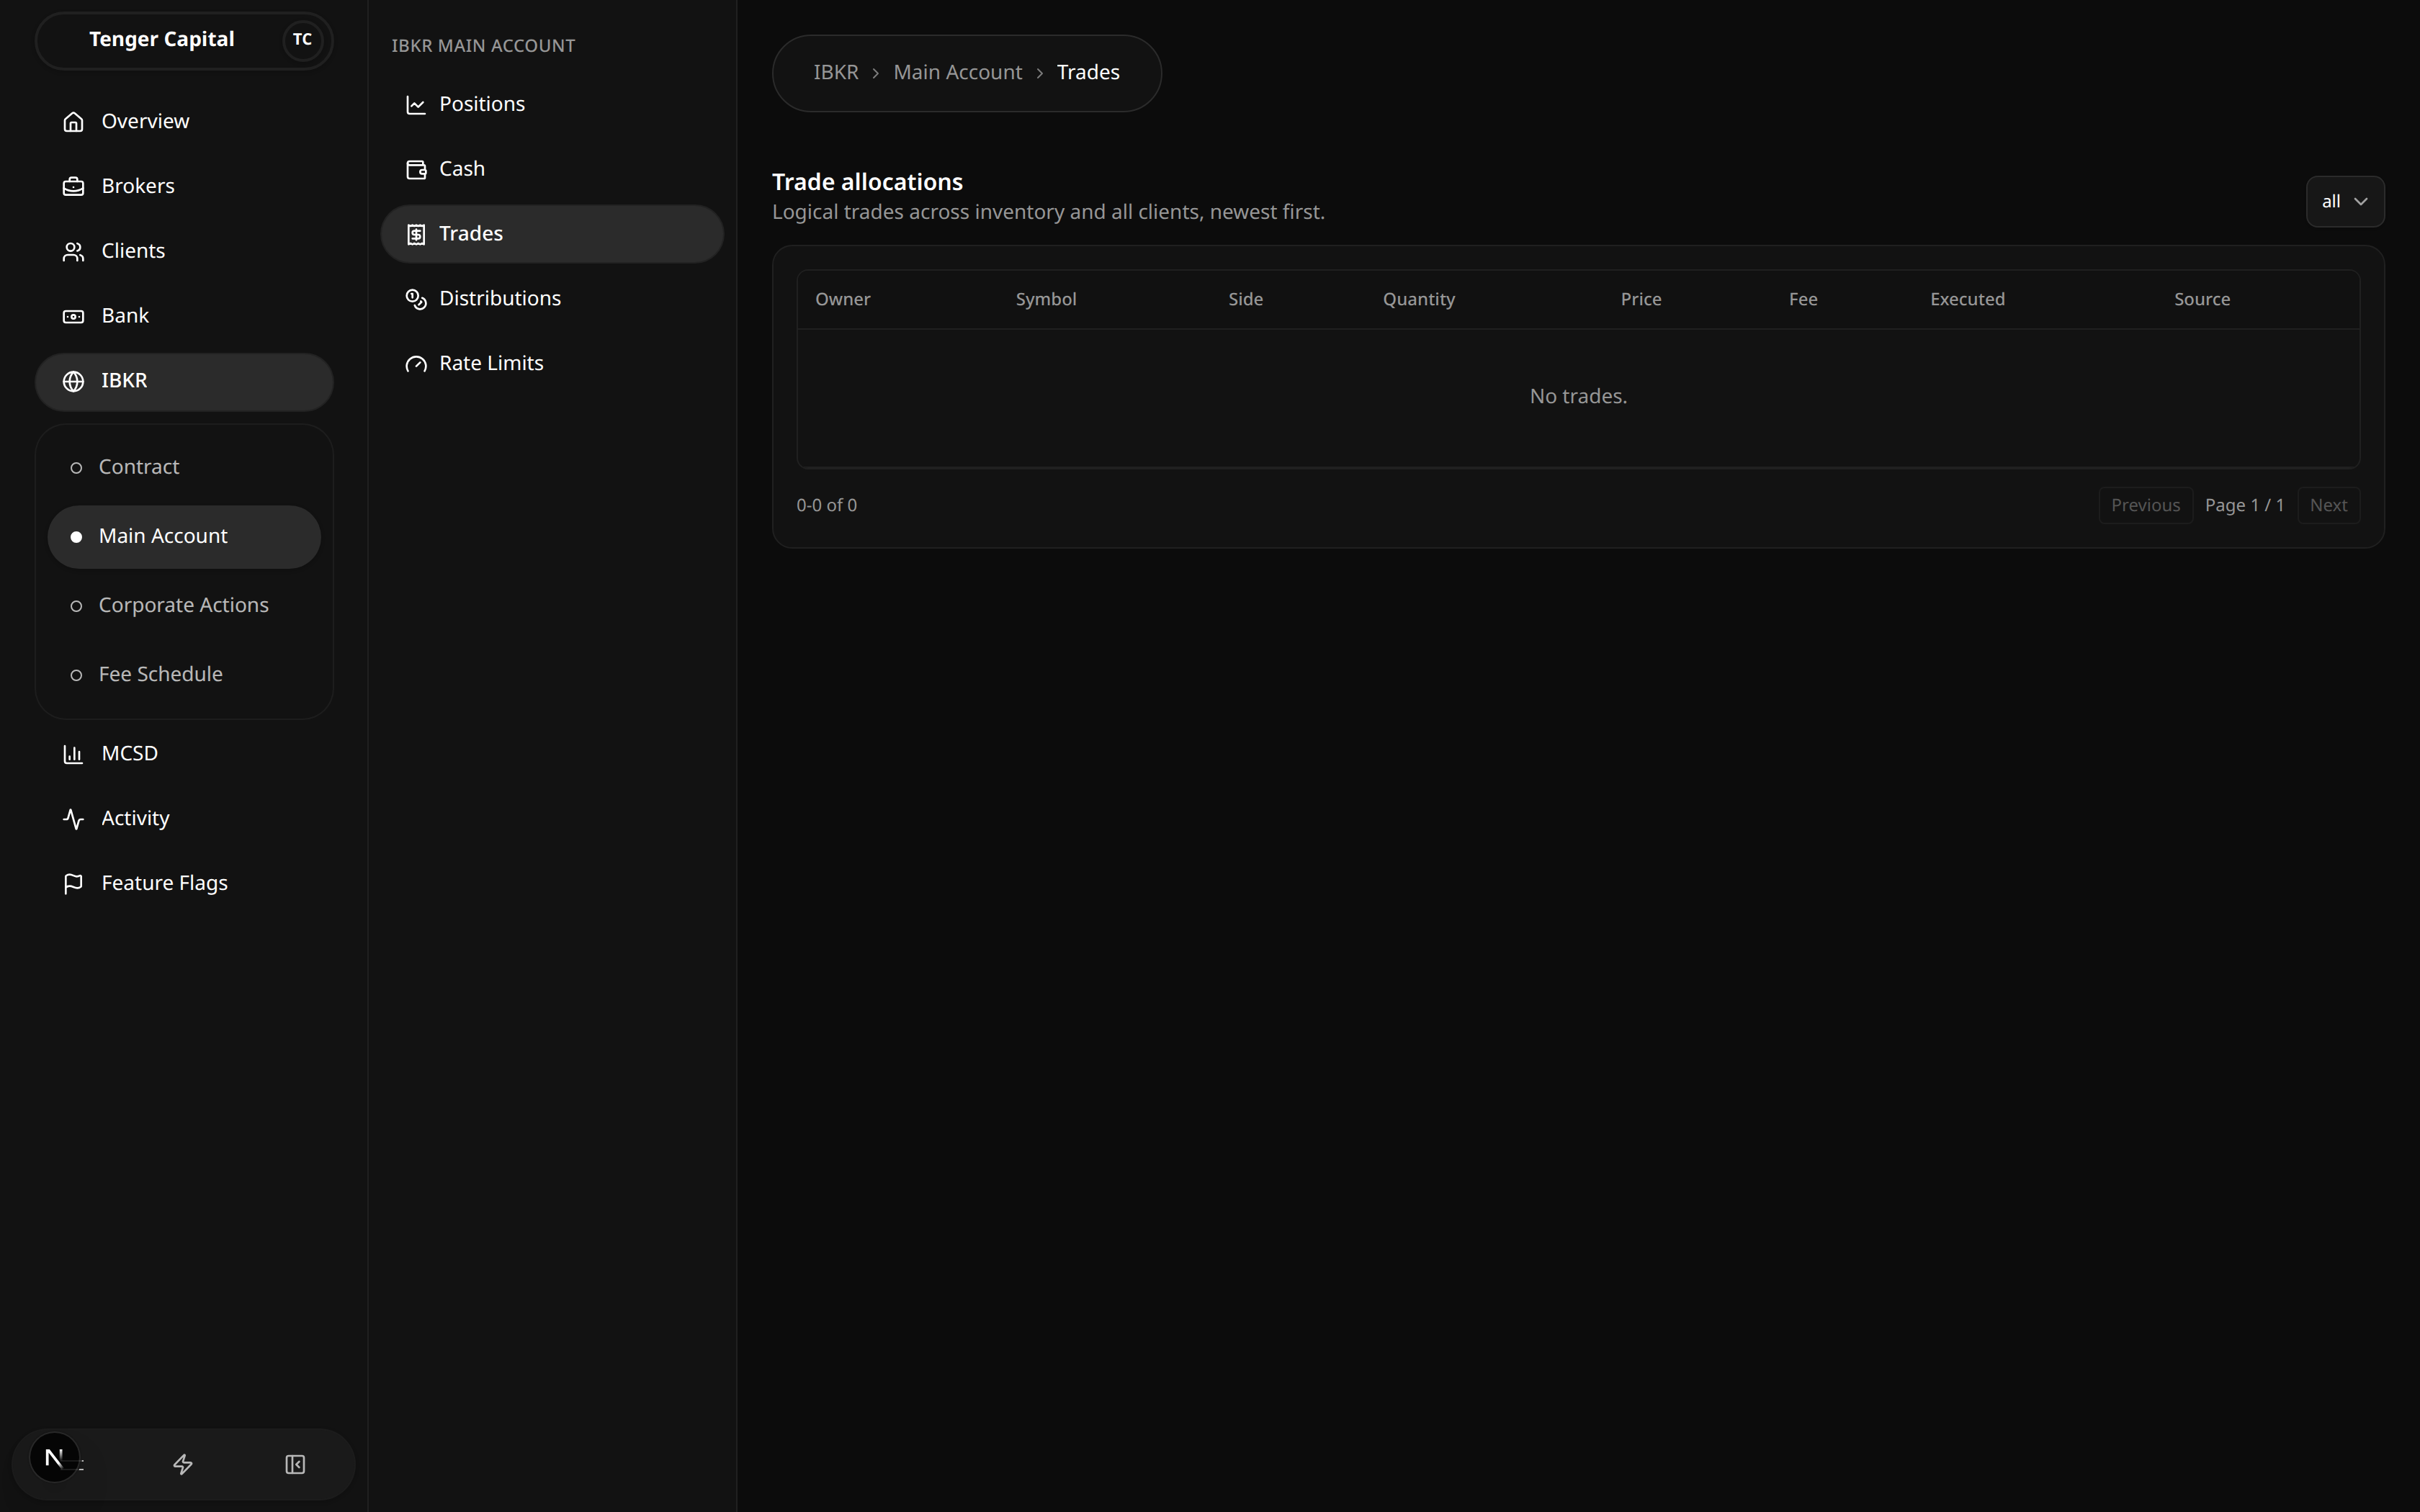
What it does
Lists the trade allocations recorded against the IBKR main account, combining the firm's own inventory trades and every client's trades, newest first. This is the running history of who bought or sold what, at what price, and what fee was charged.
How to use
Read the Trade allocations table:
- Owner — either Inventory (the firm's own trade) or a named client.
- Symbol — the ticker, with security type and currency underneath.
- Side — BUY (shown in green) or SELL (shown in red).
- Quantity — the number of shares or units traded.
- Price — the execution price.
- Fee — the fee charged, with its currency.
- Executed — when the trade was executed.
- Source — where the record came from: an IBKR execution (filled at the broker) or a Manual adjustment (entered by hand).
Use the owner filter (top right) to show All owners, Inventory only, or Clients only. Long lists are paginated with Previous / Next, and the footer shows which rows and how many in total you are viewing.
Notes
- This page is for viewing only — there are no buttons to record or edit trades here; trades arrive from broker executions and platform activity.
- The list is sorted newest first.
- If there is no trade history yet, the table shows "No trades."
Contract Search
/ibkr/temporary/contract-search
What it does
Looks up IBKR contracts (stocks) with a live IBKR lookup so you can find the exact security — and its contract ID — before adding it to the curated contract list. Opening this page takes you to the Contracts page, where the same search lives under Find and Add Contracts.
How to use
- Click Connect IBKR Brokerage Session. The label changes to Session ready once connected — you must connect before searching, and you may be prompted to connect (and retry) if the session expires.
- Type a ticker or company name (for example
IBM) into the search box and click Search, or press Enter. The query is sent to IBKR live, so results reflect what IBKR currently returns. - In the results dialog, use the filter box to narrow the list, then click the contract you want. Each result shows the symbol, company name and contract ID.
- The chosen contract is shown back to you for confirmation. Click Change selection to pick a different one.
- To keep it, click Add selected contract — see Contracts for managing the curated list afterwards.
Notes
- Results come from a live IBKR lookup, not a local cache, so a brokerage session must be connected first.
- Only stock (STK) contracts are supported, so the search returns stocks.
- This is a temporary entry point: it opens the Contracts page, where the same search and the curated-contract management live together.
- If your broker record is missing IBKR credentials the search can't run — a message asks you to contact support to set them up.
MCSD Accounts
/mcsd/accounts
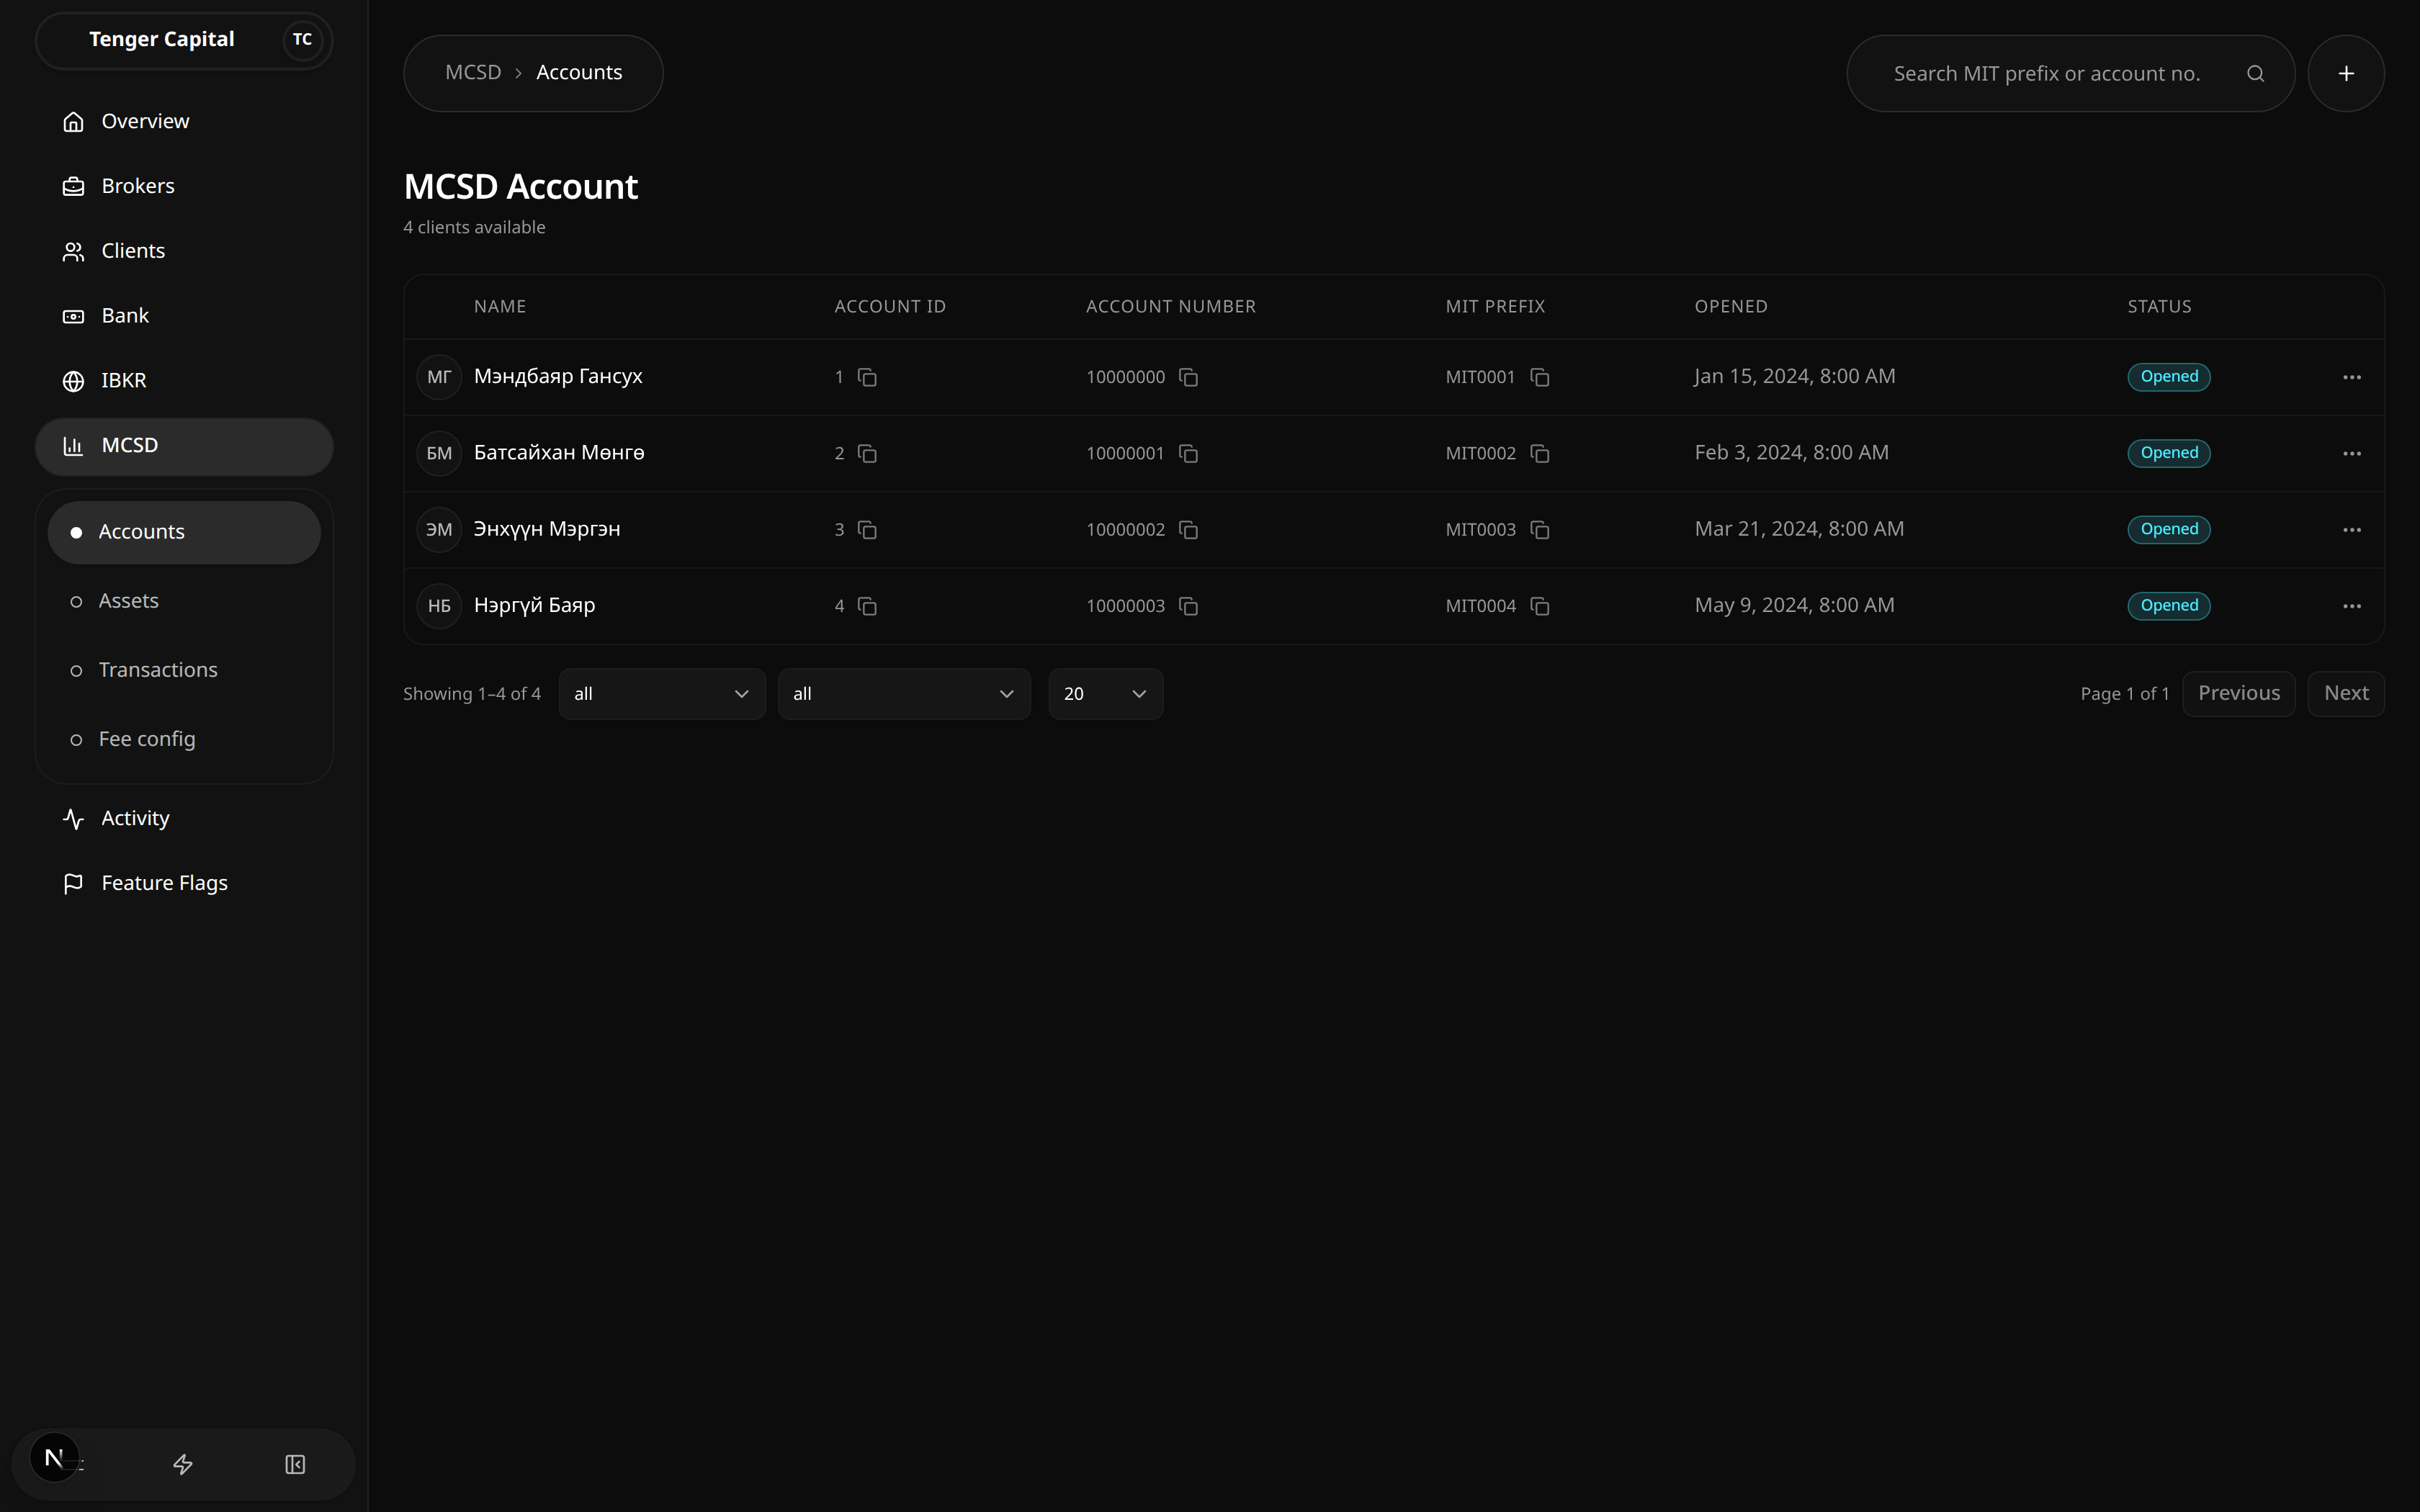
What it does
Lists the clients' MCSD (Mongolian Central Securities Depository) accounts — the depository accounts that let a client hold and settle securities. From here you can review every account, open one for full detail, edit its commission rates, delete a draft, or start creating new accounts.
How to use
Open MCSD → Accounts from the sidebar. The heading shows how many clients have accounts, and the table lists them:
- Name — the client the account belongs to.
- Account ID — the firm's internal account identifier.
- Account Number — the depository account number.
- MIT Prefix — the client's MCSD trading-member prefix.
- Opened — when the account was opened at MCSD.
- Status — where the account stands (see below).
Each value with a copy icon can be copied with a click, and the ⋯ menu at the end of a row lets you view, edit, or delete that account. Clicking a row opens the account's detail view.
Find and filter
- Search (top right) by MIT prefix or account number.
- The status dropdown filters by Draft, Submitted, Opened, or Failed.
- The suffix dropdown filters by client type: Legal Individual (LI), Junior (JR), Legal Company (LC), Foreign Individual (FI), or BR.
- Use the page-size control and Previous / Next to move through the list.
What the statuses mean
- Draft — created locally but not yet submitted to MCSD.
- Submitted — sent to MCSD and awaiting confirmation.
- Opened — confirmed and live at MCSD; the account can settle trades.
- Failed — MCSD rejected the request.
Create new accounts
Click the + button (top right) to open the Create accounts page and submit a batch of new accounts to MCSD.
Notes
- Editing and deleting are limited once an account is Opened — opened accounts are live at the depository and can't simply be removed.
- Commission rates can be adjusted from a row's menu or from the account detail view.
Create MCSD Accounts
/mcsd/accounts/create
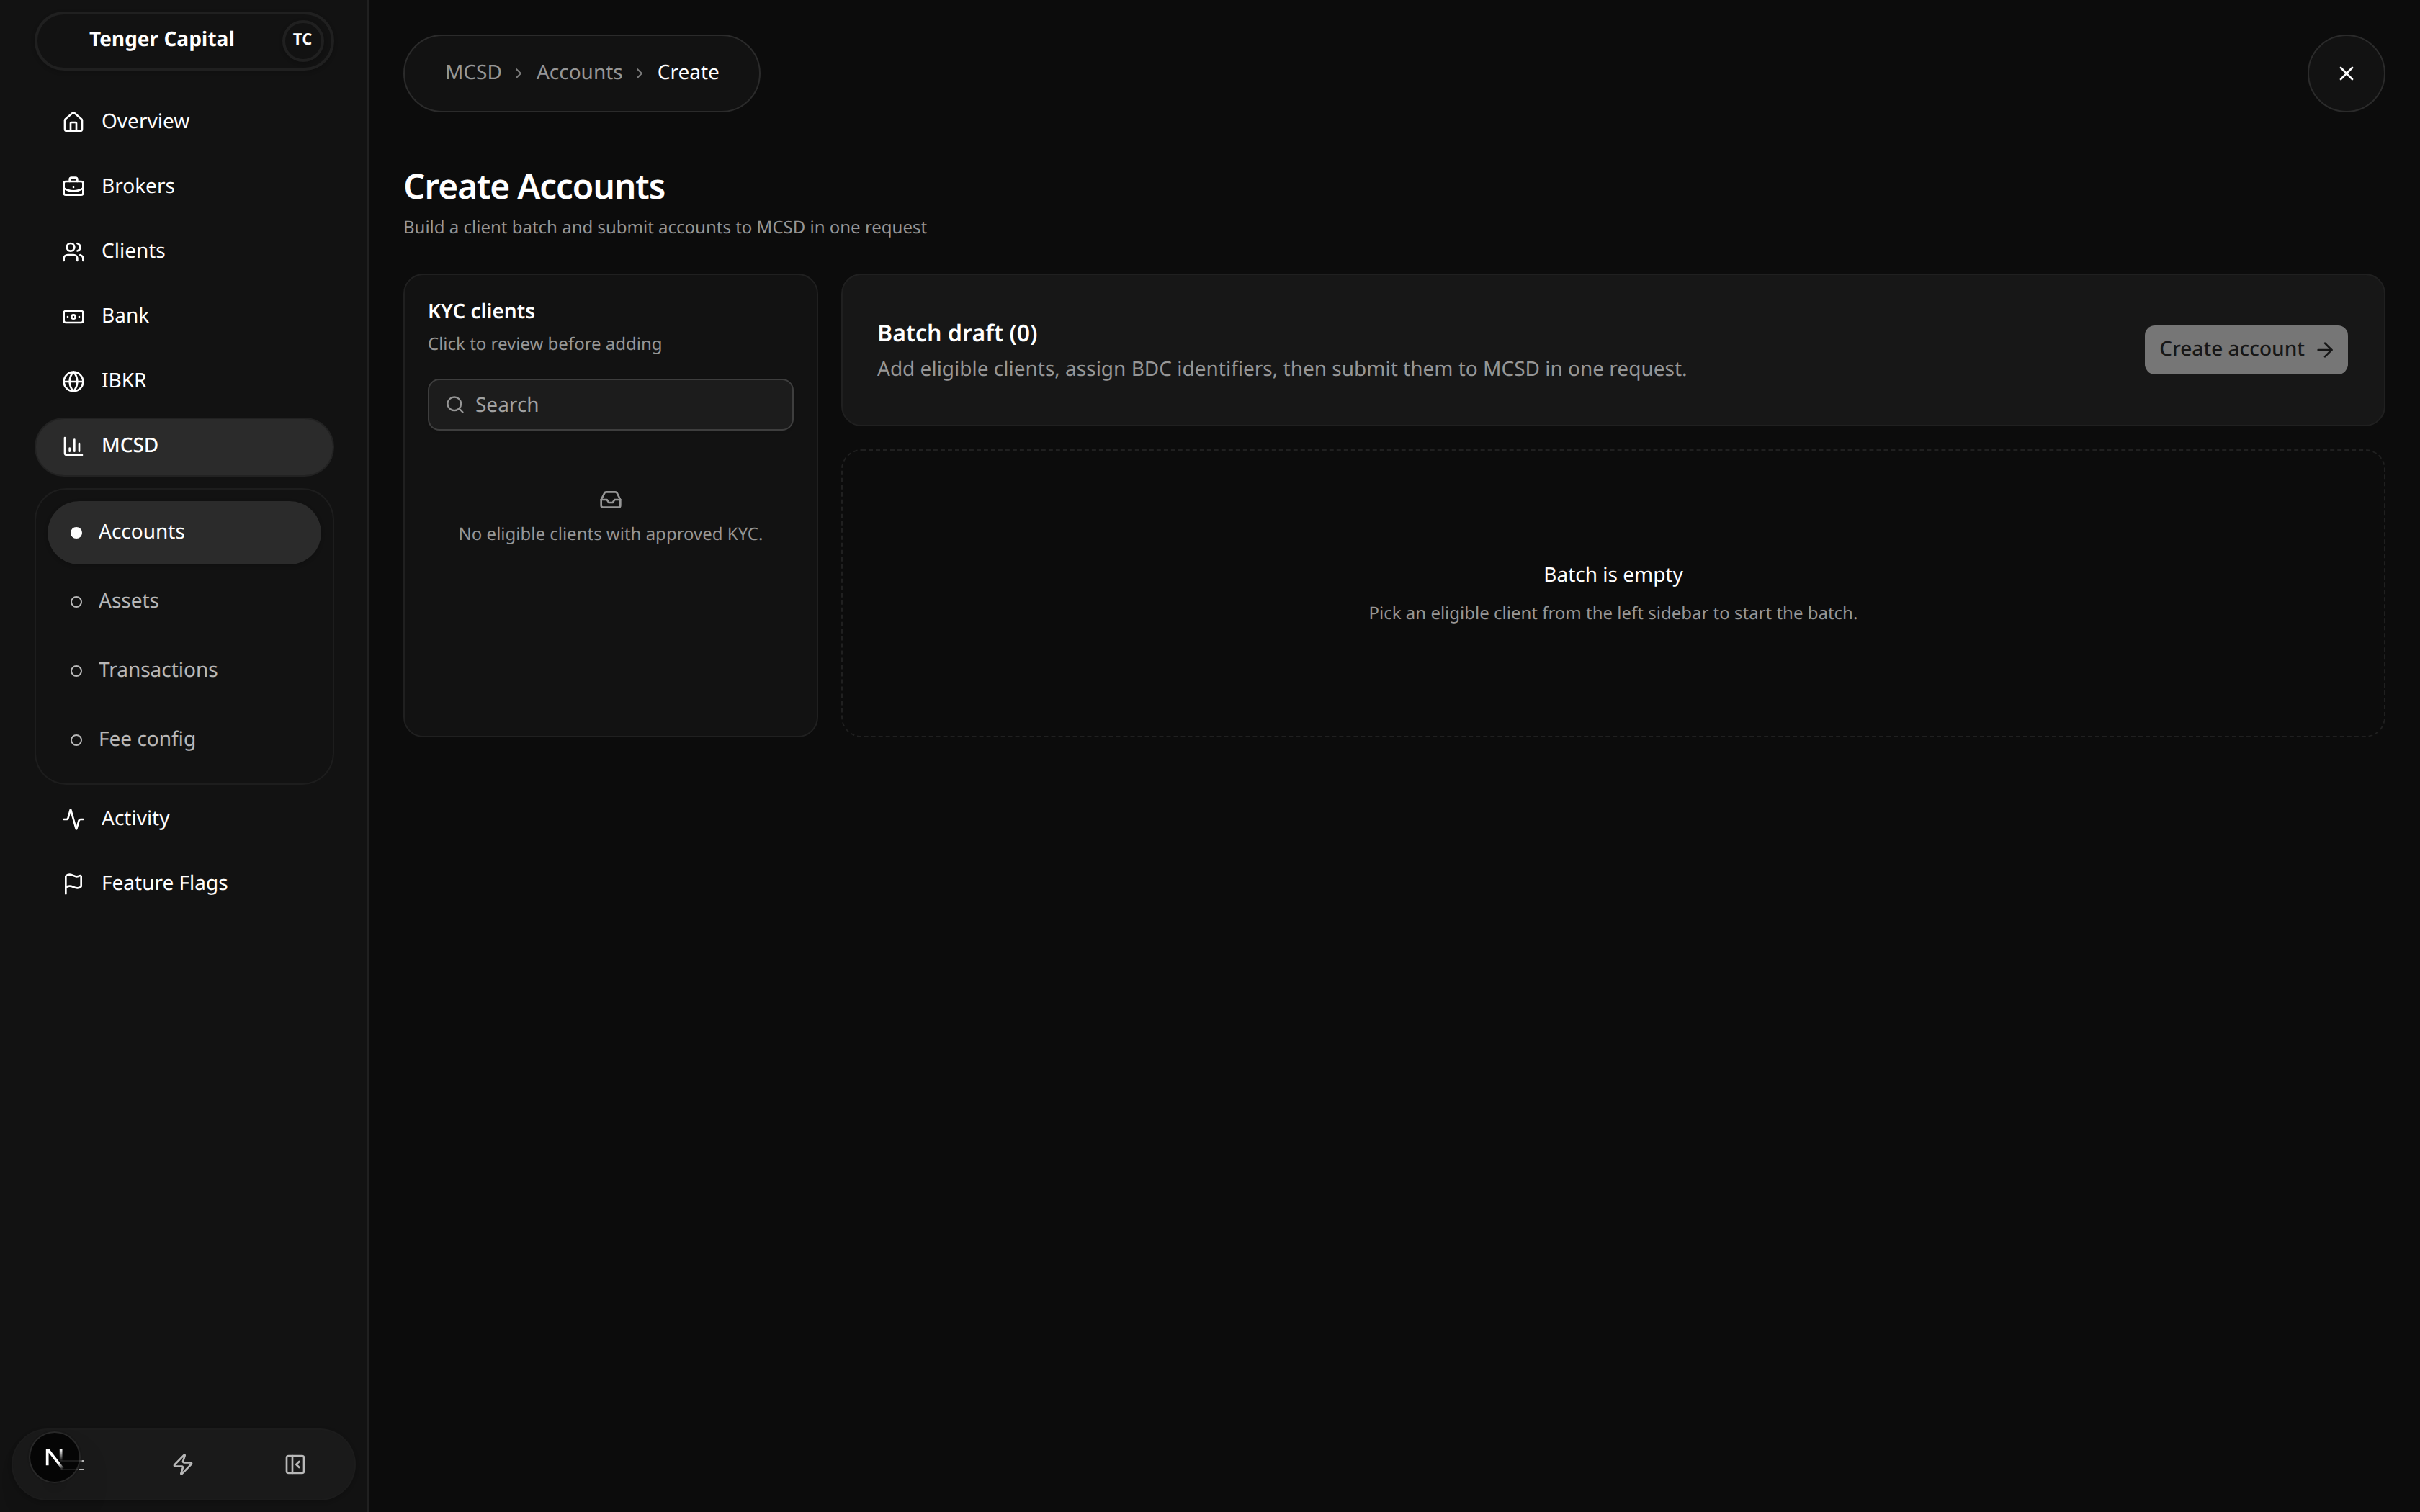
What it does
Lets you open new MCSD accounts for clients in one go. You build a batch by picking eligible clients, set each one's commission rates, and submit the whole batch to MCSD in a single request.
How to use
Open MCSD → Accounts, then click the + button to reach this page. It has two sides: the KYC clients list on the left and the Batch draft on the right.
1. Add clients to the batch
- The left sidebar lists clients who are eligible — those with approved KYC and no MCSD account yet. Search to narrow the list.
- Click a client to add them to the batch. Each added client appears as a card on the right.
- Use the list (KYC) icon on a card to review that client's KYC details before submitting, and the ✕ icon to remove them from the batch.
- If a client is missing required KYC fields they can't be added, and you'll be told why.
2. Set the commission rates
Each client card has three fee fields, entered as percentages:
- Fee equity (%) — commission rate on equity trades.
- Fee debt (%) — commission rate on debt instruments.
- Fee corp debt (%) — commission rate on corporate debt.
All three are required and must be valid, non-negative numbers.
3. Submit the batch
- Click Create account. The platform first checks every card.
- A confirmation dialog shows exactly what will be sent to MCSD for each client. Review it.
- Confirm to submit. On success you're told how many accounts were created and returned to the accounts list.
Notes
- The batch is empty until you add a client — pick someone from the sidebar to start.
- Only clients with approved KYC appear in the sidebar; if it's empty, no one is currently eligible.
- If you try to leave the page with unsaved drafts, you'll be asked to confirm before they're discarded.
- Submitting only sends the request to MCSD; the new accounts then move through Submitted → Opened as MCSD confirms them. Track their status on the accounts list.
MCSD Account Detail
/mcsd/accounts/view
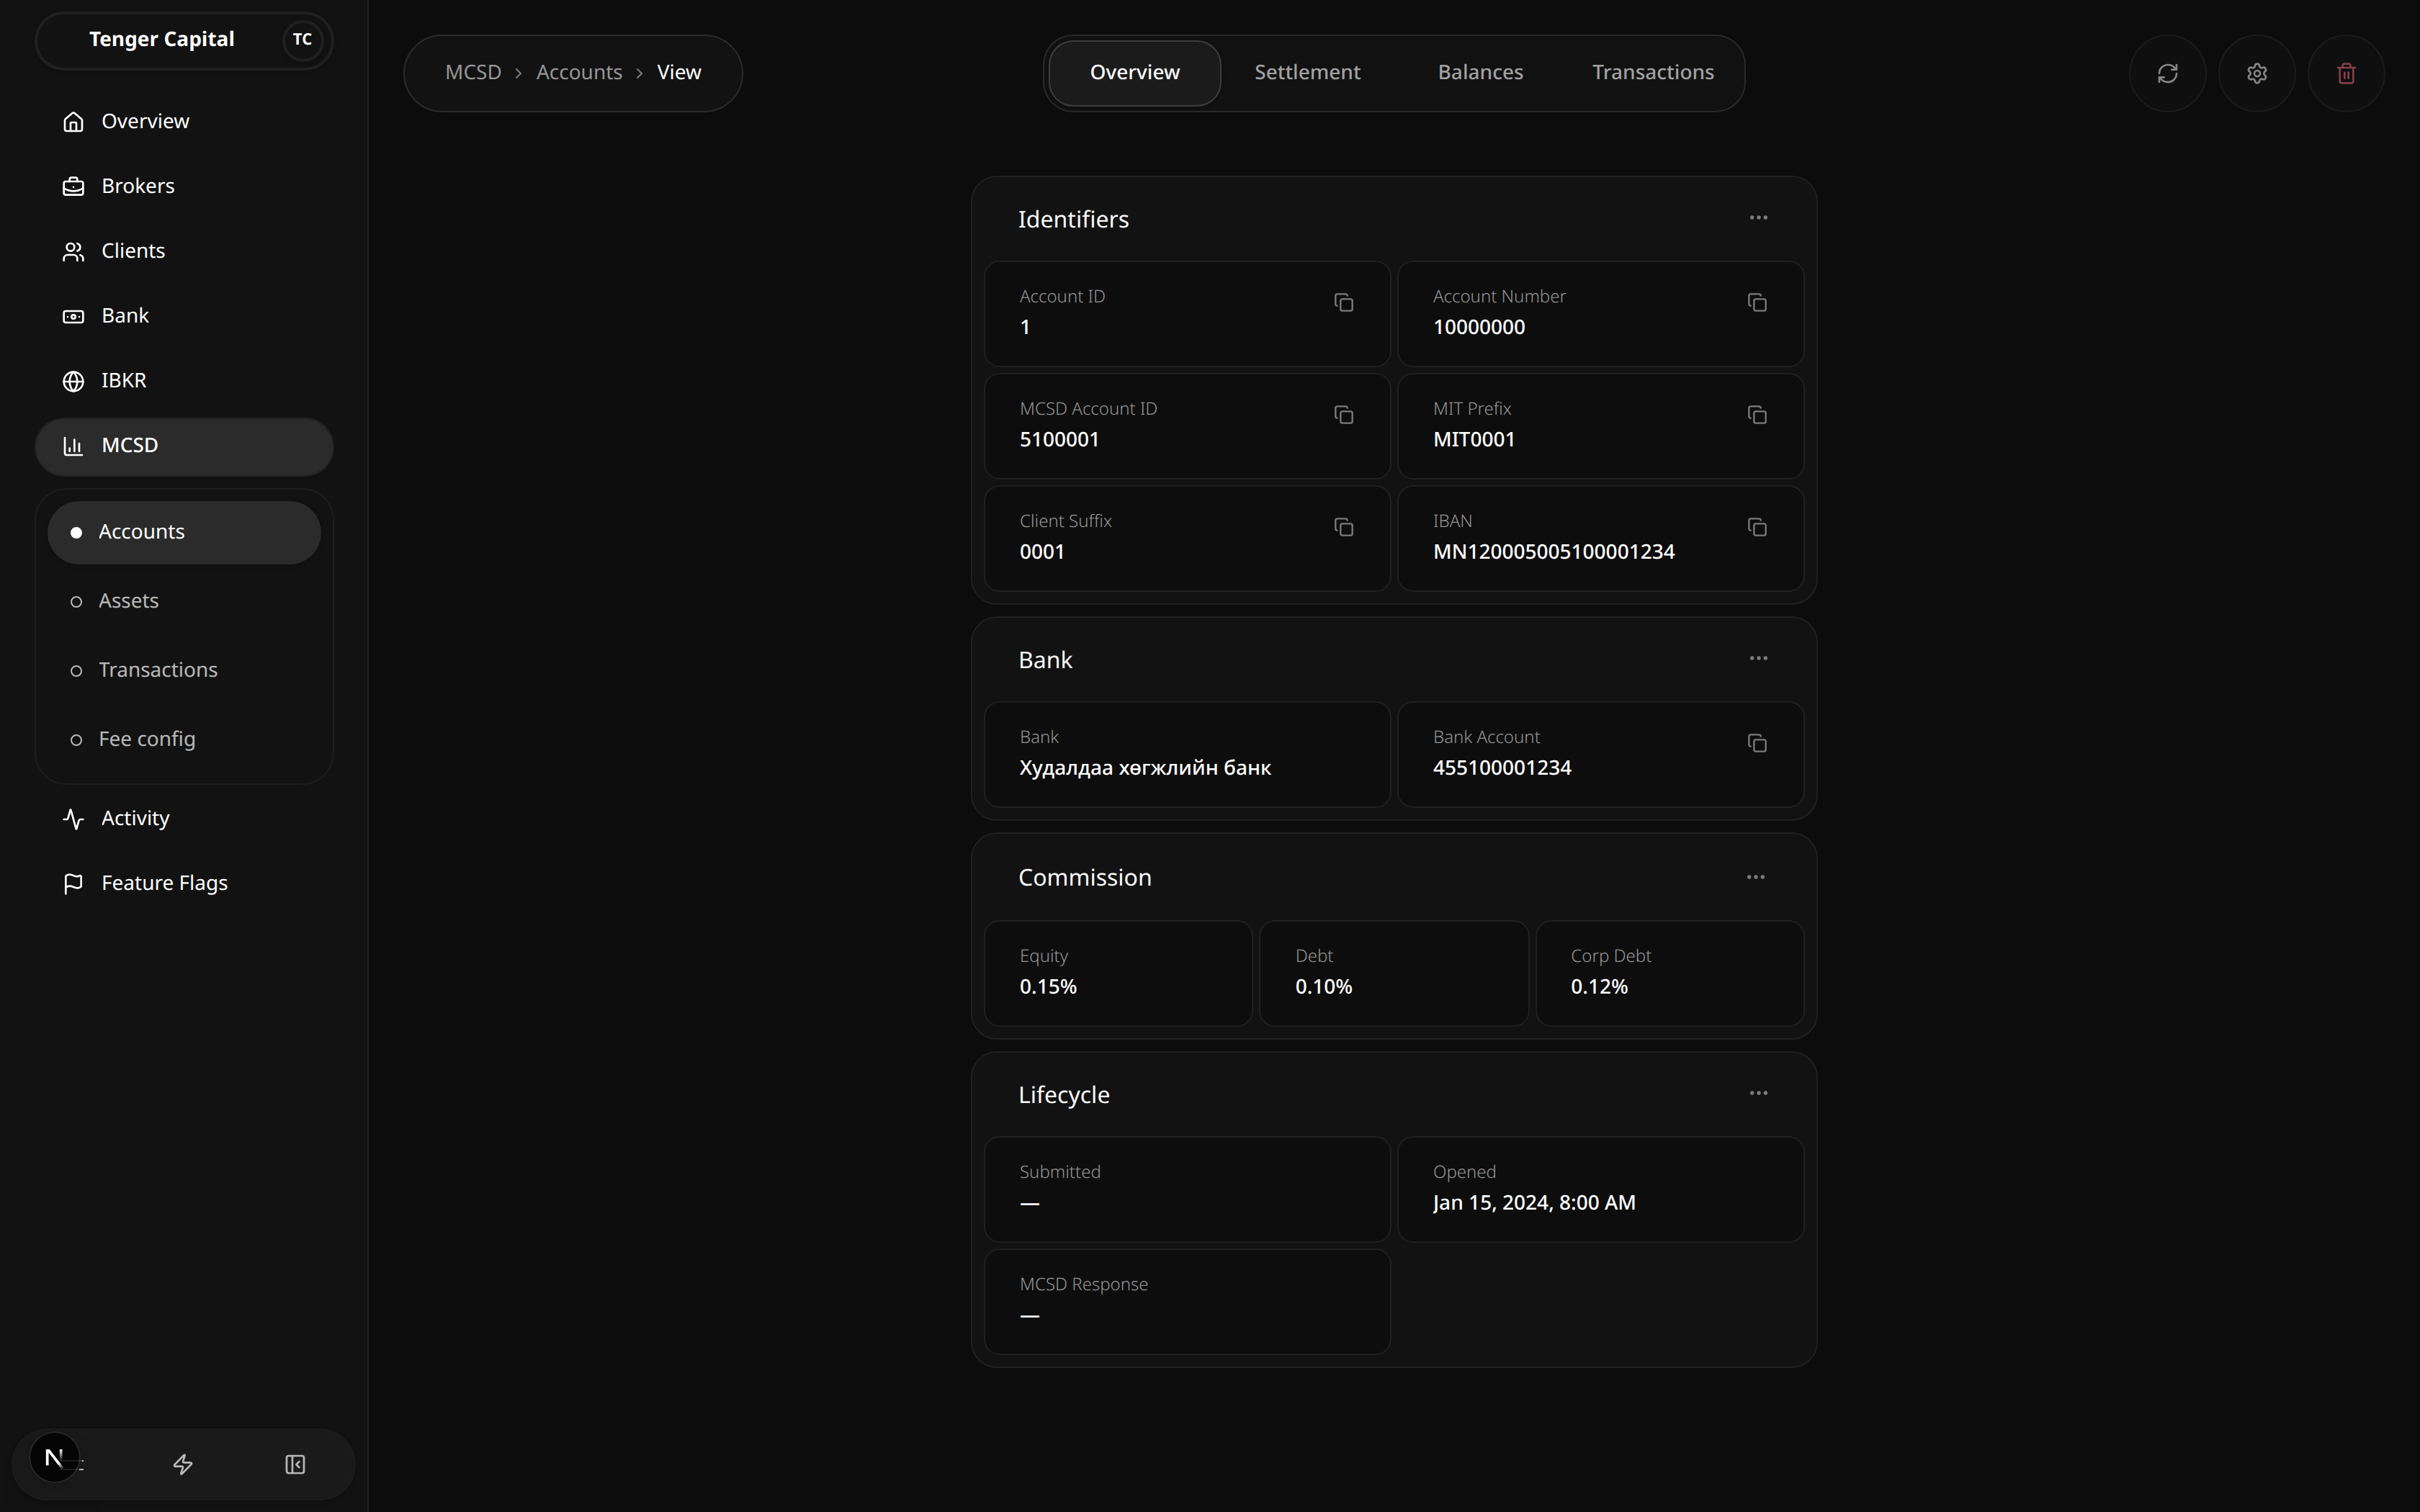
What it does
Shows everything about a single client's MCSD account in one place — its identifiers, the bank it settles through, its commission rates, its settlement bank accounts, and its full transaction history. From here you can also refresh the account's status with MCSD, edit it, or delete it.
How to use
Reach this page by clicking an account on the MCSD accounts list. Across the top are four tabs and, on the right, three actions:
- Refresh status — re-checks the account's status with MCSD (for example to see if a submitted account has now opened). Disabled once an account is already opened.
- Update account — edit the account's details and commission rates.
- Delete account — remove the account.
Editing and deleting are unavailable while an account is Opened, since an opened account is live at the depository.
Overview tab
Account facts grouped into cards. Values with a copy icon can be copied with a click:
- Identifiers — Account ID, Account Number, MCSD Account ID, MIT Prefix, Client Suffix, and IBAN.
- Bank — the settlement bank's name and the bank account number.
- Commission — the Equity, Debt, and Corp Debt rates, shown as percentages. Use the card's menu to Edit them (available once the account is opened).
- Lifecycle — when the account was Submitted and Opened, plus the latest response message from MCSD.
Settlement tab
The client's settlement bank accounts — the bank accounts used to move cash in and out of the MCSD account. It is split into:
- Active account — the confirmed settlement account currently in use.
- Requests — settlement accounts that have been requested but aren't yet confirmed.
You can add a settlement bank (when the account is opened and none is active yet), edit an account's details, and refresh bank status to pull the latest confirmation state from the bank.
Balances tab
Reserved for the account's cash and securities balances. This tab is a placeholder and shows "Balances coming soon."
Transactions tab
The account's full ledger of movements, with summary cards at the top for Transaction Count, Inflow, Outflow, and Net (in MNT, and USD when present).
Filter the ledger with the controls along the top:
- Scope — All, Cash, or Securities.
- Date — a date range.
- Transaction Type — pick one or more types (transfers, cash deposits and withdrawals, buys and sells, fees, custody locks, and so on).
- Security / Cash — narrow to a specific security or cash bucket.
Each row shows the date and time, transaction ID, type, the security or cash involved, amount, quantity, price, commission, and a description. Inflows are shown in green, outflows in red.
Notes
- Transactions and balances only appear once the account is Opened at MCSD; before then the Transactions tab explains they'll show up after the account opens.
- Refreshing status is the quickest way to confirm whether a submitted account has been opened by MCSD.
- The Balances tab is not yet built — use the Transactions tab to review activity in the meantime.
MCSD Assets
/mcsd/assets
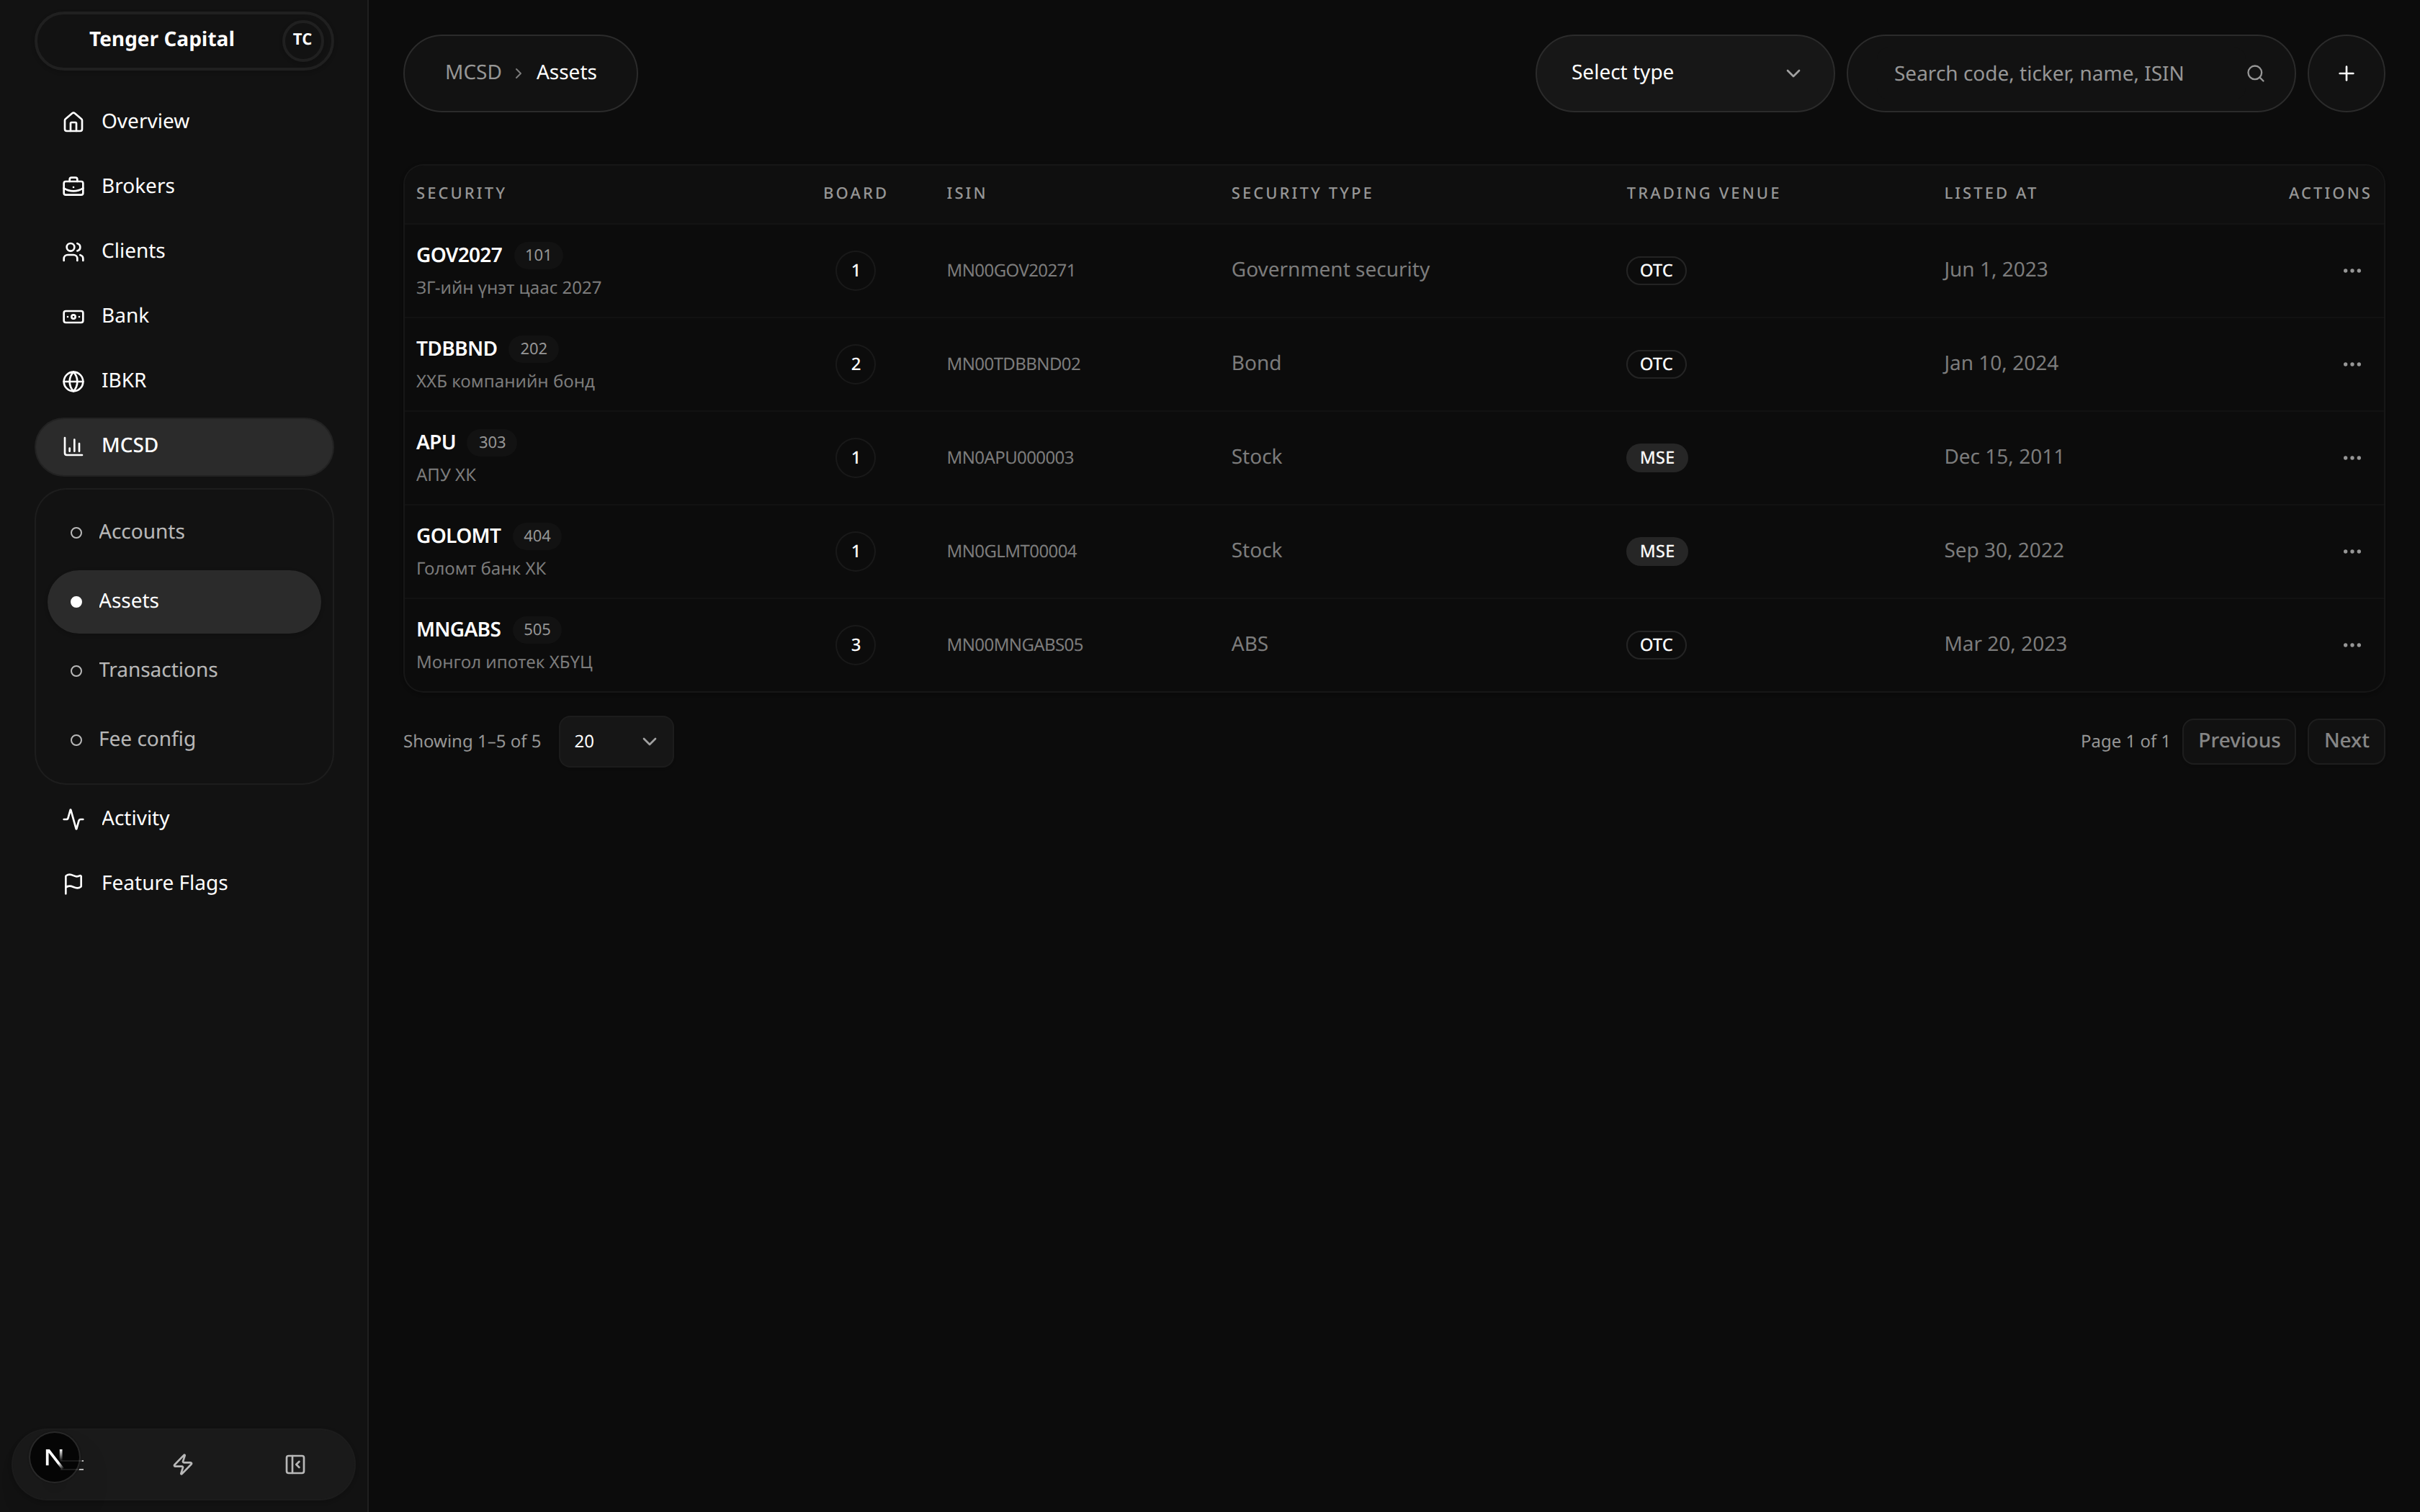
What it does
Lists the MCSD securities the firm keeps reference data for — bonds, stocks, funds, government securities and asset-backed securities. Each row is one security, with its code, ticker, ISIN and listing details. This is the master list that transactions and holdings refer back to, so a security must be registered here before activity that references it can be shown correctly.
How to use
Browse the list
Open MCSD → Assets from the sidebar and read the table:
- Security — the ticker (when set), the MCSD securities code beside it, and the full security name underneath.
- Board — the trading board the security sits on (1 to 3), or a dash if not set.
- ISIN — the 12-character international identifier for the security.
- Security type — Stock, Bond, ABS, Fund or Government security.
- Trading venue — MSE (the exchange) or OTC (over the counter).
- Listed at — the date the security was listed, or a dash if unknown.
- Actions — a menu with View (open the security's detail page) and Edit (open the edit form).
Click any row to open its detail page.
Filter and search
- Select type (top right) narrows the list to a single security type, or shows all types.
- Search matches on code, ticker, name or ISIN. The list updates as you type.
- Use the page-size selector and Previous / Next at the bottom to page through results.
Add a security
Click the + button (top right) to open the Create security form, then fill in:
- Name — the security's full name.
- Ticker — its short trading symbol.
- ISIN — exactly 12 letters and digits.
- Securities code — must match the code MCSD uses for this security.
- Trading venue — MSE or OTC.
- Board — a board number from 1 to 3 (optional).
- Security type — Stock, Bond, ABS, Fund or Government security.
- Currency — MNT or USD (set when first creating the security).
- Listed date — optional.
When the security type is Bond, an extra Bond terms section appears:
- Coupon payment period — Monthly, Quarterly, Semi annual, Annual or At maturity.
- Maturity date, Issued date, Interest rate, Price and Quantity.
- A Repayment dates preview is generated automatically from the coupon period, issued date and maturity date. You can remove individual dates that should not be scheduled (except for "at maturity", where the single date must equal the maturity date). Each generated date becomes a scheduled coupon payment.
Edit a security
Choose Edit from a row's actions menu (or the edit button on the detail page) to update the security's reference data and, for bonds, its terms. The currency cannot be changed after creation.
Notes
- The securities code is the key MCSD uses to match this security, so it must be entered correctly — get it wrong and related activity won't line up.
- ISINs are always 12 characters; the form won't accept anything shorter.
- A dash in any column simply means that detail hasn't been recorded.
- Creating a bond schedules its coupon payments straight away; you can then track and update them from the security's detail page.
MCSD Asset Detail
/mcsd/assets/view
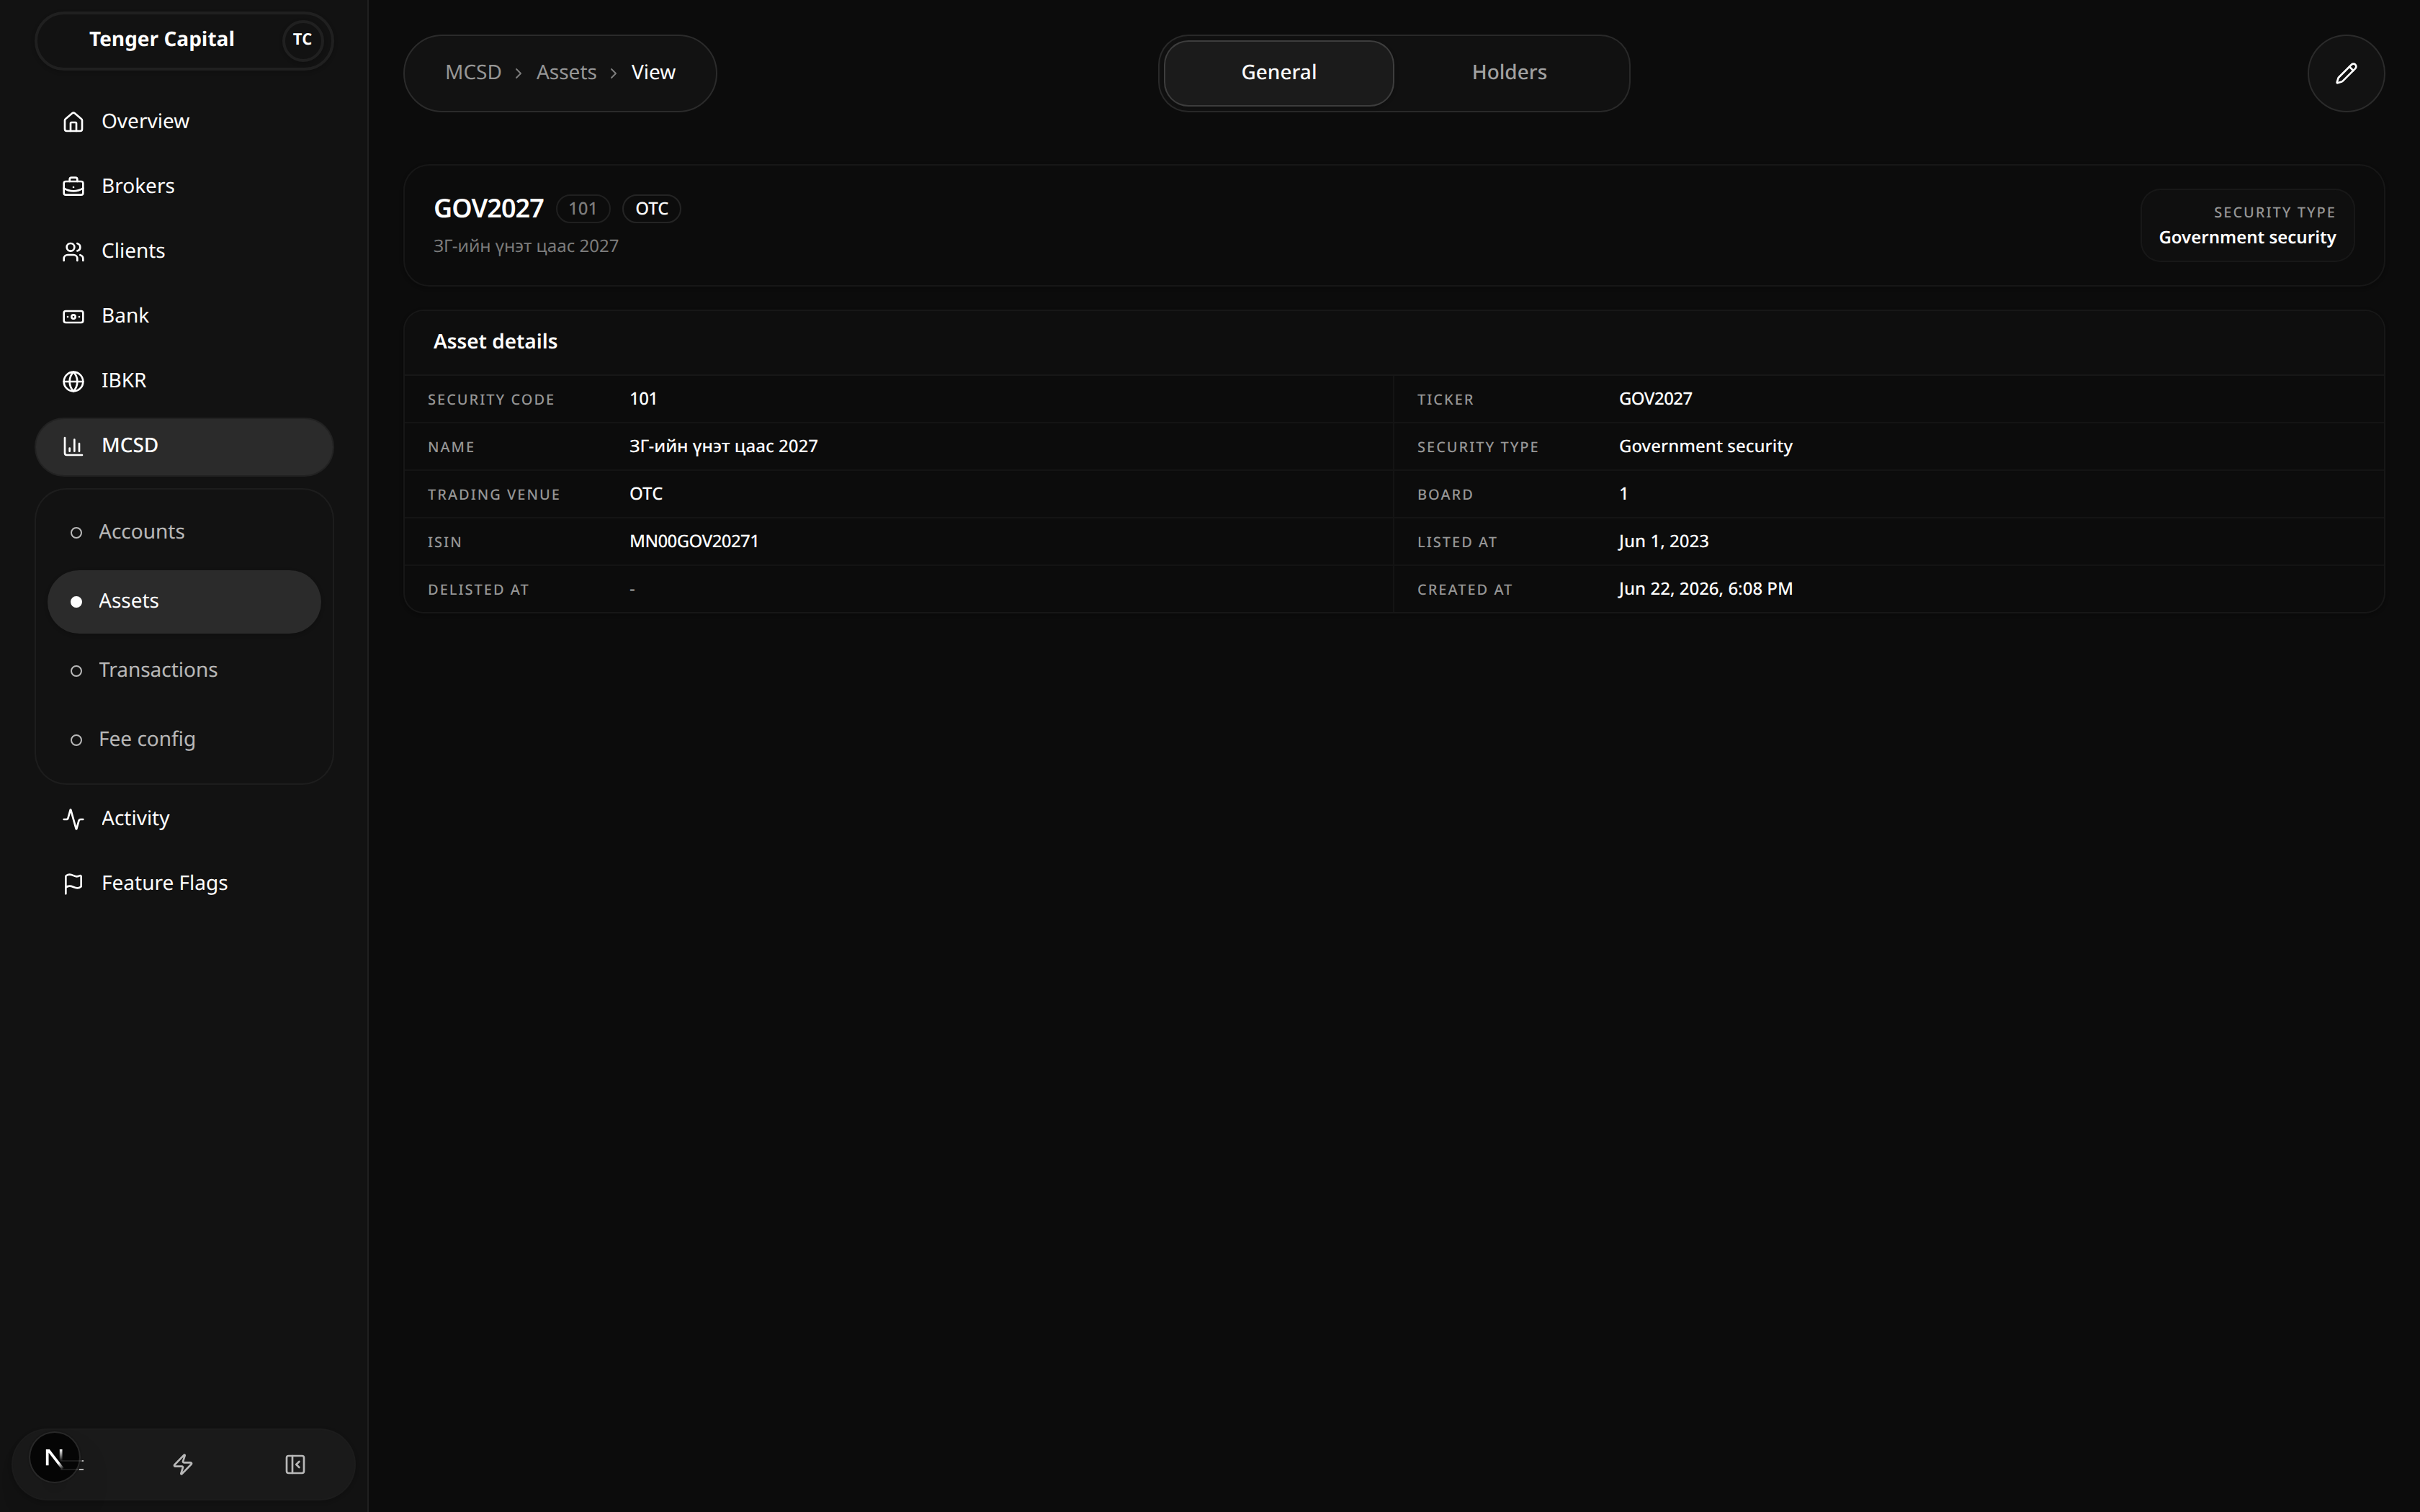
What it does
Shows everything recorded for a single MCSD security — its reference details, its bond terms and repayment schedule (for bonds), and the clients who hold it. This is where you review a security in depth, mark coupon repayments as paid, and edit the security's details.
How to use
Open this page by clicking a security on the MCSD → Assets list (or choosing View from its actions menu). The header shows the ticker, securities code, trading venue and security type, and an edit button (top right) opens the same form used on the assets list.
Tabs across the top switch between sections. The Repayment schedule tab only appears for bonds.
General
A read-only summary of the security:
- Asset details — security code, ticker, name, security type, trading venue, board, ISIN, listed date, delisted date and when the record was created.
- Bond terms (bonds only) — coupon period, maturity date, issued date, interest rate, price and quantity.
Repayment schedule (bonds only)
A table of the bond's coupon payments, with a count of how many there are:
- Payment date — when the coupon is due.
- Current status — Scheduled, Processing, Paid, Failed or Cancelled.
- Paid date — the date the coupon was actually paid (for paid rows). A pencil lets you correct this date.
- Set status — a dropdown to change the coupon's status. Choosing Paid opens a dialog asking for the date it was paid before confirming.
Holders
The clients currently holding the security, with a count of how many holders there are:
- Client — the client's name and their MIT prefix.
- Quantity — how much of the security they hold.
- Locked — the portion that is reserved and not freely available.
- Avg cost — their average cost per unit.
- Realized PnL and Unrealized PnL — profit or loss, shown in green when positive and red when negative.
Use the paging controls at the bottom of the holders table to move through a long list.
Notes
- The Repayment schedule tab is hidden for non-bond securities; only bonds have coupon payments.
- Marking a coupon as Paid always asks for the paid date so the schedule reflects what actually happened — you can revise that date later with the pencil.
- Holder figures (quantity, locked, cost and PnL) reflect current positions and update as client activity is recorded.
- If a security can't be found (for example a stale link), the page shows a "not found" message with a link back to the assets list.
MCSD Fee Config
/mcsd/fee-config
What it does
This is the place for managing MCSD fee configuration — the fee rates applied to MCSD activity. The page is reached from MCSD → Fee config in the sidebar.
How to use
The page is currently a placeholder: it shows only a Fee config panel with no settings to edit yet. There is nothing to configure here at the moment.
Notes
- This page is a work in progress and has no fee settings to manage yet.
- For the fee rates set on each individual MCSD account, use the account's own fee settings rather than this page.
MCSD Transactions
/mcsd/transactions
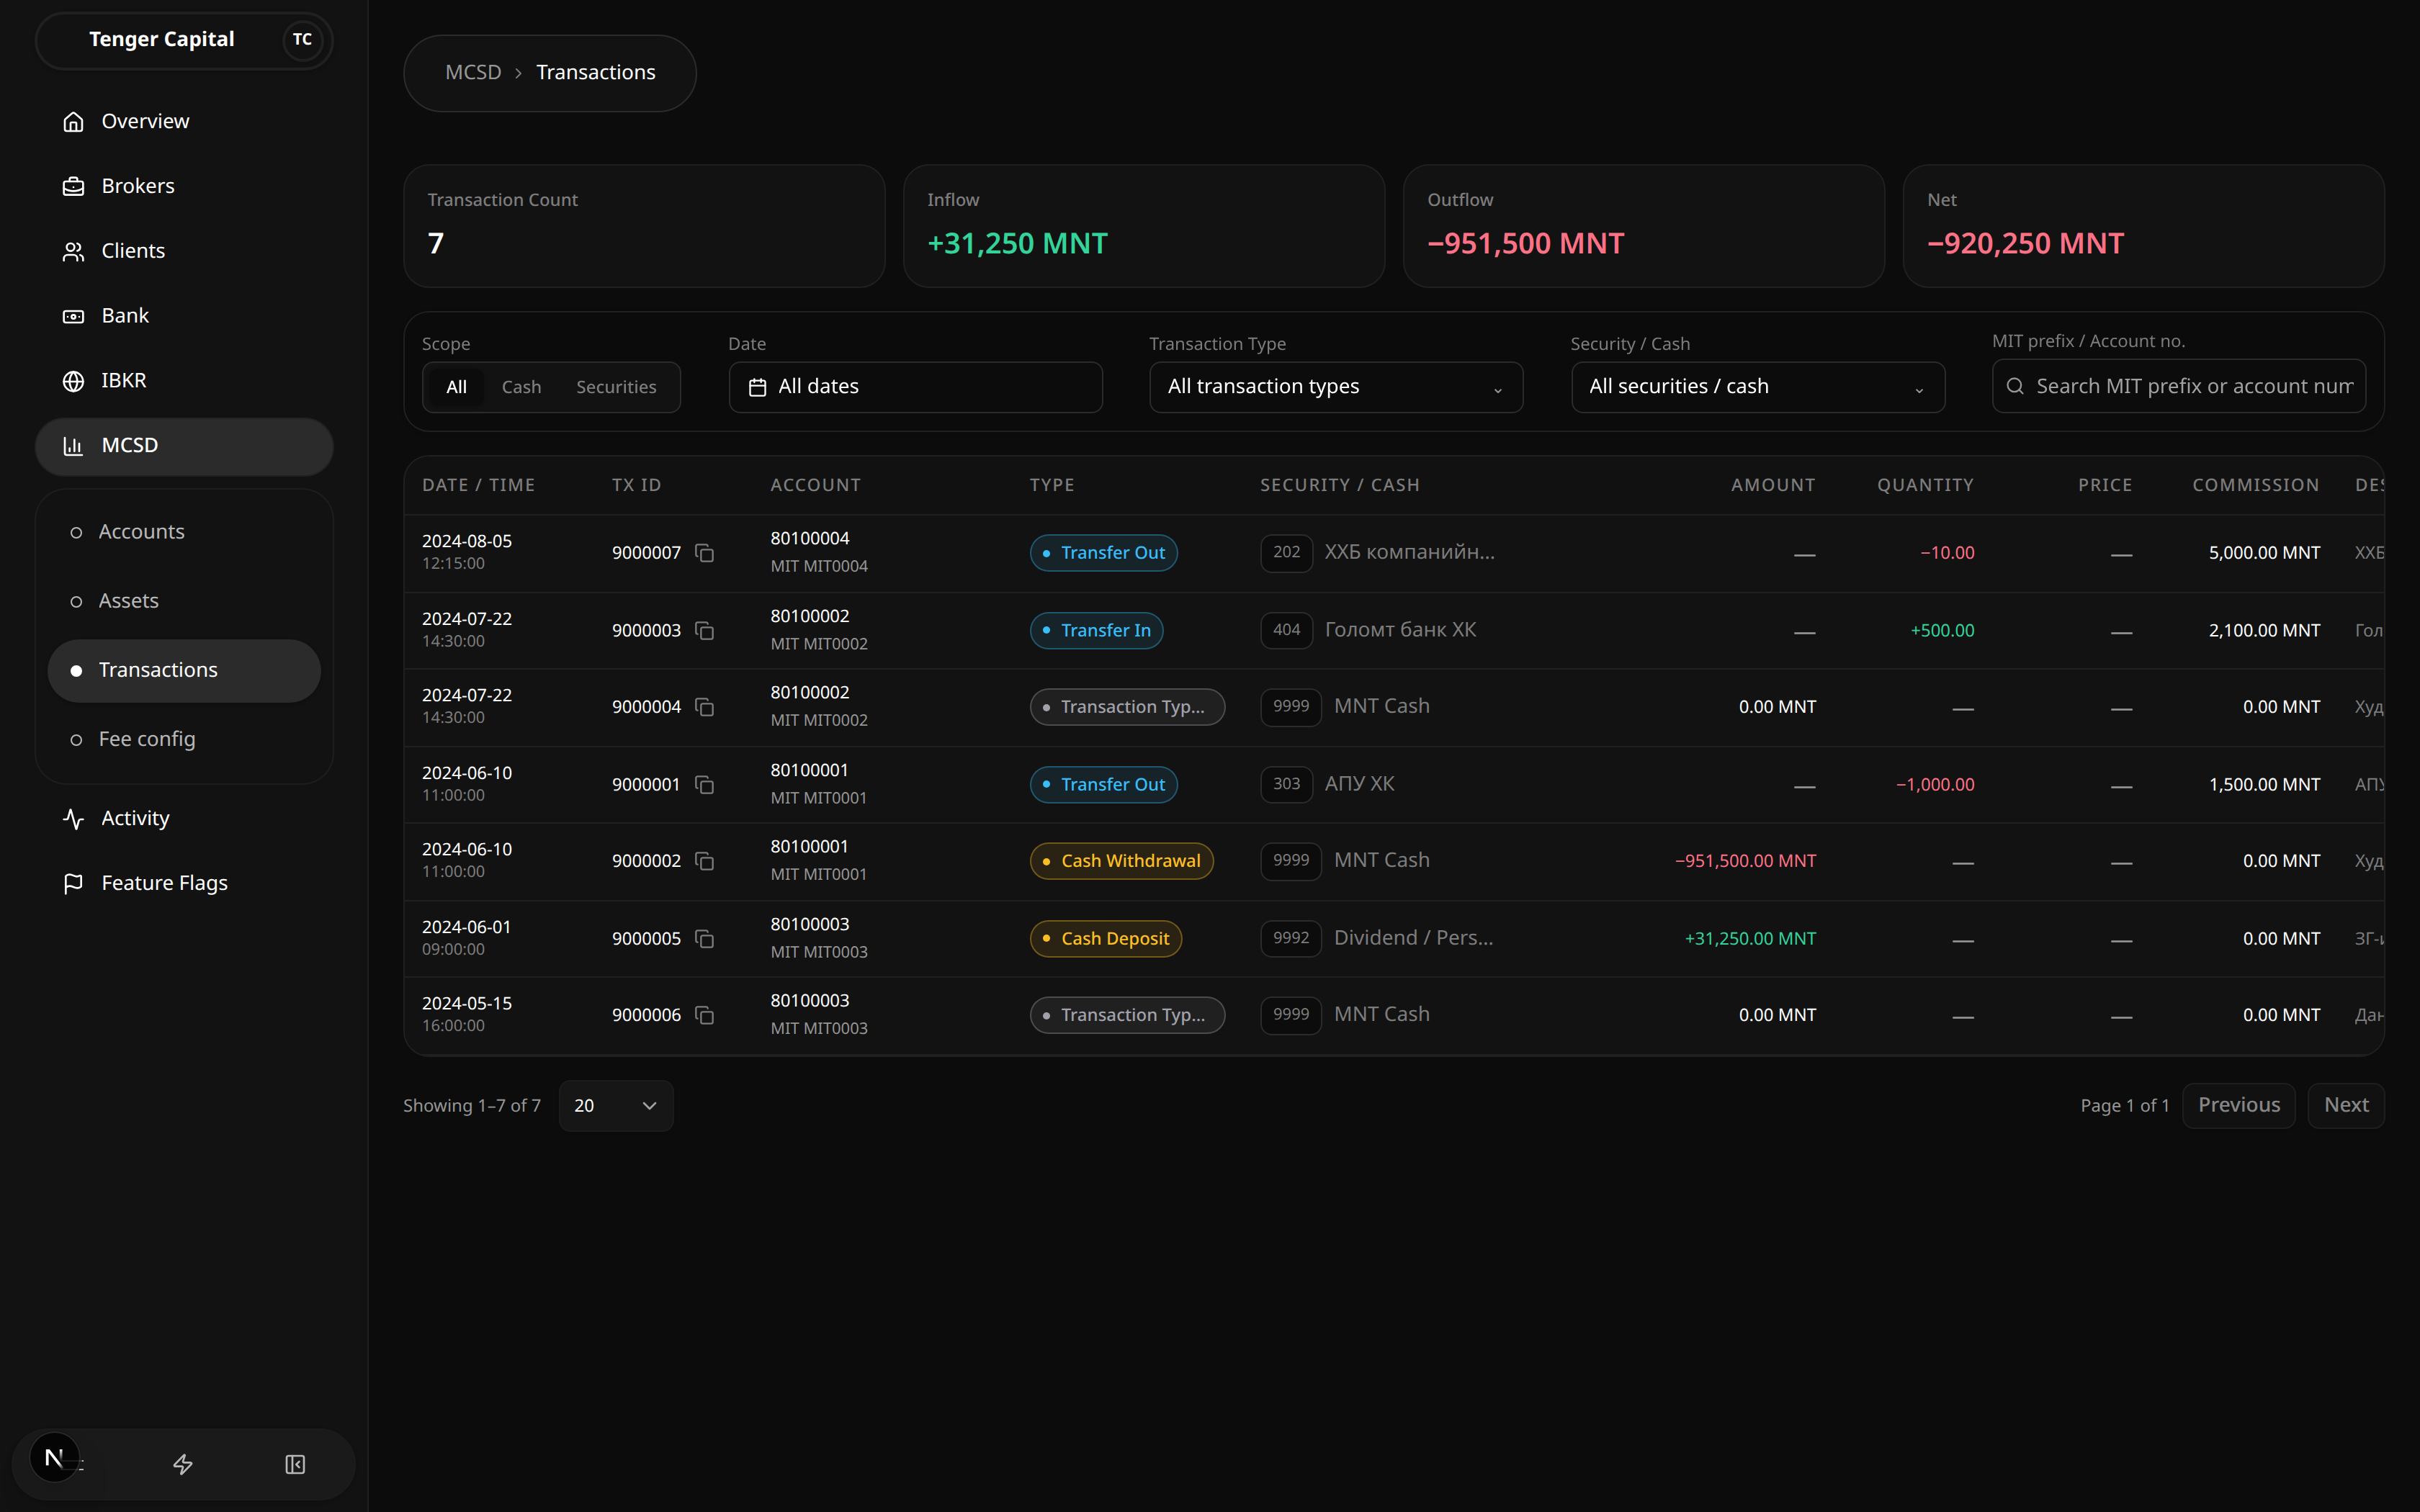
What it does
Shows the full MCSD transaction ledger across every account — transfers, cash deposits and withdrawals, securities buys and sells, fees and custody locks/unlocks. Summary cards at the top total the activity in view, and a row of filters lets you narrow down to a date range, a transaction type, a particular security or cash bucket, or a specific account.
How to use
Read the summary cards
Four cards at the top reflect the transactions currently shown:
- Transaction Count — how many transactions are in view.
- Inflow — total money coming in.
- Outflow — total money going out.
- Net — inflow minus outflow. A second line appears for USD when there is USD activity.
Filter the ledger
- Scope — switch between All, Cash and Securities.
- Date — pick a single day or a date range; clear it to see all dates. (A start date after the end date shows a warning instead of results.)
- Transaction Type — tick one or more types (Transfer In/Out, Cash Deposit / Withdrawal, Securities Purchase / Sale, the various fees, Custody Lock / Unlock). Each shows a running count for the current view.
- Security / Cash — limit to a single security (search by code, ticker or name) or a cash bucket such as MNT Cash or USD Cash.
- MIT prefix / Account no. — search for a specific account by its MIT prefix or account number.
Read the table
Each row is one ledger movement:
- Date / Time — when it happened.
- Tx ID — the MCSD transaction id, with a button to copy it.
- Account — the account number and its MIT prefix.
- Type — the transaction type, colour-coded by category (transfer, cash, trade, fee, custody).
- Security / Cash — the security or cash bucket the movement applies to, with its code.
- Amount — the money value, shown green for inflows and red for outflows.
- Quantity — the number of securities moved (for trades), signed by direction.
- Price — the per-unit price on trades.
- Commission — the commission charged.
- Description — free-text detail; hover to read the full text.
Use the page-size selector and paging controls at the bottom to move through the ledger.
Notes
- The summary cards reflect only the transactions currently in view, so they change as you apply filters.
- Cash rows don't show a quantity; securities trades show quantity, price and commission.
- Custody lock and unlock rows mark amounts as reserved rather than as inflow or outflow, so they aren't counted in the inflow/outflow totals.
- A transaction type that isn't recognised is shown by its numeric type id rather than a name.
- The transaction id identifies a logical event and can be shared by several rows (legs) of the same event.
Activity
/activity
What it does
Shows the back-office audit log for your broker organization — a running timeline of who did what, and when. Each entry records the action taken, the person who took it, the person or item it affected, the result (success, failed, or pending), and the time. Use it to review and trace activity across the platform.
How to use
Choose what to see
At the top right, switch between two views:
- Broker-wide — actions taken by members of your broker organization.
- All activity — the broader activity stream.
Narrow the timeline with filters
Use the filter row to focus on what you need. You can combine filters:
- Members — show only the actions of one team member, or all members.
- Events — show only a specific kind of action.
- Categories — group by area (for example security or funding).
- Statuses — show only Success, Failed, or Pending entries.
When any filter is active, a Reset button appears to clear them all at once.
Read an entry
Each row shows the actor (and, where relevant, an arrow to the person or item affected), a short summary of what happened, colored tags for category and status, the timestamp, and a reference to the related record.
Move through pages
The timeline is paged. Use Previous and Next at the bottom to move through older or newer entries; the current page number is shown between them.
Notes
- This page is read-only — it records what happened and cannot be edited.
- Changing any filter or switching views returns you to the first page.
- You can reach this page pre-filtered to a single member from elsewhere in the app; the member filter will already be set when you arrive.
- An empty timeline simply means no activity matches the current filters yet.
Overview
/dashboard
What it does
This is the landing page you see after signing in. It is a placeholder for an overview dashboard and does not yet show any data — the panel simply reads "Overview dashboard". Day-to-day work happens in the other sections of the sidebar.
How to use
- Open Overview from the top of the sidebar.
- There is nothing to act on here yet. Use the sidebar to go to the section you need — for example Brokers, Clients, Bank, IBKR, MCSD, Activity, or Feature Flags.
Notes
- This page is a work-in-progress placeholder. Summary figures and shortcuts are expected to appear here in a future update.
- If you are looking for balances, trades, or client information, go directly to the relevant section in the sidebar.
Feature Flags
/feature-flags
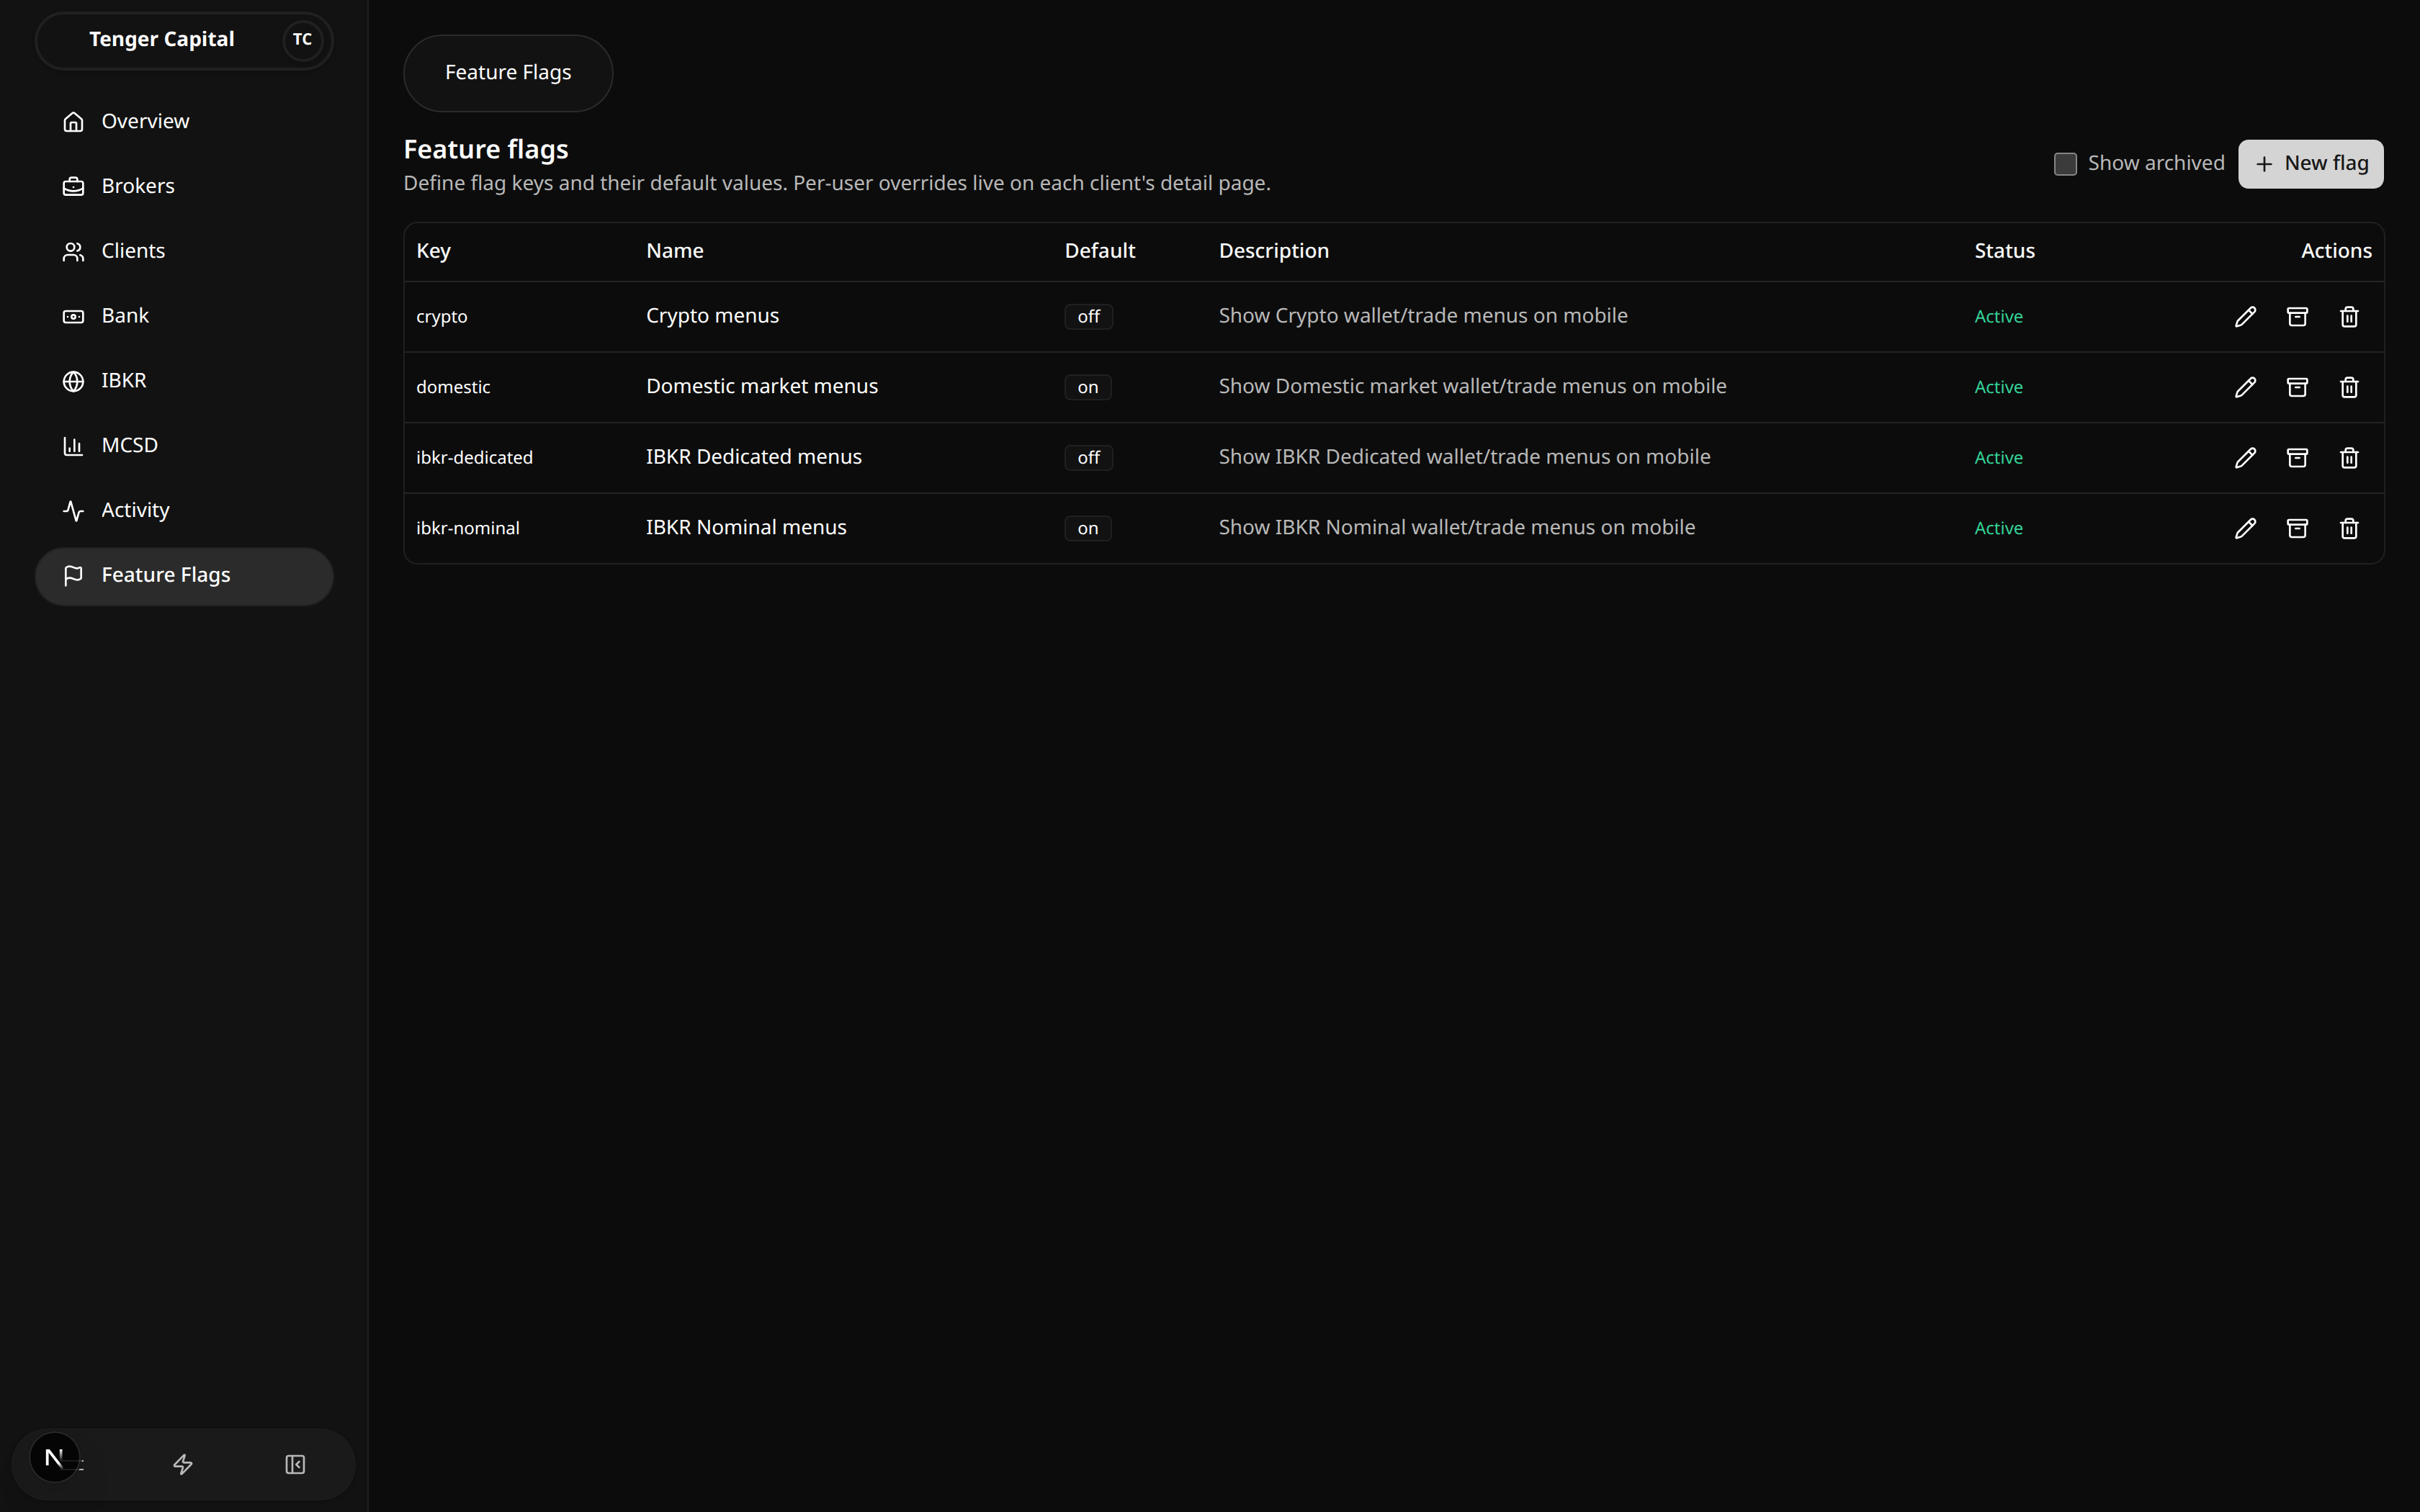
What it does
Lets you turn product features on or off and manage their default behavior. Each feature flag has a key, a friendly name, a default value, and a description. Flags listed here control things like which wallet and trade menus appear in the mobile app (for example crypto, domestic market, IBKR Dedicated, and IBKR Nominal). The value you set here is the default for everyone; you can still override a flag for an individual client from that client's detail page.
How to use
Review existing flags
Open Feature Flags from the sidebar and read the table:
- Key — the short identifier for the flag.
- Name — the human-readable label.
- Default — the current default value (for example on or off, or a piece of free text).
- Description — what the flag controls.
- Status — Active or Archived.
Tick Show archived (top right) to include flags that have been archived.
Create a flag
- Click New flag (top right).
- Enter a Key (lowercase letters, digits, and hyphens), a Name, and an optional Description.
- Choose the Default value:
- Boolean — pick on or off.
- Free text — type any value (for example a tier name).
- Click Create.
Edit a flag
Click the pencil icon on a row to change its name, description, or default value, then click Save. The key cannot be changed after creation.
Archive or restore a flag
Click the archive icon to archive a flag (it keeps the definition but marks it inactive), or restore it later with the same icon. Use Show archived to find archived flags.
Delete a flag
Click the trash icon and confirm. Deleting removes the flag and all of its per-client overrides.
Notes
- The default value here applies to everyone unless a client has a specific override set on their own detail page.
- Deleting a flag cannot be undone and also removes every per-client override for that flag. Archive instead if you only want to retire it.
- Archiving keeps the flag's history and lets you bring it back later, so prefer it over deleting when in doubt.
Notifications
/notifications

What it does
Your in-app notification inbox. It shows messages addressed to you, with a count of how many are unread, and lets you send a test message to confirm the inbox is connected. The inbox is powered by an external notifications service.
How to use
- Open Notifications from the sidebar.
- At the top, the In-app inbox header shows an unread badge — either a count of unread items or All caught up when there are none.
- Read your messages in the inbox panel below; open one to follow any link it contains.
- To verify the inbox is working, click Send demo notification (top right). A confirmation appears with the time it was sent, and the message shows up in the inbox.
Notes
- This inbox depends on an external notifications service. If that service is not configured or the connection cannot be established, the page shows a warning in place of the inbox instead of messages.
- The inbox is personal to the signed-in account — it shows your notifications, not those of other team members.
- The Send demo notification button is only a connectivity test; it does not notify anyone else.
Settings
/settings
What it does
Your personal account settings. From one place you can review your admin profile, change your password, set up two-factor authentication, and choose which notifications you receive. These settings apply to your own account only.
How to use
Open Settings and use the tabs across the top:
Profile
Review your account details — name, email, user ID, role, two-factor status, and your active organization. This tab is for reference; it shows the account you are currently signed in as.
Password
Change your password by entering your current password, then your new password twice. A strength indicator helps you choose a strong one, and you are warned if the two new entries don't match. Save to apply.
2FA
Set up two-factor authentication for extra security:
- Start setup and confirm with your password.
- Scan the QR code with an authenticator app (or use the provided setup key if you can't scan).
- Enter the 6-digit code from the app to verify and enable it.
Once enabled, you can also disable 2FA or regenerate your backup codes from here, each confirmed with your password. Keep your backup codes somewhere safe.
Notifications
Choose which notification topics you want to receive. Toggle each preference on or off; changes are saved as you make them.
Notes
- These settings affect only your own account, not other team members or clients.
- Keep your 2FA backup codes in a safe place — they let you sign in if you lose access to your authenticator app.
Accept Invitation
/accept-invitation
What it does
Lets an invited person join the broker organization. This page is opened from the invitation link in your email. If you don't have an account yet, you create one here; if you're already signed in, you review and accept the invitation.
How to use
If you're new (no account yet)
- Open the invitation link from your email.
- On Create your account, enter your Name, a Password, and the same password again under Confirm password. The page shows password strength and which requirements are still outstanding as you type.
- Click Create account & continue.
- If email verification is required, a 6-digit code is emailed to you. Enter it on the Verify your email step and click Verify & continue. Use Resend code if it doesn't arrive.
- Once verified you're signed in and the invitation details appear — continue to accept it below.
If you already have an account
- Open the invitation link from your email. If you're not signed in, use Sign in (you'll be brought back here afterward).
- Review the invitation details: Email, Role, Status, and Expires.
- Click Accept Invitation to join, or Cancel to skip.
- After accepting you're taken to the dashboard.
Notes
- This page only works when opened from a valid invitation link. The email and the invitation it points to come from the link itself.
- Your email address is set by the invitation — you sign up with the address it was sent to.
- Invitations have an expiry date, shown under Expires. An expired or already-used invitation can't be accepted; ask for a new one.
- New accounts must set a password that meets the strength requirements shown on the page, and the two password fields must match.
- The emailed verification code is for confirming your email during signup; if it expires or doesn't arrive, use Resend code.
Login
/login
What it does
The sign-in page for back-office operators. Enter your email and password to access the platform. If your account has two-factor authentication (2FA) turned on, signing in continues with a verification step before you're let in.
How to use
- Open the login page.
- Enter your Email and Password.
- Click Login.
- If 2FA is enabled on your account, a verification step appears:
- Choose Authenticator and type the 6-digit code from your authenticator app, or choose Backup code and enter one of your saved recovery codes.
- Optionally tick Trust this device so this browser doesn't ask for 2FA next time. Only do this on a private browser — shared devices will keep asking.
- Click Continue securely.
- On success you're taken into the platform. If you arrived here from another page, you're returned to where you were headed.
Notes
- Forgot your password? Click Forgot password? next to the password field to request a reset link.
- During the 2FA step, Back to sign-in returns you to the email and password form if you need to start over.
- Trust this device is off by default. Leave it off on any shared or public computer.
- Use a backup code if your authenticator app is unavailable. Each backup code works only once.
- If your email or password is wrong, an error appears beneath the form — check the details and try again.
Forgot Password
/login/forgot-password
What it does
Lets you request a password reset link when you can't remember your password. You enter your email and the platform sends a link you can use to set a new one.
How to use
- Open this page from the Forgot password? link on the login page.
- Enter the Email for your account.
- Click Send reset link.
- A confirmation tells you to check your email. Open the email and follow the link to set a new password.
- To go back without requesting a reset, click Back to login.
Notes
- The reset link is delivered by email, so make sure you enter the address your account is registered under.
- The link takes you to the Reset Password page, where you choose your new password.
- Reset links don't last forever — if too much time passes, the link stops working and you'll need to request a new one from this page.
- If sending fails, an error appears beneath the form. Check the email address and try again.
Reset Password
/login/reset-password
What it does
Lets you set a new password after requesting a reset. This page is opened from the reset link in your email — it won't work on its own.
How to use
- Open this page from the link in your password-reset email.
- Enter your New password. As you type, the page shows how strong it is and which policy requirements still need to be met.
- Re-enter the same password under Confirm new password.
- Click Reset password.
- On success you see a confirmation. Click Back to login to sign in with your new password.
Notes
- This page only works when opened from a valid reset link. If you open it directly — or the link has already been used or has expired — you'll see Invalid or expired reset link. Use Request a new reset link to start over from the Forgot Password page.
- Your new password must meet the strength requirements shown on the page; the Reset password button stays disabled until it does.
- The two password fields must match. A mismatch is flagged before you submit.
Verify Two-Factor
/login/verify-2fa
What it does
The second step of signing in when two-factor authentication (2FA) is enabled. After your email and password are accepted, you confirm it's really you by entering a code from your authenticator app or one of your backup codes.
How to use
- This page follows the login step, so you reach it after entering your email and password.
- Choose how to verify:
- Authenticator — enter the 6-digit code shown in your authenticator app.
- Backup code — enter one of your saved recovery codes instead (use this if your authenticator app is unavailable).
- Optionally tick Trust this device so this browser skips 2FA next time. Only choose this on a private browser — shared devices will keep asking.
- Click Continue securely to finish signing in.
Notes
- The 6-digit authenticator code refreshes on a timer. If it's rejected, wait for the next code and try again.
- Each backup code works only once. Keep your remaining codes somewhere safe.
- Trust this device is off by default. The page reminds you that this browser isn't trusted unless you tick the box.
- If a code is wrong, an error appears and you can try again.
- If you've lost both your authenticator app and your backup codes, contact an administrator to regain access.